 Skip to content
Let's be honest—scratches happen. Whether it's from a piece of furniture being dragged, the dog's excited zoomies, or just everyday life, seeing a scuff on your beautiful hardwood, laminate, or LVP floor can be frustrating. But here's the good news: most of the time, it doesn't have to be permanent. For homeowners in Parker, understanding how to approach hardwood floor refinishing is key to keeping your home looking its best.
For those minor surface scuffs, a simple DIY touch-up with a repair marker or even a bit of walnut oil can work wonders. Deeper gouges, though, are a different story and usually call for a more serious game plan, often involving professional hardwood floor refinishing in Parker and our advanced UV-Cure System for a flawless, lasting repair.
Your Guide to Flawless Floors in Parker
A scratched floor can really take away from the charm of a home, whether it’s a classic two-story in Pinery or a modern build near Salisbury Equestrian Park. The key is knowing what you're dealing with. Understanding the severity of the scratch is the first step toward bringing your floor back to its former glory. This guide is all about giving Parker homeowners a realistic look at floor repair, helping you decide when a quick DIY fix is enough and when it's time to call in the pros for a lasting solution with our hardwood floor refinishing and UV-Cure System.
First, we'll dive into some simple but effective techniques for those light surface scuffs—the kind you can probably tackle yourself in an afternoon. These are perfect for the normal wear and tear that comes from daily foot traffic, pets, and kids. After that, we’ll get into the more involved methods needed for deeper gouges that have actually broken through the top finish and demand a bit more attention.
And when a DIY job just won't cut it, we'll introduce you to the professional services that deliver those flawless, durable results you're after. These include:
- Dust-Free Sanding: A super clean and efficient way to strip off the old, damaged finish without coating your entire home in a layer of fine dust.
- Hardwood Floor Refinishing: The ultimate restoration. This process erases deep scratches, stubborn stains, and years of wear, making old floors look brand new.
- Advanced UV-Cure System: An incredible finishing process that cures instantly. You can walk on your floors and move furniture back the very same day—no lingering smells or long drying times.
Knowing how to fix scratched floors starts with a solid assessment. And while repairs are important, preventing them in the first place is even better. For some great tips on keeping your floors in top shape, check out our guide on how to protect hardwood floors.
Ready to bring back the beauty? Let's get to it.
Quick Guide to Fixing Scratched Floors
Not sure where to begin? This table breaks down the most common types of floor scratches and gives you a realistic starting point for each. It’s a handy reference to help you quickly figure out the best approach.
| Scratch Severity | Affected Floor Type | Recommended First Step | Estimated Time |
|---|---|---|---|
| Minor Surface Scuff | Hardwood, Laminate, LVP | Use a repair marker or blending pencil. | 5-15 minutes |
| Light Scratch | Hardwood, Engineered Wood | Apply a thin layer of restorative finish. | 20-30 minutes |
| Moderate Scratch | Hardwood, Laminate | Test a color-matched wood filler or wax stick. | 30-60 minutes |
| Deep Gouge | All Floor Types | Assess for professional repair; deep fill if possible. | 1-2 hours (DIY) |
| Widespread Damage | Hardwood | Schedule a professional screen & recoat or full refinishing. | 1-3 Days (Professional) |
Remember, this is just a starting point. Every floor is different, and what works for a minor scuff on LVP might not be the right move for a deep scratch in solid oak. The goal is always to start with the least invasive method first.
First Things First: Assessing the Scratch and Your Floor Type
Before you even think about grabbing a repair kit, you need to play detective for a few minutes. The secret to a successful floor repair isn't the product you use; it's correctly diagnosing the problem in the first place. Is it a faint, barely-there line you only see when the light hits it just right? Or is it a deep wound that’s cut right through to the raw material?
Getting this right is the difference between a quick fix and a costly mistake. So, let’s get down on the floor and take a good, hard look.
The Fingernail Test: Your Best Diagnostic Tool
Get down to floor level with a bright light and examine the scratch from a few different angles. Sometimes, what looks like a disaster from a distance is just a minor scuff in the topcoat. This is the best-case scenario and often the easiest to fix.
For a more hands-on approach, use what we in the business call the fingernail test. It's simple, but it tells you almost everything you need to know.
Gently run your fingernail across the width of the scratch.
- If your nail glides right over it without catching, you’re in luck. The scratch is superficial, meaning it's only in the protective polyurethane finish. These are the kinds of scuffs you can often handle yourself with a little DIY magic.
- If your nail catches in the groove, the scratch is more serious. It has broken through the finish and dug into the actual wood or the wear layer below. This kind of damage calls for a more involved repair, like filling it in. If you have a lot of these, it might be time to consider a professional hardwood floor refinishing.
This simple test is the most reliable way to gauge the severity and decide whether you’re looking at a quick touch-up or a more robust solution.
This flowchart can help you visualize which path to take based on what you find.
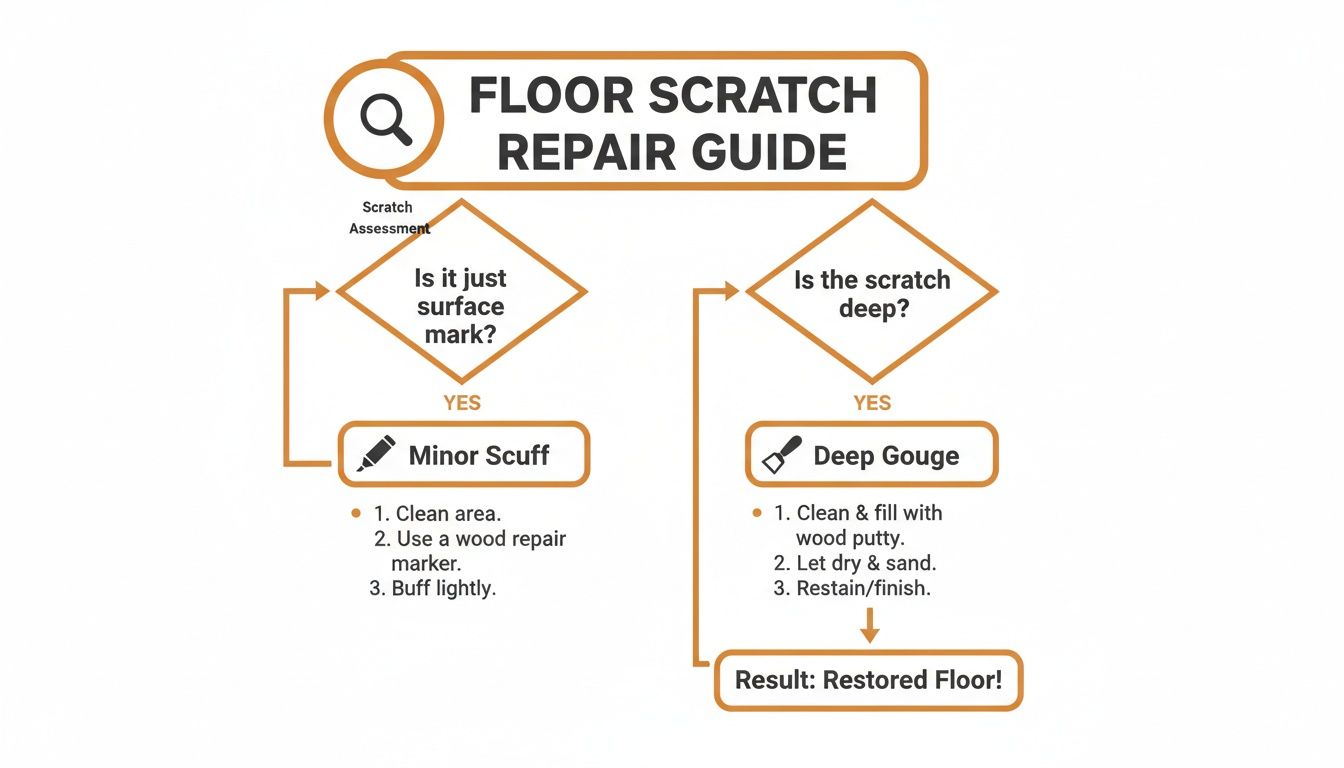
As you can see, figuring out if you've got a minor scuff or a deep gouge is the critical first step that points you toward the right repair strategy.
Identifying Your Floor Material
Just as important as the scratch depth is knowing exactly what kind of floor you're working with. A method that works wonders on solid hardwood could permanently ruin a laminate or luxury vinyl plank (LVP) floor. For example, the beautiful red oak floors we see in so many classic Parker homes require a completely different approach than the engineered wood in a modern downtown condo.
A proper diagnosis is the foundation of a successful repair. Taking a few extra minutes to correctly identify the scratch depth and floor material will save you time, money, and a whole lot of frustration.
Not sure what you have? Here’s a quick guide:
- Solid Hardwood: Each plank will be unique with a grain pattern that doesn't repeat. If you can peek at the side of a board (at a floor vent or transition strip), you'll see it's one solid piece of wood from top to bottom.
- Engineered Hardwood: This has a real wood veneer on top, but it's bonded to layers of plywood underneath. The grain looks authentic because it is, but the construction is layered.
- Laminate: This is a synthetic floor with a high-definition picture of wood grain printed on it. Look closely, and you'll often spot repeating patterns every few planks. It also tends to feel harder underfoot.
- Luxury Vinyl Plank (LVP): Similar to laminate, LVP uses a printed image layer, but it has a more resilient, waterproof core. The texture is often surprisingly realistic, mimicking real wood very closely.
Once you’ve nailed down both the severity of the scratch and your floor type, you’re ready to pick the right tool for the job. This crucial first step ensures you don't waste time on a fix that won't work or, even worse, cause more damage. For deep, widespread scratching on hardwood, the best path often leads to professional hardwood floor refinishing in Parker, where techniques like our dust-free sanding and UV-Cure System can deliver a flawless, incredibly durable restoration.
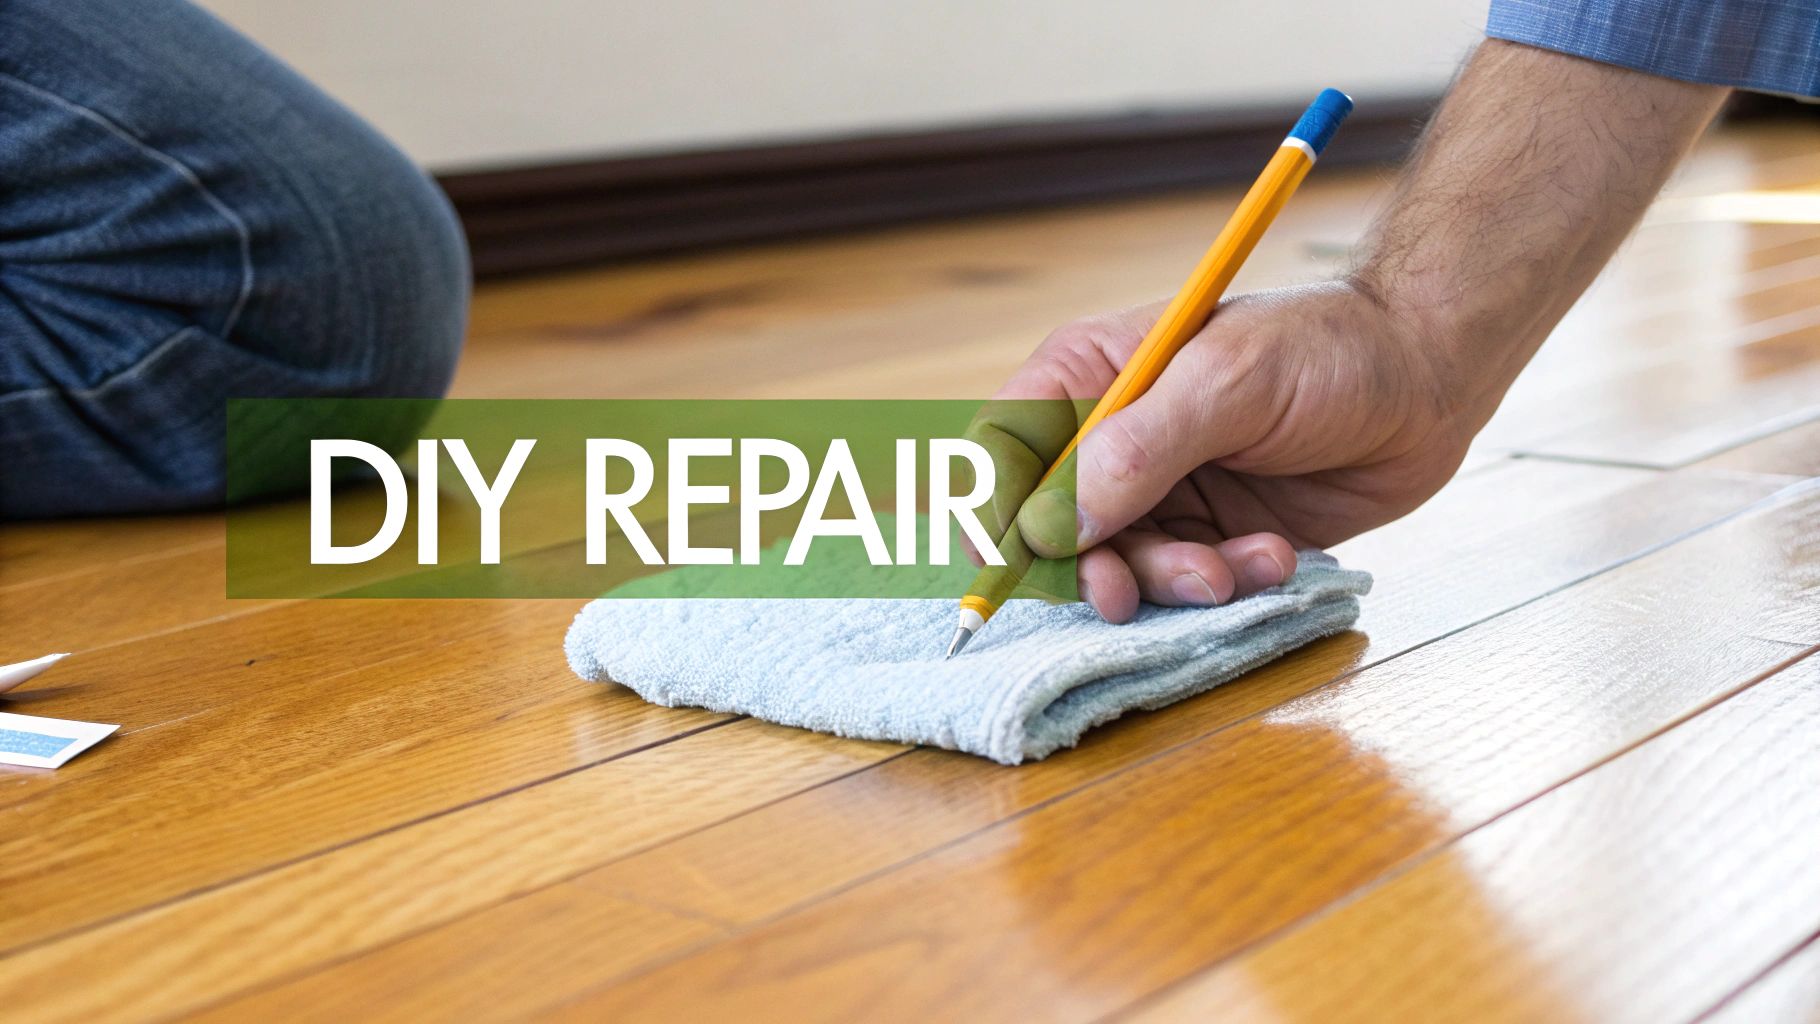
DIY Fixes for Annoying Surface Scratches & the UV-Cure System Alternative
So, you did the fingernail test and breathed a sigh of relief. The culprit is just a minor surface scratch, living only in the top layer of the finish. Good news! You can often tackle these yourself without calling in the pros.
These quick and easy DIY fixes are perfect for handling the everyday wear and tear that comes with a busy home. For homeowners here in Parker, knowing how to patch up a few scuffs can save you a ton of time and money between professional services.
Before you start any repair, the first step is non-negotiable: clean the area thoroughly. Grab a pH-neutral hardwood floor cleaner and a microfiber cloth to wipe away any dust, grime, or residue. A clean surface is key—it ensures your repair product sticks properly and doesn't trap tiny bits of debris, which would just make the scratch stand out even more. Let it dry completely before moving on.
Wood Repair Markers and Blending Pencils
One of the simplest and most effective tricks in the book is using a wood repair marker or blending pencil. These things are popular for a reason—they let you match your floor's color almost perfectly and fill in scuffs in minutes. We're talking under 10 minutes per square foot for light touch-ups, which can save you up to 80% compared to a full refinishing job. The market for these handy tools is booming, and you can see why on reports from sites like growthmarketreports.com.
Here’s how to get it right:
- Always Test First: Find a hidden spot, like inside a closet or under the sofa, to test the marker. The last thing you want is a color that’s way off.
- Apply with a Light Hand: Gently draw along the scratch, moving with the grain of the wood. It’s always better to build up the color with a few light coats than to lay it on thick all at once.
- Blend It In: Immediately after applying, use a clean, soft cloth to wipe away any excess and gently feather the edges. This helps the repair melt into the surrounding finish.
A Natural Trick: Oils and Nuts
For those super-fine, hairline scratches on certain hardwood finishes, you might have a solution sitting in your pantry. This old-school method works by darkening the exposed wood fibers just enough to make the scratch disappear.
A popular go-to is the oil from a walnut or pecan. Just crack the nut in half and rub the meaty part gently along the scratch. The natural oils seep into the wood, concealing the blemish. Let it sit for a few minutes, then come back and buff the area with a soft cloth. It's a fantastic trick for a quick fix, but it's really only meant for the most superficial scuffs.
Pro Tip: When you're buffing out any DIY repair, use small, circular motions. The idea is to make the repaired spot blend seamlessly with the rest of the floor, so you don't end up with a weirdly dull or overly shiny patch.
Knowing When a DIY Fix Isn't the Answer
These home remedies are brilliant for minor imperfections and can definitely extend the beauty of your floor's finish. But let's be real—they're temporary patches for the top layer.
If your floors have widespread light scratching, look dull all over, or the scuffs just won't budge with these methods, it’s probably time to call for backup. A professional clean and buff, or what we call a screen and recoat service, is the logical next step. These services are designed to refresh that top protective layer without the dust and disruption of a full sanding. It’s a cost-effective way to bring back the shine and add a new shield against future damage.
You can learn more about the process in our guide on when and why to buff your hardwood floors.
For Parker homeowners who need a more robust solution, our hardwood floor refinishing services—including our innovative UV-Cure System—provide a durable, factory-tough finish that DIY methods simply can't match.
Tackling Deeper Scratches: Parker Hardwood Floor Refinishing Solutions
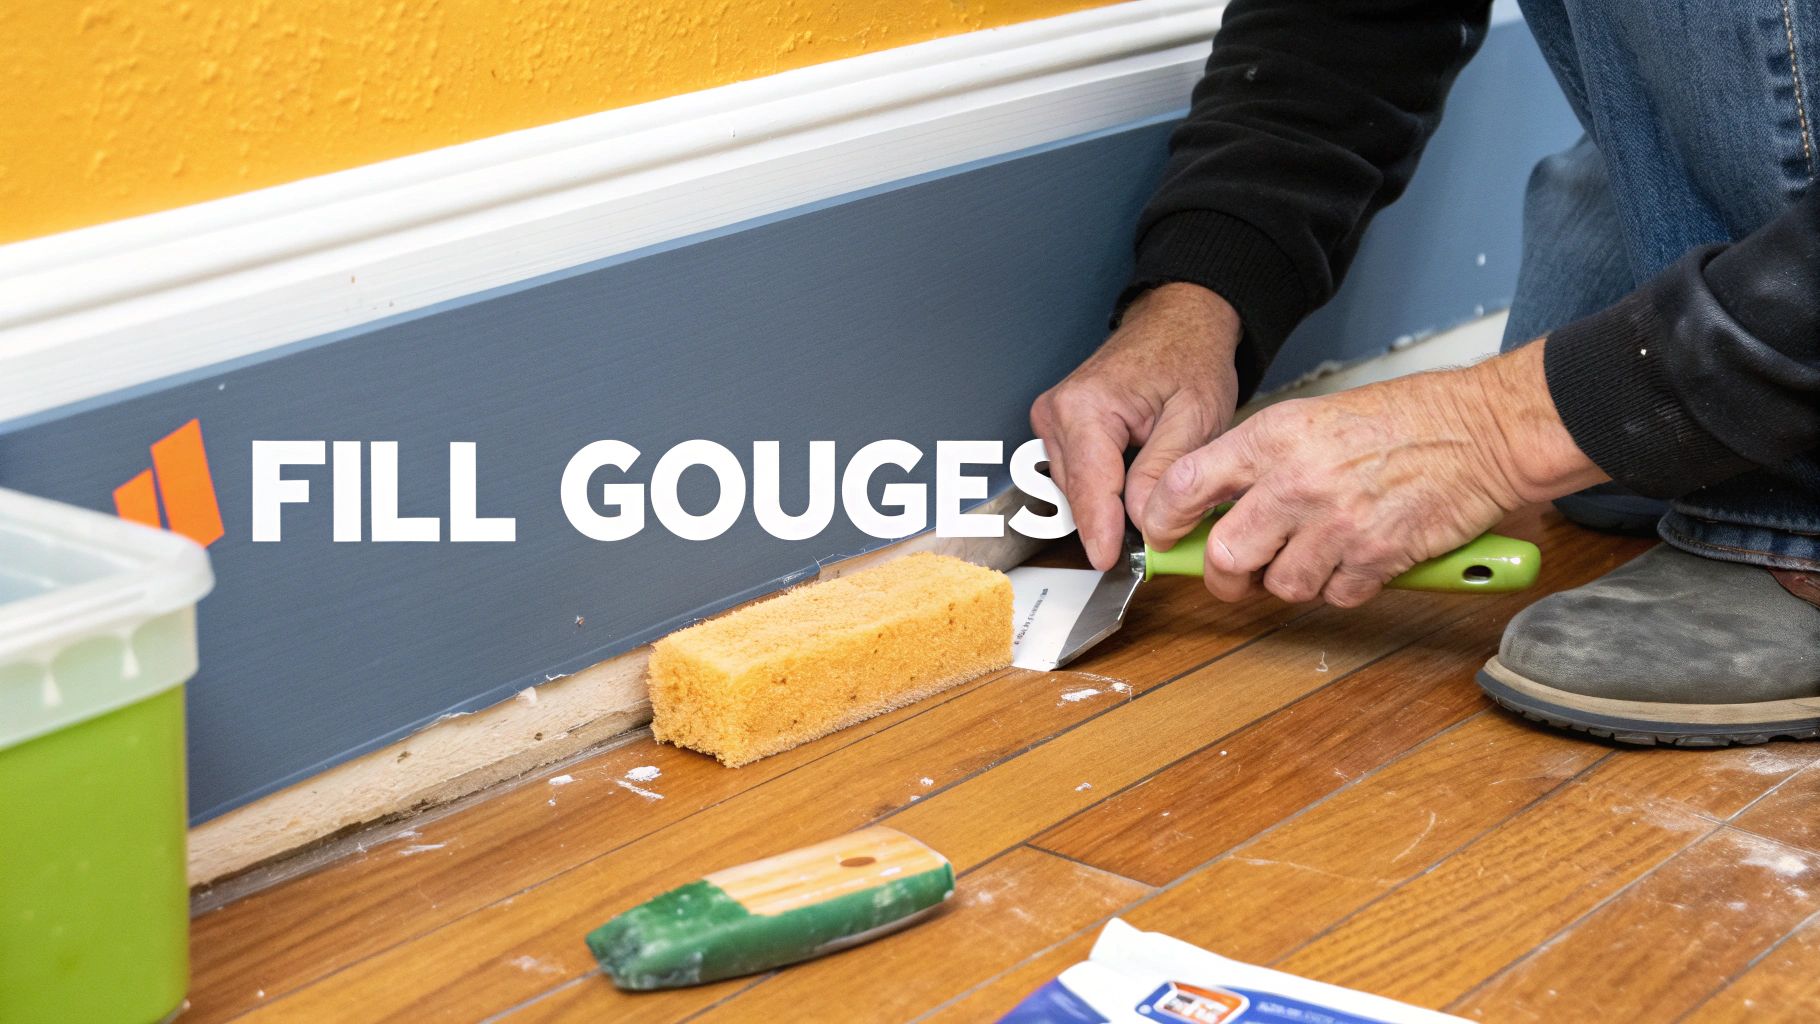
So, those little surface-level tricks didn't quite cut it. What now? If you run your fingernail across a scratch and it catches, you know you’re dealing with something more serious. That little dip means the damage has sliced right through the protective finish and bitten into the wood itself. This kind of wound calls for more than a cover-up—you need to actually fill the void.
For these deeper gashes, your new best friends are tools like wood fillers, putty, and those handy color-matched wax sticks. These products are specifically made to fill in the missing material, leveling out the surface so it can be blended back in with the rest of your floor. The whole point is to make the repair disappear, restoring both the look and the protective seal of your flooring.
Preparing for a Deeper Repair
Listen, proper prep is everything. Before you even think about applying filler, you need a perfectly clean slate. Grab a vacuum with a brush attachment and gently clear out any dust or tiny splinters from inside the gouge. Once that's done, wipe the area with a cloth slightly dampened with mineral spirits. This gets rid of any oils or grime that could stop the filler from bonding properly. Then, just let it dry completely.
Don't skip this step. A clean surface ensures a strong, lasting repair. If you rush it, you might find the filler cracking or popping out down the road, and you'll be right back where you started.
Applying Fillers and Waxes Effectively
Okay, once the area is prepped and dry, it's go-time. The product you pick really depends on your floor type and the size of the damage.
- Wood Putty: This is usually oil-based and stays a bit pliable, which makes it great for spots that might see some minor movement. It’s typically used before a final finish is applied.
- Wood Filler: Often water-based, this stuff dries hard and can be sanded perfectly smooth. It’s the ideal choice for floors that are already finished, since you can sand it flush and dab a little polyurethane over the top to seal it.
- Wax Sticks: These are the champs for quick and easy fixes. You just melt the wax into the scratch and scrape it level. They come in tons of colors that you can even blend together to get a perfect match.
No matter which product you use, apply it with a flexible putty knife. Press it in firmly to make sure the entire gouge is filled. I always recommend slightly overfilling the scratch, because most fillers tend to shrink just a little as they dry.
Taking action early with fillers offers a significant advantage in preventing minor issues from becoming major ones. For wood floors, applying color-matched fillers to shallow scratches—a common issue in about 60% of homes—can cost less than $0.50 per square foot and halt damage before it requires sanding. Modern fillers now have up to 98% color accuracy, and while a DIY approach can save 75% on labor, professional filler services are a growing part of the resilient flooring market.
The Limits of Spot Repairs
While these spot treatments are fantastic for an isolated scratch or two, they definitely have their limits. Let's be honest: a DIY filler repair will never have the same bulletproof durability or flawless look as a professionally refinished surface. If your floor is covered in deep scratches, has widespread damage, or the gouges are particularly wide, a spot fix is just going to look patchy and obvious.
For instance, we recently worked on a red oak floor in a Parker home that had taken a beating from years of heavy furniture being dragged around. The homeowners had tried filling the worst gouges, but the repairs stuck out like a sore thumb against the beautifully aged patina of the surrounding wood. It was a classic case where a professional touch was needed.
In situations like that, our dust-free sanding and hardwood floor refinishing in Parker is the only way to get a truly uniform and durable result. We sand the entire surface down to fresh, clean wood, completely erasing every single scratch and gouge. You can see exactly how we do it by reading about our sanding and refinishing steps for hardwood floors.
This process, especially when topped with our advanced UV-Cure System, doesn't just patch the damage—it creates a brand-new, factory-tough surface that's ready for whatever life throws at it. It's all about knowing when a small patch just won't cut it and a full restoration is the smarter long-term investment.
Knowing When to Call a Pro for Parker Hardwood Floor Refinishing
Let’s be honest, those DIY scratch repair kits are fantastic for a random scuff mark or a tiny scratch. But there’s a tipping point—a moment when a homeowner in Parker realizes a wax stick just isn’t going to cut it anymore. Some floor damage is simply too widespread or too deep for a quick fix.
Knowing when to put down the DIY tools and pick up the phone for professional hardwood floor refinishing in Parker is a game-changer. It can save you a ton of frustration, time, and, believe it or not, money in the long run by avoiding a patchy, failed repair.
Signs It's Time for Professional Help
So, what does that tipping point look like? It’s when you’re no longer dealing with a minor cosmetic issue but with the long-term health and integrity of your hardwood. If you see any of these signs, it’s definitely time to call in the experts:
- Widespread Scratching: Your floors have lost their shine and look dull or hazy from a web of countless tiny scratches. Spot-fixing this is impossible. A professional Screen & Recoat is the perfect solution to restore the finish across the entire floor.
- Deep Gouges Exposing Wood: This is a big one. When a scratch is so deep you can see the raw, light-colored wood underneath, the protective finish has been totally breached. That spot is now vulnerable to moisture, dirt, and even worse damage.
- Water Damage or Discoloration: Are you seeing dark stains, graying wood, or boards that are starting to cup or warp? That’s a clear sign of moisture damage, which needs a professional eye and often a full hardwood floor refinishing to fix correctly.
- A Completely Worn-Out Finish: In hallways or the main living area, the finish can literally wear away, leaving the wood exposed. If the floor feels rough and looks faded, it’s time to bring it back to life.
When you choose professional sanding and refinishing, you're not just fixing scratches; you're making a long-term investment in your home. This process is a powerful way to revive floors that might otherwise need a costly replacement, potentially extending their lifespan by 20–50 years. By removing a minuscule layer of damaged material and applying new stain and protective coats, experts can restore up to 95% of a floor's original beauty for a fraction of the cost of a full replacement. Discover more insights on the value of floor restoration services.
The Professional Advantage: Dust-Free Sanding and the UV-Cure System
Here’s the thing: a DIY repair can never truly replicate the seamless, durable finish a professional service provides. Our process is worlds away from a simple touch-up. We use a dust-free sanding system that removes the old, damaged finish without blanketing your Parker home in a layer of fine wood dust. This gives us a perfectly smooth, clean canvas to work with.
Then comes our secret weapon: the advanced UV-Cure System. Forget traditional polyurethane finishes that take days to cure and fill your home with fumes. Our UV-cured finishes harden instantly under a special light. This gives you a factory-tough, incredibly durable surface you can walk on and move furniture back onto the very same day. For a more detailed breakdown, check out our guide on DIY vs. professional hardwood floor refinishing.
To help Parker homeowners see the full picture, here’s a quick look at how our services stack up against a typical DIY attempt when you're learning how to fix scratched floors.
Deciding on the right approach can be tricky, but seeing the options side-by-side makes it much clearer. A quick DIY patch has its place, but for a lasting, beautiful result, professional methods are in a league of their own.
J.R. Hardwood Refinishing Services vs DIY Repair
| Feature | DIY Spot Repair | Professional Screen & Recoat | Professional Full Refinishing with UV-Cure |
|---|---|---|---|
| Best For | One or two isolated minor scratches. | Widespread light scratches and dullness. | Deep gouges, water damage, and extensive wear. |
| Durability | Low; a temporary patch that may wear away. | High; adds a new, durable protective topcoat. | Exceptional; a brand-new, factory-tough surface. |
| Appearance | Can look patchy or discolored. | Uniform, consistent sheen across the entire floor. | Flawless, seamless, and completely uniform. |
| Process | Manual application of filler or wax. | Lightly abrading the old finish and applying a new coat. | Full dust-free sanding and multiple coats of finish. |
| Cure Time | Minutes to hours. | 24–72 hours for full cure. | Instant Cure; ready for use immediately. |
Ultimately, while a quick fix is tempting, investing in a professional service ensures your floors not only look incredible but are also protected for years to come.
FAQ: Your Floor Scratch Repair Questions Answered
When you're staring at a scratch on your floor, a dozen questions can pop into your head. Homeowners in Parker are always asking us about the best way to handle certain issues, from tiny scuffs to more serious gouges. We get it. You want to make the right call for your home.
So, we’ve put together some answers to the most common questions we hear every day. Think of this as a quick chat with an expert to help you figure out your next steps.
Can I use wood filler on laminate or LVP floors?
This is a big one, and the answer is a hard no. It might seem like a logical fix, but traditional wood fillers are made to bond with actual wood fibers. They dry hard so they can be sanded down smoothly. Using wood filler on a synthetic surface like laminate or Luxury Vinyl Plank (LVP) is a recipe for disaster. These materials can't absorb the filler, so the patch will just sit on top. Before you know it, it'll crack, flake off, or just look like a clumpy, obvious repair. You'll end up with a bigger eyesore than the original scratch. Instead, you need a repair kit specifically designed for laminate or LVP. These kits usually come with a color-matched wax or a special putty that stays a bit flexible, which is exactly what you need for synthetic flooring.
Is a screen and recoat the same as full refinishing?
Not even close! They’re two completely different services for two different levels of wear and tear. It’s like the difference between getting a car detailed versus getting a whole new paint job. A Screen and Recoat is a maintenance move for dull floors with light scratches. We lightly abrade the top layer of finish and apply a fresh coat. A Full Refinishing is a total restoration where our dust-free sanding equipment takes the floor down to bare wood, erasing deep gouges and stains before we apply a brand-new finish, like our durable UV-Cure System. Choosing the right Parker hardwood floor refinishing service depends on your floor's condition.
How often should I refinish my hardwood floors?
There's no single magic number, as it really depends on your lifestyle. A floor in a busy home with kids and pets will need attention sooner than one in a quiet, shoes-off household. Generally speaking, a professionally finished hardwood floor can go 7-10 years before needing a full, down-to-the-wood refinishing. But you can push that timeline way out with proactive care. Getting a professional deep clean and buff or a screen and recoat every 3-5 years keeps that protective top layer strong and extends the life of your floor. For a deeper dive, check out our guide on how often to refinish hardwood floors.
Will a UV-Cure finish prevent all future scratches?
Our UV-Cure System is, hands down, one of the most durable, scratch-resistant finishes you can get. It's a huge leap forward from traditional polyurethanes, offering incredible protection against the daily grind of scuffs, scrapes, and claws. That said, while a UV-Cure finish is exceptionally tough, no finish is truly scratch-proof. Think of it as armor for your floors. It will dramatically reduce the number and severity of scratches, but it won’t make your floor indestructible. The real magic is its incredible resilience and the fact that it cures instantly. The moment we finish the job, your floors are protected by a factory-tough layer, which is why so many Parker homeowners are choosing this modern hardwood floor refinishing solution.
Homeowners in Parker trust J.R. Hardwood Floor Refinishing & Cleaning to restore the natural beauty of their hardwood floors with our dust-free sanding system and advanced UV-curable finishes. Unlike traditional methods, our UV technology cures instantly, so you can move furniture back the same day with no lingering odor or downtime. Choose the perfect refinishing service to match your needs and home traffic. Our dust-free process ensures a clean, beautiful finish every time.
📞 Phone: 720-327-1127
🌐 Website: jrhardwoodfloorrefinishingandcleaning.com
📍 Service Area: Parker, Lone Tree, Castle Rock, Highlands Ranch, and Centennial.
📺 YouTube: https://www.youtube.com/channel/UCLaTAi6KxwT-g8QCKqKTQ8Q?sub_confirmation=1