 Skip to content
TL;DR:
- Effective floor protection involves layered strategies that include physical barriers, proper cleaning habits, and floor-specific maintenance to prevent damage. Knowing your floor type is essential for selecting appropriate materials and protection methods, such as plastic sheeting, Ram Board, or Masonite, during renovations or high-traffic events. Consistent habits like removing shoes, promptly cleaning spills, and inspecting protective layers significantly extend your floors’ lifespan and maintain their appearance over time.
Effective floor protection is defined as the combination of physical barriers, targeted cleaning habits, and floor-type-specific maintenance that prevents dirt, moisture, and impact damage before they cause lasting harm. The floor protection tips 2025 homeowners need most go beyond a simple doormat. They involve layered strategies, updated materials like Ram Board and UV-cured finishes, and daily habits that work together to extend the life of hardwood, laminate, vinyl, tile, and carpet. Whether you own your home or rent it, the right approach saves you from expensive repairs and keeps your floors looking their best for years to come.
How can different floor types affect your protection strategy?
Not every floor needs the same care, and treating them all the same is one of the most common mistakes we see. Knowing your floor type is the first step in any smart protection plan.
Here is a quick breakdown of how each major floor type behaves:
- Hardwood: Beautiful but sensitive. Hardwood scratches from grit and swells from moisture. It needs felt pads under furniture, barely damp mopping, and a no-shoes policy to stay in top shape. You can learn more about scratch causes and prevention to get ahead of the most common damage.
- Laminate: Similar to hardwood in vulnerability but with one key difference. Laminate has a photographic layer that cannot be sanded down. Once the surface is damaged, replacement is often the only fix. Moisture is its biggest enemy.
- Vinyl (LVP): Vinyl plank is more water-resistant than hardwood or laminate, but its seams and edges can allow moisture to creep underneath. Avoid soaking the floor and keep seams sealed.
- Tile: Hard and durable on the surface, but the grout lines between tiles are porous and stain easily. Sealing grout annually is a must for any tile floor in a kitchen or bathroom.
- Carpet: Carpet absorbs impact well and feels warm underfoot, but it holds onto stains and odors if spills are not addressed immediately. High-traffic areas flatten and wear faster than the rest.
Pro Tip: Before buying any cleaning product or protective material, flip over a tile or check a manufacturer label to confirm your floor type. Using the wrong product on laminate or unsealed hardwood can void your warranty and cause permanent damage.
The best floor protection strategies always start with identification. Once you know what you are working with, every other decision becomes much easier.
What are the best modern floor protection materials?
Think of layered floor protection like sunscreen on a sunny Colorado day. One thin layer might not be enough. The real defense comes from stacking the right materials in the right order.
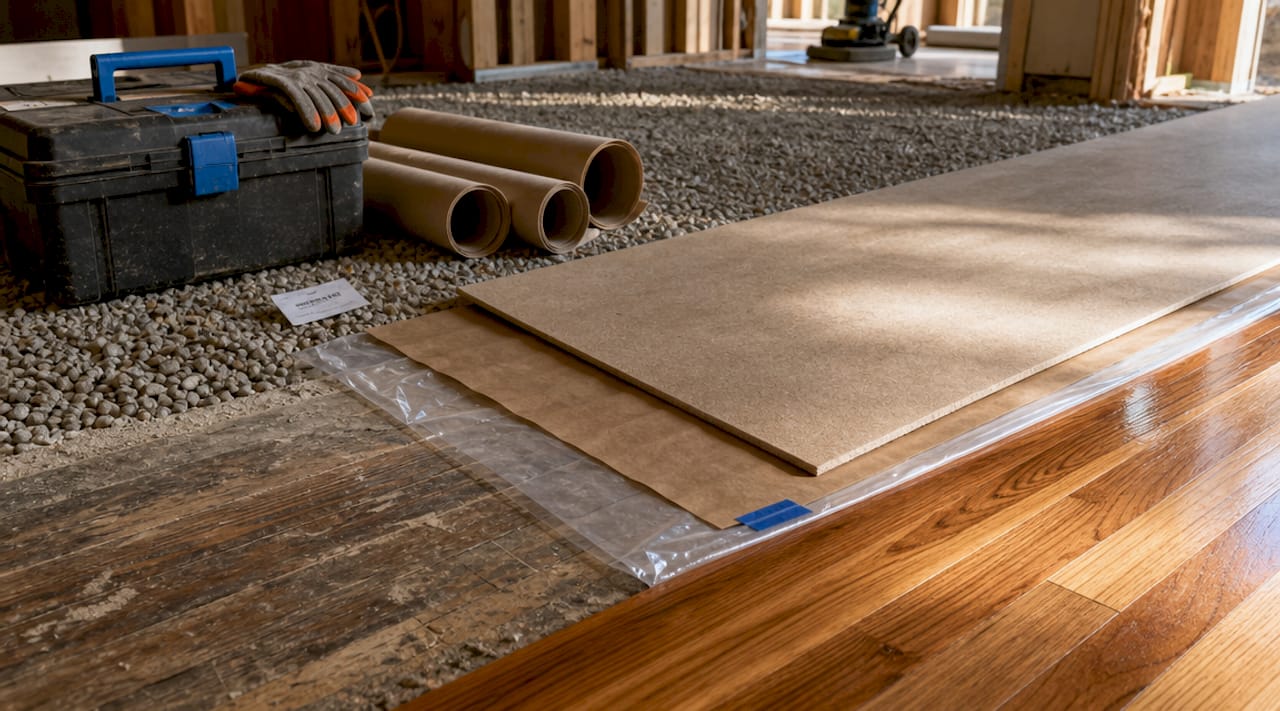
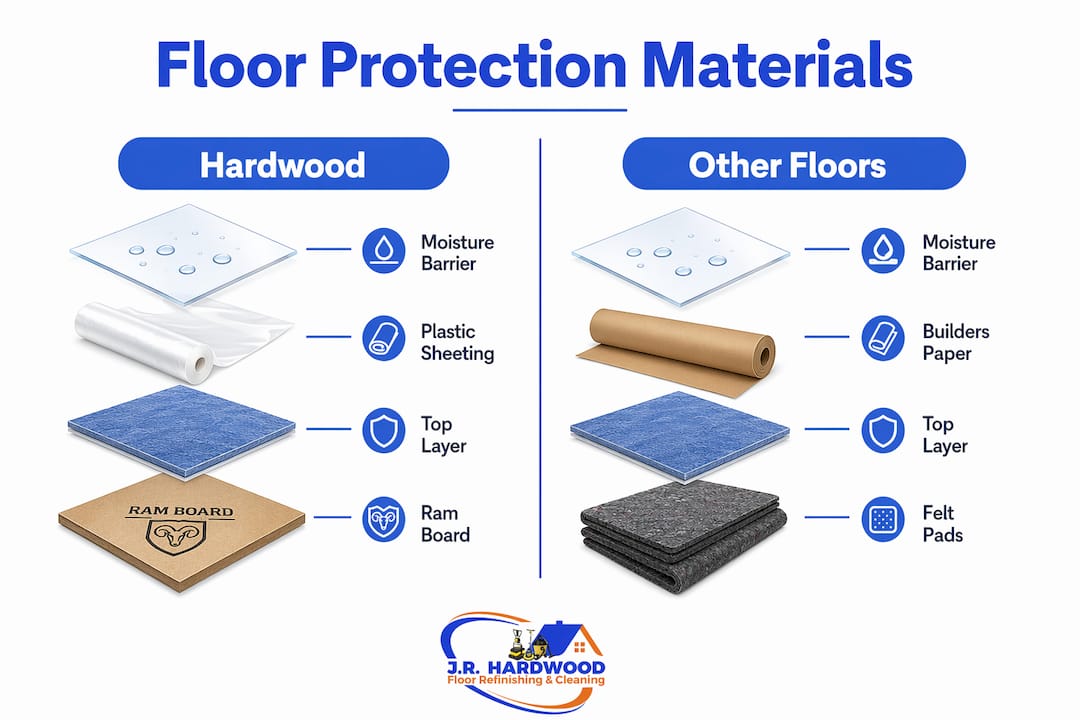
The gold standard for layering uses 1-mil plastic sheeting as a moisture barrier first, then tops it with builders paper or Ram Board for impact resistance and traction. This combination outperforms using plastic alone, which can be slippery and allows abrasion to punch through to the floor beneath.
Here is how to choose the right materials for each scenario:
- Hardwood during renovation: Lay 1-mil plastic sheeting first, then cover with Ram Board or heavy-duty builders paper. Tape seams with painter’s tape, not duct tape, to avoid adhesive residue on the finish.
- Carpet during a project: Skip standard adhesive films. Low-tack films or runners are the safe choice because standard adhesive films bond to carpet fibers if left in place too long, pulling them out when removed.
- Tile during heavy foot traffic: Use corrugated plastic panels or Masonite sheets for rigid protection. These handle rolling loads from dollies and heavy equipment without cracking the tile underneath.
- Vinyl plank during painting: Lay rosin paper over the vinyl and tape edges to the baseboard, not the floor. This protects the surface without risking adhesive damage to the seams.
| Floor Type | Moisture Barrier | Top Protection Layer |
|---|---|---|
| Hardwood | 1-mil plastic sheeting | Ram Board or builders paper |
| Carpet | None needed | Low-tack film or carpet runner |
| Tile | None needed | Corrugated plastic or Masonite |
| Vinyl (LVP) | Rosin paper | Taped rosin paper or Ram Board |
| Laminate | 1-mil plastic sheeting | Builders paper |
Pro Tip: Replace your protective layers every few days during long projects. Moisture can build up underneath and cause more damage than the renovation itself.
Which cleaning routines best preserve your floor’s finish?
Cleaning your floors the right way is like giving them a regular spa day. The right routine keeps the finish intact, prevents buildup, and adds years to the floor’s life. The wrong routine, especially over-wetting, is the fastest way to cause swelling, warping, and finish breakdown.
Over-wetting during mopping is the most common cause of damage across all major floor types. For hardwood and laminate, a barely damp mop is the rule, not the exception. Wring out your mop until it feels almost dry before it touches the floor.
Here are the cleaning habits that actually protect your floors:
- Use pH-neutral cleaners. pH-neutral cleaners diluted 1:20 with warm water are safe for all sealed hard surfaces, including hardwood, vinyl, laminate, and stone. Harsh chemicals strip finish and leave floors vulnerable.
- Match your cleaning frequency to your traffic. Deep cleaning high-traffic floors every one to three months keeps grit from grinding into the finish. Low-traffic areas only need a deep clean every six to twelve months.
- Let tile cleaners dwell. Alkaline tile cleaners need at least five minutes of dwell time to break down oils and clean grout effectively. Scrubbing too soon means the chemistry has not had time to work.
- Treat carpet spills immediately. Blot, never rub. Rubbing pushes the stain deeper into the fibers and spreads it wider. A clean white cloth and cold water handle most fresh spills before they set.
- Avoid steam mops on hardwood and laminate. Steam forces moisture into the seams and under the finish, causing the same damage as over-wetting with a traditional mop.
For a step-by-step approach to keeping every floor type clean, our floor cleaning checklist walks you through the full process room by room.
What lifestyle habits boost floor protection and reduce wear?
The best floor care tips 2025 has to offer are not always about products. Some of the most powerful protection comes from simple daily habits that cost almost nothing.
Up to 80% of residential floor dirt is tracked in from outside by foot traffic. That single fact changes how you think about floor protection. The dirt that scratches and dulls your finish is mostly coming in on shoes, and stopping it at the door is far easier than cleaning it up later.
“A no-shoes policy indoors is universally endorsed by flooring professionals as a low-cost, high-return method of preserving floor finish and cleanliness.” — D and G Flooring
Here are the habits that make the biggest difference:
- Go shoes-off at the door. A strict no-shoes policy keeps abrasive grit, outdoor chemicals, and moisture off your floors entirely. Add a small bench and a basket for shoes near the entrance to make it easy for guests.
- Use high-quality doormats at every exterior door. A good mat catches the dirt before it ever reaches your floor. Look for mats with a scraper surface on top and a rubber backing that will not slide.
- Put felt pads under all furniture legs. Chair legs, table legs, and sofa feet all scratch hardwood and vinyl when they shift. Replace felt pads every six months because they collect grit and become abrasive themselves.
- Clean up spills within minutes. Moisture sitting on hardwood or laminate for even a few minutes can start to seep into seams. Keep a small stack of microfiber cloths in the kitchen and bathroom for fast response.
- Inspect and replace worn protective items regularly. Worn-out felt pads, frayed rugs, and cracked furniture glides do more harm than good. A quick monthly check takes five minutes and prevents scratches that take hours to fix.
Pro Tip: Place a second interior mat just inside each exterior door. The first mat scrapes, the second absorbs. Together, they catch what a single mat misses.
If you have pets, the wear patterns on your floors are even more intense. Our guide on floor care for pet owners covers the specific strategies that work best for homes with dogs and cats.
How to protect floors during renovations and high-traffic events
Renovations, painting projects, and even big holiday gatherings put your floors under serious stress. Preventing floor damage 2025 style means having a plan before the first contractor walks through the door.
Follow these steps to keep your floors safe during any high-traffic event or project:
- Pre-clean the floor before applying any protection. Dirt and grit trapped under a protective layer will scratch the floor every time someone walks over it. Sweep and vacuum thoroughly first.
- Lay your moisture barrier. For hardwood and laminate, roll out 1-mil plastic sheeting and tape it to the baseboard. This step is non-negotiable in bathrooms, kitchens, or anywhere water is being used.
- Add your impact layer on top. Ram Board, builders paper, or corrugated plastic panels go over the moisture barrier. Overlap seams by at least six inches and tape them flat to prevent tripping hazards.
- Use rigid panels for rolling loads. If you are moving appliances or heavy furniture on dollies, lay Masonite sheets over your protective layers. They distribute weight and prevent the layers beneath from shifting.
- Inspect your protection every two to three days. Moisture can build up under coverings during extended projects, especially in Colorado’s variable climate. Lift a corner, check for condensation, and replace layers if needed.
| Project Type | Recommended Protection | Key Caution |
|---|---|---|
| Interior painting | Plastic + Ram Board | Tape to baseboard, not floor |
| Moving heavy furniture | Masonite over plastic | Replace layers if torn |
| Kitchen renovation | Plastic + builders paper | Check daily for moisture |
| Holiday party | Carpet runners or area rugs | Anchor edges to prevent slipping |
| Bathroom remodel | Plastic + corrugated panels | Seal all seams tightly |
For deeper guidance on avoiding the mistakes that cost homeowners the most, our article on common refinishing mistakes covers what goes wrong and how to prevent it.
Key takeaways
Consistent floor protection combines physical barriers, smart cleaning habits, and floor-type-specific strategies to prevent damage and extend the life of every surface in your home.
| Point | Details |
|---|---|
| Know your floor type first | Hardwood, laminate, vinyl, tile, and carpet each require different protection methods and products. |
| Layer your protection materials | Use a moisture barrier plus an impact layer for the most effective temporary coverage during projects. |
| Clean with barely damp tools | Over-wetting is the top cause of floor damage. Use pH-neutral cleaners diluted 1:20 for all sealed surfaces. |
| Stop dirt at the door | Up to 80% of floor dirt comes from outside. Doormats and a no-shoes policy are your first line of defense. |
| Inspect and replace regularly | Worn felt pads, frayed mats, and old protective layers cause damage. Check them monthly. |
What I have learned after years of protecting floors in Colorado homes
After seeing hundreds of floors across Denver, Parker, Castle Rock, and beyond, the pattern is always the same. The floors that hold up beautifully over time are not the most expensive ones. They belong to homeowners who do a few simple things consistently.
The biggest mistake I see is treating floor protection as a one-time event. People buy felt pads, stick them on, and forget about them for three years. By then, those pads are loaded with grit and acting like sandpaper on every hardwood plank. The fix takes five minutes. The damage takes hours to sand out.
The second thing I have noticed is that most homeowners underestimate moisture. Colorado’s dry climate makes people think moisture is not a concern, but it absolutely is. Spills, steam from cooking, and even wet shoes in winter all add up. I have seen laminate floors buckle from nothing more than a pet’s water bowl sitting in the same spot for six months.
My honest advice is this: spend less time worrying about which product to buy and more time building two or three non-negotiable habits. Shoes off at the door. Spills cleaned within minutes. Felt pads checked every six months. Those three habits alone will do more for your floors than any premium cleaner on the market.
And when the finish finally does wear down, because it will eventually, do not wait until the wood itself is damaged. A screen and recoat or a full refinish at the right time costs a fraction of what floor replacement does. Prevention is always cheaper than restoration, but restoration is always cheaper than replacement.
— J.R.
Give your floors the professional care they deserve
If your floors have already taken some wear and need more than a cleaning routine can fix, we are here to help. At Jrhardwoodfloorrefinishingandcleaning, we specialize in bringing hardwood floors back to life with eco-friendly products, premium finishes, and techniques like Instant UV-curable finishing that protect your floor from the inside out.
We serve homeowners and businesses across Denver, Parker, Castle Rock, Boulder, and Colorado Springs with free over-the-phone quotes and honest advice tailored to your floor’s actual condition. Whether you need a light screen and recoat or a full sand and refinish, we will tell you exactly what your floor needs and what it does not. Explore your options with our DIY vs. professional refinishing guide and see which path makes the most sense for your home.
FAQ
What is the most effective floor protection habit for homeowners?
A no-shoes policy indoors is the single most effective habit, as up to 80% of floor dirt is tracked in from outside. Pairing it with high-quality doormats at every exterior door stops the majority of abrasive grit before it reaches your floors.
How often should I deep clean my floors?
High-traffic floors need a deep clean every one to three months. Low-traffic areas only need attention every six to twelve months, depending on the floor type and household activity.
Can I use the same cleaner on all my floors?
A pH-neutral cleaner diluted at a 1:20 ratio with warm water works safely on all sealed hard surfaces, including hardwood, vinyl, laminate, and stone. Avoid harsh chemicals and steam mops on wood-based floors.
What is the safest way to protect floors during a renovation?
Layer 1-mil plastic sheeting as a moisture barrier first, then cover it with Ram Board or builders paper for impact protection. Inspect and replace the layers every two to three days to prevent moisture buildup underneath.
Are adhesive films safe to use on carpet?
Standard adhesive films can damage carpet fibers if left in place too long. Use low-tack films or corrugated plastic runners instead to protect carpet during projects without pulling out fibers when removed.