
So, you're thinking about refinishing your hardwood floors. It's a fantastic way to bring them back to life, but hold on a second. Before you even think about renting a sander, we need to talk. The entire project hinges on what you do right now: a thorough, honest assessment of your floors.
Getting this first step right is everything. It dictates your entire game plan—what tools you'll need, how long it'll take, and whether you're looking at a light refresh or a full-blown restoration. For example, misidentifying a thin engineered floor and sanding it like solid hardwood could ruin it permanently, forcing you to replace the entire floor instead of just refinishing it. Mess this up, and you could waste a whole lot of time and money.
The Two Paths: A Full Sanding vs. a Lighter Recoat
At its core, refinishing comes down to two main choices. You either need a full sanding to take the wood down to its raw state, or you can get away with a much simpler "screen-and-recoat" to refresh the existing finish.
This flowchart breaks it down nicely.
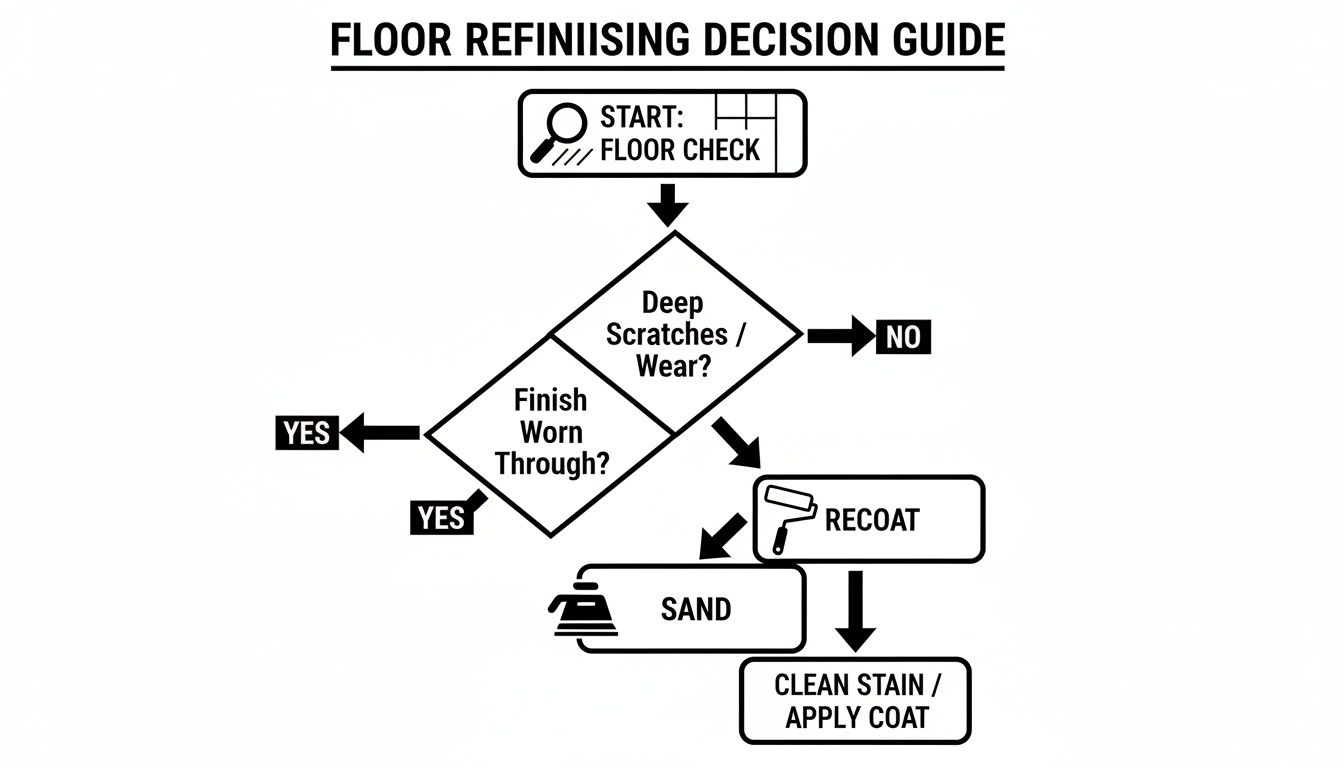
If you're dealing with minor surface scuffs and a dull finish, a recoat might be all you need. But for deeper damage, you've got to bring out the big guns.
First Things First: Are Your Floors Solid or Engineered?
Before you can make that call, you absolutely have to know what kind of wood you're working with. Is it solid hardwood, or is it engineered?
Solid hardwood is exactly what it sounds like—a single, solid piece of wood from top to bottom. Engineered hardwood, on the other hand, is constructed with a thin layer of real wood (called the "veneer") on top of a plywood core.
This is a critical distinction. You can sand down solid hardwood floors multiple times over their lifespan. But that thin veneer on engineered floors? You might get one or two sandings out of it if you're lucky. Some are so thin they can't be sanded at all. If you sand right through that top layer, you've hit plywood, and that plank is ruined.
Here's a pro tip: Find a floor vent, a doorway transition strip, or any spot where you can see a cross-section of a board. If it looks like one solid piece of wood, you've got solid. If you see distinct layers stacked like a sandwich, it's engineered.
Engineered flooring has exploded in popularity, now making up a whopping 74% of the market. That's why it's so important to identify your floor type before you start—the wrong approach can be a costly mistake.
Get Up Close and Personal: Inspecting for Damage
Now it's time to get on your hands and knees and play detective. Go over your floors section by section, looking for the tell-tale signs that will point you toward either a full refinishing or a simpler screen-and-recoat.
Here's what to look for:
- Deep Scratches and Gouges: Run your fingernail over them. If your nail catches in the scratch, a simple recoat isn't going to cut it. A practical example is the deep grooves left by a dog's claws near the back door or the long gouge from sliding a refrigerator. This kind of damage has gone through the finish and into the wood itself.
- Water Damage: Keep an eye out for dark gray or black stains. You'll usually find them near exterior doors, under leaky windows, or around house plants. This means water has soaked deep into the wood fibers, and only sanding will get those stains out.
- Worn-Through Finish: Pay close attention to high-traffic zones like hallways, entryways, and the path from the sofa to the kitchen. Does the wood look dull, gray, or almost raw compared to the protected areas under a rug? That's a clear sign the protective finish has been completely worn away.
- Old Wax or Polishes: Some older floors have a history. They might have been treated with wax-based products like Murphy Oil Soap over the years, which can be a nightmare for new finishes. If you suspect this is the case, you'll need to remove it completely. We have a whole guide on how to tackle hardwood floor wax removal like a pro.
The Water Drop Test: Here’s a simple trick we use in the field. Pour a tablespoon of water on a high-traffic spot. If the water beads up and sits on the surface, your finish is still doing its job, and a screen-and-recoat is likely all you need. If it soaks in within a few minutes and darkens the wood, the seal is broken. You’re looking at a full sand-and-refinish.
So, how do your floors stack up? The damage you find will steer you down the right path.
To help clarify, here's a quick comparison of the two main approaches.
Choosing Your Refinishing Path Sand vs. Screen-and-Recoat
| Consideration | Full Refinishing (Sanding) | Screen-and-Recoat |
|---|---|---|
| Best For | Deep scratches, gouges, water stains, worn-through finish, changing stain color. | Dull finish, light surface scuffs, and general maintenance. |
| Process | Sands wood down to its raw state, removing the old finish entirely. | Lightly abrades (buffs) the top layer of the existing finish. |
| Time Commitment | 4-5 days of work, plus several days for curing. | Typically completed in just one day. |
| Mess & Dust | Can be significant unless a dustless system is used. | Virtually dust-free. |
| Outcome | A completely restored, like-new floor. You can change the color. | Revives the shine and adds a new protective layer. Color remains the same. |
Ultimately, a full refinishing is a major reset button, while a screen-and-recoat is a powerful refresh.
If your inspection leaves you feeling overwhelmed, or if you're just not sure about your floor type, don't guess. Getting a professional opinion is a smart move. For a fast, no-obligation consultation, call our team at 720-327-1127 and we can talk through your project.
Setting the Stage for a Perfect Finish
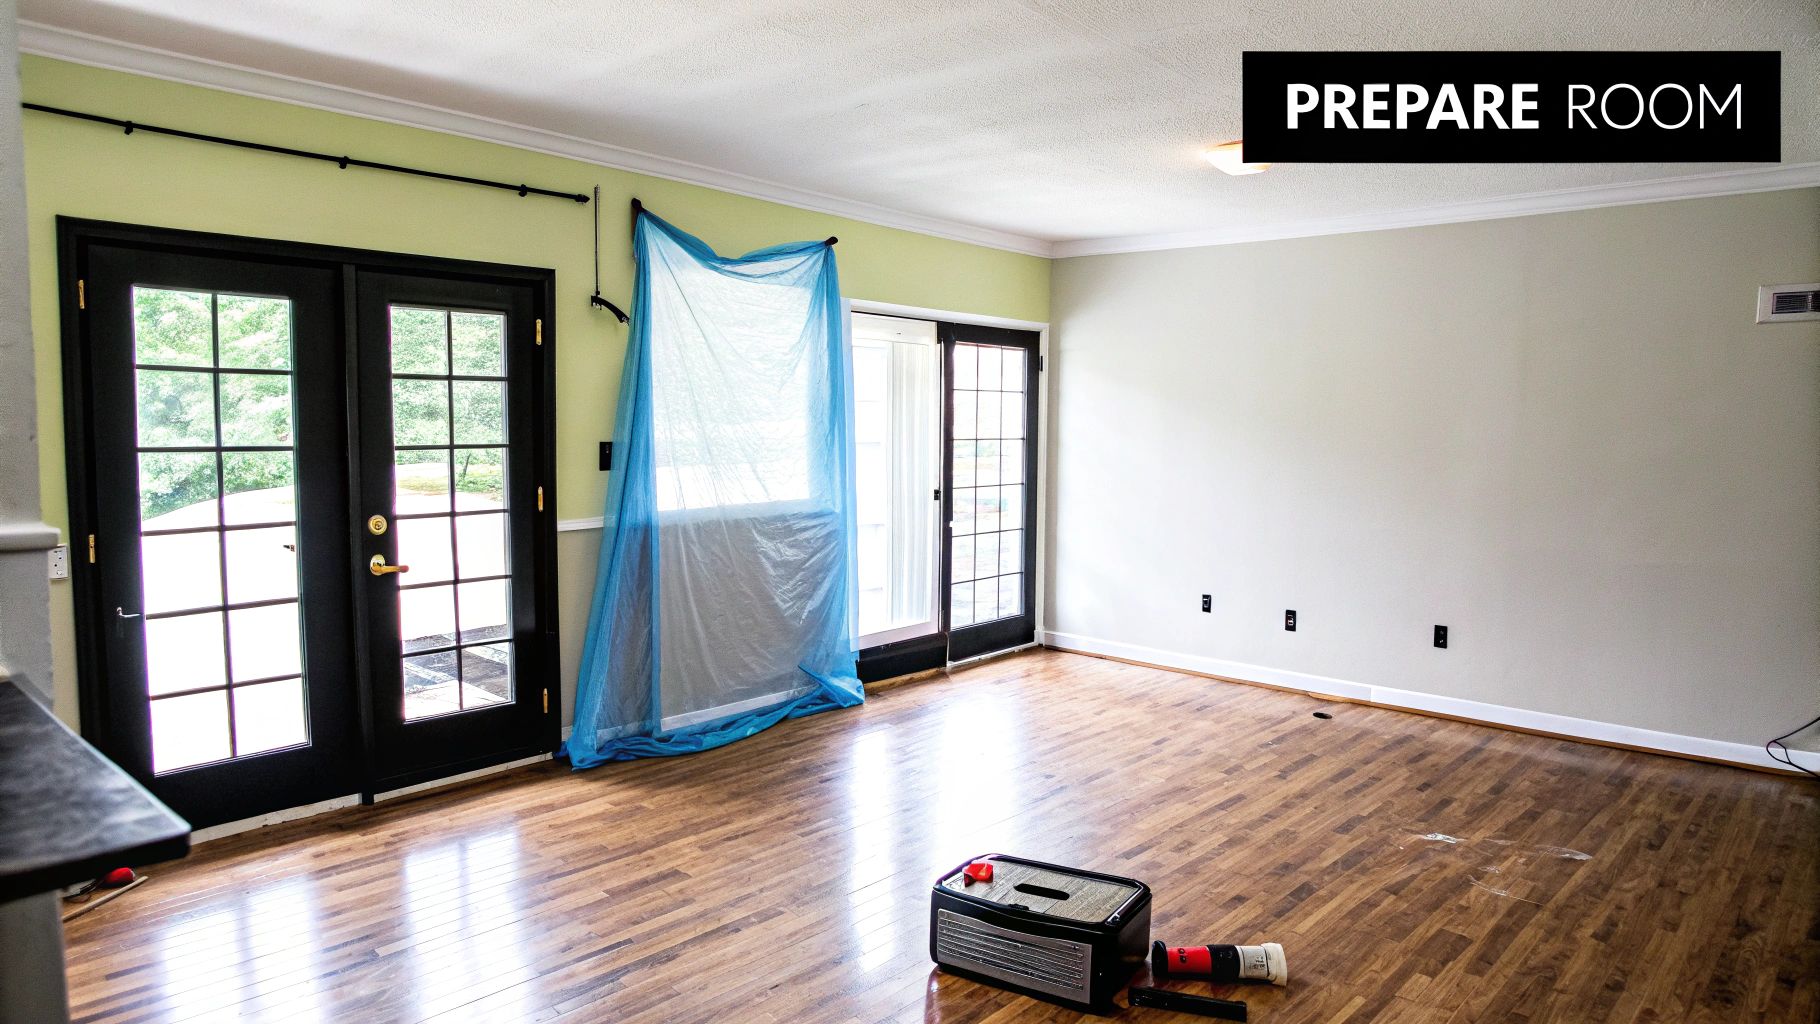
Alright, you’ve picked your finish and you're ready to get started. Now for the most important part of the entire project: the prep work. Honestly, this is where most DIY jobs go wrong. Skimping here is a guaranteed way to get a disappointing result, so let’s talk about how to create the perfect canvas for your new floors.
This phase is about so much more than just dragging furniture out of the way. It’s about total containment. Even the best "dustless" sanding systems kick up an incredible amount of super-fine dust, and that stuff will travel everywhere if you let it.
Creating a Dust-Proof Bubble
Your first mission is to completely isolate the room you're working in. Trust me, fine wood dust can sneak through the tiniest cracks and settle on every single thing you own.
- Seal Doorways: Don't just hang plastic—use painter's tape to secure heavy-duty plastic sheeting over all doorways. You'll want to tape it on all four sides to create a real seal. If you need to get in and out, a "zip wall" system is a lifesaver.
- Cover Vents and Returns: This is non-negotiable. Shut down your HVAC system to stop dust from circulating through the whole house. Then, cover every supply and return air vent in the room with plastic and tape. This protects your furnace and keeps your air clean.
- Protect Fixtures: Dust settles on every horizontal surface. For instance, plastic-wrap your chandeliers and cover ceiling fan blades so you don't have a dust storm raining down on your fresh finish later.
A critical pro tip here: Use the blue painter's tape for all this. It seals well but comes off clean without ripping your paint or wallpaper. Using the wrong tape can create a whole new repair project you weren't planning on.
Preparing the Floor Surface Itself
Once the room is sealed, turn your attention to the floor. Before a sander ever touches it, the surface has to be perfectly clean and smooth. Any wax, grime, or debris left behind will clog up your sandpaper and can even contaminate the new finish.
Start with a really good vacuuming, using a brush attachment to get right into the corners and along the baseboards. If your floors have seen years of polish or wax, you’ll need to deal with that. A clean rag lightly dampened with mineral spirits is great for cutting through that old buildup.
Next, it’s time for some minor repairs. Walk every inch of the floor, looking for any nail heads that are sticking up. Use a nail set and a hammer to gently tap them about 1/8 inch below the surface. This little step saves your expensive sandpaper from getting shredded by a rogue nail.
If you have deeper gouges or cracks—say, from moving a heavy fridge—now's the time to fill them with a quality, stainable wood filler. A good trick is to overfill the spot just slightly, since the filler tends to shrink a bit as it dries. You’ll sand it perfectly flush with the rest of the floor during the main event.
Finally, deal with any old hardware. Pull out any remaining carpet staples with a good pair of pliers. Leaving just one behind can tear a huge gouge in your sander's drum, which is a costly mistake that will leave an uneven pattern across your floor. If you run into any tricky spots or just want advice, our team is always here to help at 720-327-1127.
Mastering the Sanding Process
Alright, with the room prepped and ready, it's time to dive into the most transformative part of the job: sanding. This is where the real magic happens, stripping away years of wear and tear to reveal the fresh, raw wood hiding underneath. Honestly, getting this step right is the key to a finish that looks like a pro did it.
To learn how to refinish hardwood floors the right way, you'll need to get comfortable with a couple of powerful machines. The main workhorse is the drum sander, a beast of a machine that handles the large, open areas. For the perimeter, corners, and tight spots where the big guy can't reach, you'll use a smaller tool called an edger.
The Sanding Sequence: A Grit-by-Grit Guide
Sanding isn't just a single pass. Think of it as a multi-stage process where you start with aggressive, coarse-grit sandpaper and work your way up to finer grits. Each new grit erases the scratches left by the previous one, eventually leaving you with a surface as smooth as glass.
- The First Pass (Coarse Grit): You’ll kick things off with a coarse grit, usually 36-grit sandpaper. This is the heavy-lifting phase. Its job is to power through the old finish, level out minor high spots, and sand away shallow scratches.
- The Intermediate Pass (Medium Grit): After that first cut, you’ll swap to a medium paper, like 60-grit. This pass smooths out the deeper scratches left by the 36-grit and continues refining the surface of the wood.
- The Final Pass (Fine Grit): Your last pass with the sander will be with a fine grit, typically 80-grit or 100-grit. This step is all about polishing the wood to a silky-smooth finish, getting it perfectly prepped for stain and sealer.
For a closer look at these techniques in action, check out the detailed tutorials on our YouTube channel. Sometimes, seeing how the machines move makes all the difference.
Pro Techniques for a Flawless Surface
Just running the sanders back and forth won't cut it. The real difference between a DIY job and a professional one is all in the technique. The number one rule? Always keep the sander moving whenever the sanding drum is touching the floor.
If you let a drum sander sit in one spot for even a split second, it will carve out a divot or a "stop mark" that’s incredibly difficult to fix. Think of it less like sanding and more like planing the wood—you want long, steady, and even passes. It’s always better to lift the drum off the floor as you come to a stop or change directions.
Another crucial tip is to overlap each pass by about one-third of the sander's width. So, if your sanding drum is 8 inches wide, your next pass should cover the previous one by about 2.5 to 3 inches. This ensures you get a beautifully blended surface without any visible lines between your passes.
The single most overlooked step by amateurs is cleaning up between grits. After each complete sanding pass, you MUST vacuum every square inch—the floor, the walls, the windowsills. Any leftover grit from a coarser paper will get dragged around by the finer grit, creating deep scratches that will stick out like a sore thumb in your final finish.
Edging and Blending for a Seamless Look
Once you’ve finished the main field of the floor with the drum sander, it’s time to tackle the perimeter with the edger. This machine is powerful and takes a careful hand to avoid creating a "picture frame" effect, where the edges look noticeably different from the center of the room.
The secret is to blend the edger's sanding pattern with the drum sander's. Use the exact same grit sequence on the edger as you did on the drum sander. As you work, try to feather your sanding marks into the main floor area to create a transition so smooth you can't see it. For those extra-tricky corners where the edger can’t reach, a detail sander or even some good old-fashioned hand sanding will be necessary.
If you’re here in the Denver area and find the sanding process is a bit more than you bargained for, don't sweat it. Our team is always here to offer expert advice or a professional quote. Just give us a call at 720-327-1127 to talk about your project.
Applying Stain and Finish Like a Pro
Alright, you've made it through the dust and noise of sanding. Your floor is now a perfectly smooth, raw canvas. This is where the real magic happens—the part where all that prep work pays off and you finally see the true character of the wood come roaring back to life.
Applying stain and finish is an art, but it’s one you can absolutely master. The goal is a stunning, professional-grade result, free of those pesky streaks, blotches, and lap marks that scream "DIY job."
Before you even think about opening that stain can, you have to test your color. I can't stress this enough. The sample chip on the can is just a suggestion; how it looks on your floor depends entirely on your specific wood species. Always try your top choices on a scrap piece of wood from the project or in a hidden spot like a closet. Let it dry completely before you commit.
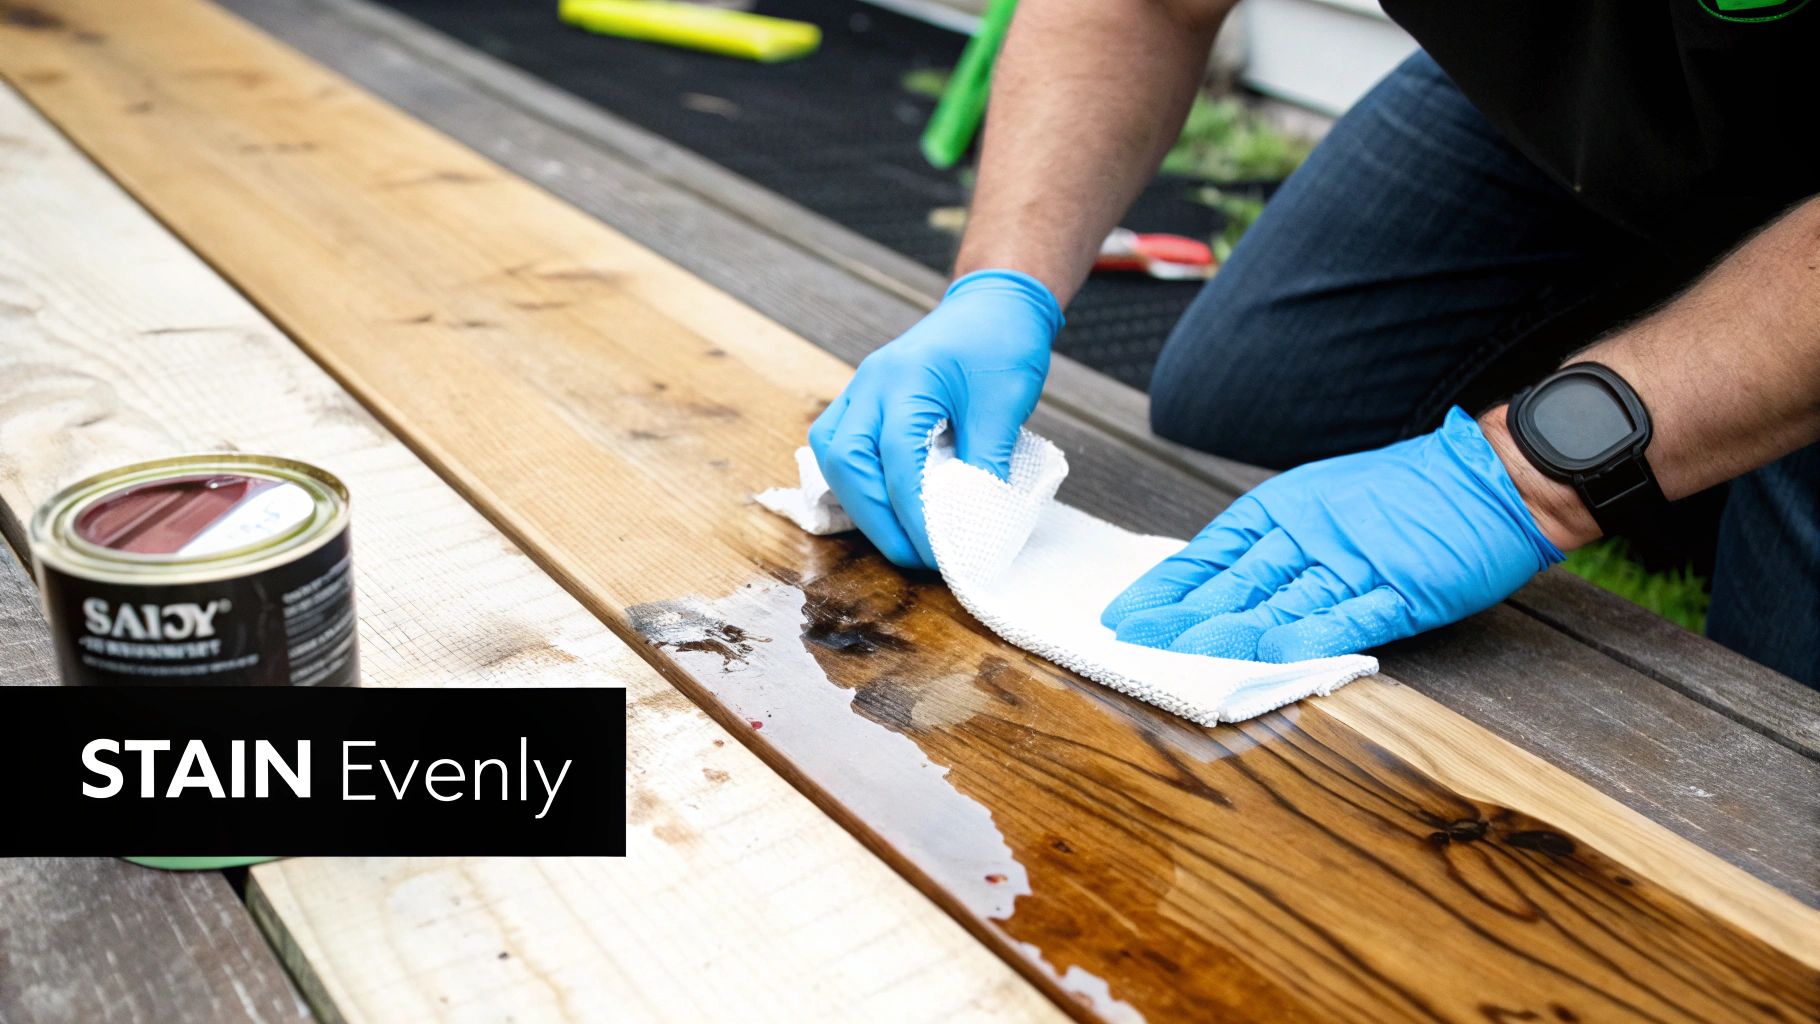
Mastering the Art of Staining
When it's time to apply, forget the brushes and rollers. Professionals almost always grab a clean, lint-free rag. Why? A rag gives you incredible control. You can work the stain right into the wood grain and wipe away the excess for a perfectly even, consistent color. This is the key to avoiding that blotchy look that happens when stain pools on the surface.
The secret to a flawless stain job is maintaining a “wet edge.” This just means you should always be applying new stain right next to a section that's still wet. If you let an edge dry and then stain next to it, you'll get a visible overlap line, or "lap mark," that’s impossible to hide.
To nail this technique:
- Work in small, manageable sections—think two to three boards wide.
- Run each section the full length of the room, from one wall all the way to the other.
- Always plan your exit so you're working your way out of the room, not into a corner.
Following this method ensures every board blends seamlessly into the next, creating a single, uniform color from wall to wall.
Choosing and Applying the Final Finish
The stain gives you the color, but the clear topcoat is your floor's armor. This is what shields the wood from scratches, spills, and everything else life throws at it. Your main choice here is between a traditional oil-based polyurethane or a modern water-based one. Each has its pros and cons, and knowing the difference is critical. We break it all down in our comprehensive guide to hardwood floor finishes.
This decision is more important than ever. The floor refinishing market is seeing a huge shift, with 62% of clients now asking for eco-friendly products and 48% prioritizing low-VOC finishes. It makes sense, especially when you consider that a good refinish can extend a floor’s life by up to 30 years. You can discover more insights about these market trends and see how the industry is adapting to smarter, more durable solutions.
Pro Tip: Whatever you do, don't shake the can of polyurethane! Shaking creates tiny air bubbles that will dry into rough little bumps all over your beautiful floor. Instead, gently stir it with a paint stick for at least two minutes to make sure everything is mixed properly.
For a silky-smooth application, use a high-quality T-bar or a synthetic pad applicator. Apply a thin, even coat, always moving with the grain of the wood. Most floors need two to three coats for proper protection. Between each coat, you'll need to lightly "abrade" the surface with a very fine-grit screen (around 220-grit). This knocks down any tiny dust particles and helps the next coat stick better. Just be sure to vacuum thoroughly after each screening.
If you run into any trouble or just want an expert opinion, our team is always here to help. For advice right here in the Denver area, give us a call at 720-327-1127. You can also watch us in action on our YouTube channel to see these techniques firsthand.
Budgeting Your Project and When to Call for Help

Alright, let's talk about the two biggest factors in any floor refinishing project: your money and your time. Getting a handle on the real costs is the first step in deciding whether this is a weekend warrior project or a job for the pros. Let's break down what you can actually expect to spend.
A Look at DIY Refinishing Costs
Doing it yourself seems like the obvious way to save a buck, right? While you do dodge the labor bill, the costs for gear rentals and materials can sneak up on you fast. You're on the hook for everything, from the heavy-duty sander down to the last roll of painter's tape.
Here’s a practical example of a budget for a standard 300 sq. ft. room:
- Drum Sander & Edger Rental: You're looking at about $100 – $150 per day. And trust me, you'll probably need it for at least two full days.
- Sandpaper (Multiple Grits): Plan on spending around $75 – $100. This is not the place to cheap out; good sandpaper makes a world of difference.
- Stain & Finish: This can swing anywhere from $150 to $300, depending on if you go with a basic oil-based poly or a premium water-based finish.
- Applicators & Supplies: Think brushes, rollers, rags, tape, and plastic sheeting. This will add another $50 – $75 to your tab.
So, your DIY total for a single room is likely to land somewhere between $475 and $775. But that number doesn't include your most valuable resource: your time. A project this size will eat up an entire weekend, and that's if everything goes smoothly.
The biggest hidden cost of DIY is a mistake. One wrong move with a drum sander can leave a deep gouge that costs hundreds, if not thousands, to fix. A botched stain job often means calling a professional to come in and start the whole process over from scratch.
Understanding Professional Refinishing Costs
Hiring a professional might look more expensive on paper, but what you're really paying for is peace of mind. You get a predictable cost, a much faster turnaround, and a result that's guaranteed to look great.
So, how does it all stack up? Here’s a side-by-side look at what you can expect for a typical 300 sq. ft. room.
DIY vs. Professional Refinishing Cost and Time Breakdown
| Factor | DIY Project | Professional Service |
|---|---|---|
| Material & Rental Costs | $475 – $775 (sanders, sandpaper, finish, supplies) | Included in the total price |
| Time Investment | 2-4 days (shopping, prep, sanding, staining, finishing) | 1-2 days (team works efficiently) |
| Risk Factor | High (sanding mistakes, uneven finish, dust) | Low (insured, experienced, guaranteed results) |
| Equipment Quality | Rental-grade equipment | Professional dustless sanding systems |
| Final Outcome | Varies based on skill | Consistent, high-quality, professional finish |
While a DIY job has its appeal, hiring a pro eliminates the guesswork and the risk of costly errors. For a no-pressure quote so you can compare a real professional estimate against your DIY budget, call us at 720-327-1127.
When to Put Down the Tools and Call an Expert
Being a savvy homeowner means knowing your limits. While many DIY projects turn out great, some situations are just begging for a professional touch.
It’s time to call for help if you run into any of these scenarios:
- Major Water Damage: If you see deep, black stains or boards that are cupped and warped, you need specialized equipment to get them flat again without destroying the wood.
- Previously Sanded Floors: Hardwood only has so much life in it. If your floors have been refinished multiple times, the wood might be too thin for another aggressive sanding. A pro can measure the thickness to see if it’s even possible.
- Tricky Wood Species: Woods like maple, birch, or exotic species like Brazilian cherry are notoriously difficult to stain evenly. They often require specific conditioners and techniques to avoid a blotchy, amateur-looking finish.
- Structural Repairs Are Needed: Loose boards, big gaps, or subfloor problems have to be fixed before you even think about sanding. This is carpenter-level work that needs to be done right.
Ultimately, the choice comes down to balancing your budget against the job's complexity and what your time is worth. For a more detailed breakdown, check out our guide on hardwood floor refinishing DIY vs professional service, where we explore the pros and cons even further.
Got Questions? We’ve Got Answers.
Even after walking through the whole process, it’s totally normal to have a few questions rattling around. Refinishing your floors is a big deal, and feeling confident means getting straight answers. Let's tackle some of the most common things we hear from homeowners just like you.
How Long Does This Really Take?
This is always the first question, and the answer isn't just about the hands-on work. For a standard 300 sq. ft. room, you’ll want to block off about 4 to 5 days for the actual job. Day one is all about prep. Day two is for the heavy lifting—the sanding. Day three is for stain and the first coat of finish, with the final coats going down on days four and five.
But the real test of patience? The curing process. Your floors might feel dry enough to walk on with socks in 24 to 48 hours, but that finish is a long way from being fully hardened. It needs anywhere from 7 to 30 days to completely cure. Rushing this is a recipe for heartache.
We once had a client move their heavy sofa back after just three days. The legs left permanent dents in the still-soft finish. Trust us, patience during the cure time is non-negotiable.
Can I Actually Change the Color of My Floors?
Absolutely! This is honestly one of the best parts of a full sand-and-refinish project. Once the old finish and stain are sanded away, you're left with a clean slate of raw, beautiful wood. It’s your chance to completely transform the vibe of your home.
You can go in any direction you want:
- Pick a light, natural stain to make the room feel bright and airy.
- Go for a deep espresso or Jacobean for a sophisticated, dramatic look.
- Try a trendy gray wash for a more contemporary feel.
The one step you can't skip is testing your stain. Always try it out in a closet or on a spare piece of wood first. The final color is a mix of the stain itself and the natural undertones of your specific wood species. Skipping this test can lead to some pretty big surprises.
What Are the Biggest DIY Mistakes to Avoid?
Over the years, we've seen it all. A few common slip-ups can turn a promising DIY job into a major headache. Knowing what they are ahead of time is half the battle.
Here are the most frequent missteps we see:
- Uneven Sanding: This is a classic. Someone leaves the big drum sander in one spot just a hair too long, creating dips and waves. You won't see them on the raw wood, but once you apply stain, the color will pool in those low spots and scream for attention.
- Leaving Dust Behind: We can't say this enough: be obsessive about cleanup. Even a tiny bit of dust left on the floor will get trapped in the finish, leaving you with a gritty, rough texture that you can't fix without starting over.
- Rushing the Dry Time: Slapping on another coat of finish before the last one is properly dry is a critical error. It traps solvents, resulting in a soft, gummy finish that will scratch and scuff if you so much as look at it wrong.
- Creating Lap Marks: This happens when you don't maintain a "wet edge" while applying stain or finish. You'll end up with visible overlap lines where one section started to dry before you blended in the next.
Can My Engineered Hardwood Be Refinished?
The answer here is a firm "it depends." Unlike solid wood, engineered floors have a top layer of real hardwood called the veneer. How thick that veneer is makes all the difference.
If your floors have a beefy veneer—think 3mm or more—you can probably get away with a careful sanding, maybe once or twice in its lifespan. The problem is, a lot of newer engineered flooring comes with a paper-thin veneer (less than 2mm) that just can't be sanded. If you try, you'll chew right through it to the plywood core and ruin the plank for good.
If you're not sure how thick your veneer is, the safest move is to call in a pro. We can take a quick look and tell you what your options are. Just give us a call at 720-327-1127 for a quick chat.
Ready to get those floors looking brand new but want an expert to handle it? The team at J.R. Hardwood Floor Refinishing & Cleaning is here for you. For a free, no-pressure quote and some professional advice tailored to your home, check us out at https://jrhardwoodfloorrefinishingandcleaning.com.
Article created using Outrank