 Skip to content
Refinishing your hardwood floors without sanding is a fantastic way to bring back their original shine and add a fresh layer of protection against daily life. This process, often called a screen and recoat or chemical abrasion, lets you skip the massive disruption and dust storm of a full sand-down. Instead, we lightly scuff the existing topcoat and apply a new, durable finish.
Deciding if No-Sand Refinishing Is Right for You
Before you get too excited, let's make sure your floors are a good fit for this method. This is hands-down the most critical step. Getting it wrong means you could end up with a peeling finish, wasted money, and a bigger headache than when you started.
A no-sand refinish is perfect for floors with surface-level wear—think of it like a new clear coat on a car. It addresses light scratches, dullness, and minor scuffs that are only in the top protective layer.
But, it's not a miracle cure. If the damage has gone past the finish and into the wood itself, this approach just won't cut it. Deep gouges, dark pet stains that have soaked into the wood grain, or spots where the finish is completely gone, exposing bare wood, all need a full sand and refinish to be fixed properly.
What to Look For: A Quick Floor Inspection
Grab a good light and get down on your hands and knees. A close look will tell you everything you need to know.
Here are the main things to check for:
- Surface Scratches: These are the fine, whitish lines you can see but can't really feel with your fingernail. They're usually from pet claws, shoes, or furniture being scooted around. If this is your main issue, you're in luck—this is exactly what a no-sand solution is for.
- Deep Gouges: Can you catch your fingernail in the scratch? That's a tell-tale sign it's too deep. A classic example is the damage left from dragging a heavy refrigerator across the floor. These need sanding to be erased.
- Existing Finish Integrity: Some older floors were maintained with wax or oily polishes like Murphy Oil Soap. Modern polyurethane finishes absolutely will not stick to these surfaces and will eventually peel right off. If you suspect your floor has wax on it, a no-sand method is off the table until that wax is professionally stripped away.
- Water Damage: See any dark gray or black stains? That means water has gotten into the wood fibers, and a simple recoat can't fix that discoloration. For example, a stain from a potted plant that leaked over time will require sanding to remove.
This decision tree gives you a quick visual to help you figure out the best path forward for your floors.
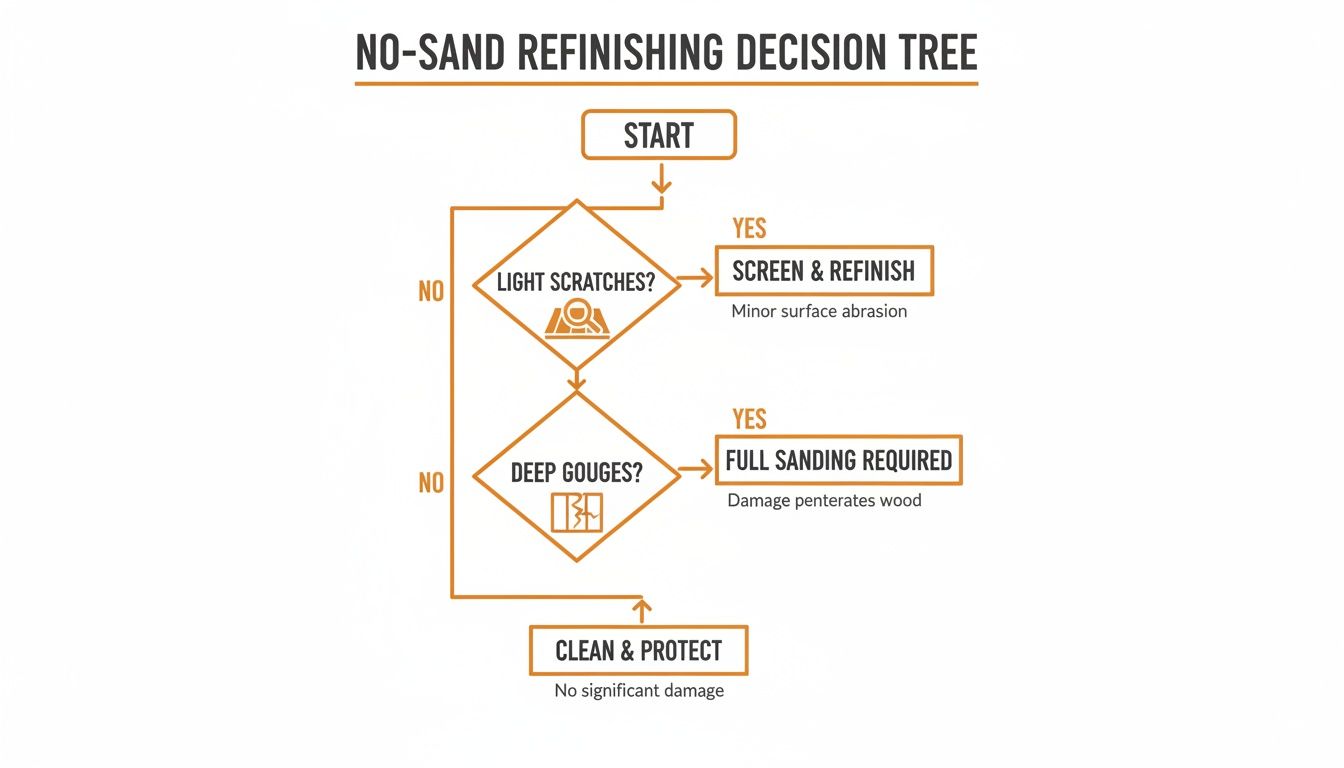
As the chart shows, minor cosmetic issues are a perfect match for no-sand methods. But once you get into significant damage, you have to bring in the sander.
Sanding vs. No-Sand Refinishing: Which Method Suits Your Floor?
Still on the fence? This quick comparison should help you decide if a no-sand approach is the right call for your floor's current condition.
| Floor Condition | Recommended Method | Why |
|---|---|---|
| Dull Finish & Light Scratches | No-Sand (Screen & Recoat) | The damage is only on the surface layer. A light buff and new topcoat will restore the shine and protection. |
| Deep Gouges & Dents | Full Sanding | The damage goes into the wood itself. Sanding is required to level the surface and remove the imperfections. |
| Exposed Bare Wood | Full Sanding | The protective finish is gone. A new finish won't bond properly without sanding the entire area first. |
| Dark Stains (Water/Pet) | Full Sanding | The stain has penetrated the wood fibers. A simple recoat will not hide or remove these deep-set stains. |
| Changing the Floor Color | Full Sanding | To change the color, you must sand down to bare wood to apply a new stain evenly. |
| Wax or Oily Residue | Full Sanding | A new finish won't adhere to wax. The floor must be sanded to remove the contaminant completely. |
Ultimately, a no-sand refinish is a maintenance step, not a complete restoration. It’s meant to extend the life of a floor that's in pretty good shape.
Simple On-the-Spot Tests
You don't need fancy tools to test your floor. A few drops of water can tell you a lot.
Just place a small bead of water on a high-traffic area.
- If the water beads up and sits on top, your finish is still doing its job. You're likely a great candidate for a screen and recoat.
- If the water slowly soaks in and darkens the wood a bit, the finish is getting thin, but you might still be able to save it with a recoat.
- If the water immediately soaks in and leaves a dark spot, the finish is gone. Sanding is your only option.
While no-sand options are popular for their convenience, the pros agree they're best for floors with only light wear. As the experts at This Old House explain, when you have deep damage or want to change the color, sanding down to bare wood is the only way to go.
Expert Takeaway: Think of a no-sand refinish as a maintenance procedure, not a restorative one. It’s designed to protect and beautify a floor that is structurally sound but just looks a little tired. When in doubt, a professional opinion is always your best bet.
For a personalized assessment of your floors, our team is here to help. Give us a call at 720-327-1127 for a free consultation. And for more visual guides and project examples, subscribe to our YouTube channel. We share detailed videos showcasing real transformations.
Choosing the Right No-Sand Refinishing Method
Alright, so you've checked your floors and they're a solid candidate for a sandless refresh. Perfect! Now comes the fun part: picking your game plan. Not all no-sand methods are created equal, and choosing the right one really boils down to your budget, your timeline, and just how much chaos your floors see on a daily basis.
You've basically got two main paths to choose from: the professional-grade Screen and Recoat method or the more DIY-friendly Chemical Abrasion Kits.
Making the right call here is the difference between a finish that looks great for years and one that starts peeling or scuffing within a few months. Let's break down what each one involves and figure out which is the perfect fit for your home.
The Professional's Choice: Screen and Recoat
Ask any seasoned flooring pro, and they'll tell you the screen and recoat (sometimes called a "buff and coat") is the gold standard for a reason. This isn't just slapping on a new coat of finish; it's a methodical process that guarantees a lasting bond.
We use a large floor buffer, but instead of a polishing pad, we fit it with a mildly abrasive screen. This machine lightly scuffs, or "screens," the entire surface of your existing polyurethane. Think of it like giving the floor a light exfoliation.
This light abrasion creates millions of microscopic scratches that give the new topcoat of polyurethane something to physically grip onto. It’s the same principle as lightly sanding a piece of wood before you paint it—you need that texture for the new layer to lock in place and not peel off later.
Because it creates such a strong mechanical bond, this is the method we almost always recommend for the busiest parts of a house—kitchens, hallways, and family rooms, especially if you have kids or pets. While you can rent a buffer and try this yourself, those machines can be tricky to handle. Without experience, it's easy to leave swirl marks or create an uneven surface. For that reason, it's often best left to the pros.
A screen and recoat is the perfect solution for a landlord who needs a bulletproof finish for a rental property or a homeowner wanting to restore serious protection to their main living space for another 5-7 years.
Expert Insight: The magic of a screen and recoat is all in the bond. By physically abrading the old finish, you're creating the perfect canvas for a new polyurethane topcoat to lock into. It provides a level of durability that chemical methods just can't match in high-traffic areas.
The DIY-Friendly Option: Chemical Abrasion Kits
If you're looking for a weekend project and the idea of wrestling with a heavy floor buffer sounds like a nightmare, chemical abrasion kits are an excellent alternative. You'll often see these marketed as "no-sanding" or "sandless" refinishing systems in big-box stores.
Instead of a buffer, these kits rely on a liquid de-glosser or chemical etcher. You simply apply the solution to the floor, and it works to soften and chemically etch the old finish. This creates a slightly tacky, receptive surface that allows the new polyurethane coat to form a chemical bond.
These kits are way more user-friendly and don't require renting heavy machinery. For instance, if you're looking to quickly freshen up a guest bedroom that doesn't see much foot traffic, you could easily knock out the project in a single weekend with one of these kits. The result is a fresh, shiny floor without the steep learning curve of a buffer.
But here's the trade-off: the chemical bond is generally not as tough as the mechanical bond you get from a screen and recoat. That's why we typically steer people away from these kits for high-traffic areas that take a daily beating.
Curious about the pro-level approach? You can learn more about how to revive your floors in just one day using the sandless screen and recoat secret in our detailed guide.
Comparing Your Options Head-to-Head
To make the decision a little easier, here's a simple breakdown of how these two popular methods stack up.
| Feature | Screen and Recoat | Chemical Abrasion Kit |
|---|---|---|
| Best For | High-traffic areas, maximum durability | Low-traffic rooms, quick DIY projects |
| Effort Level | Moderate to High (pro-recommended) | Low to Moderate (DIY-friendly) |
| Equipment | Floor buffer, abrasive screens | Mop, application pads, de-glosser |
| Durability | Excellent (5-7 years) | Good (2-4 years) |
| Typical User | Landlords, homeowners with busy households | DIY enthusiasts, weekend warriors |
Sandless refinishing methods have become popular because they're fast and affordable compared to a full sand-down. These techniques, which essentially involve a light abrasion and a new polyurethane topcoat, can often be done in a single day. The cost for a professional screen and recoat typically lands between $1.50 and $4.00 per square foot, making it a really accessible option for most homeowners.
If you're still on the fence about which method is right for your floors or you'd just rather have a professional handle it, our team is here to help. Give us a call at 720-327-1127 for a personalized quote. You can also see the incredible results of our screen and recoat projects on our YouTube channel.
Gathering Your Tools and Preparing the Space
Let’s get one thing straight: proper prep is 90% of the job when refinishing floors without sanding. I can't stress this enough. Every shortcut you take here will show up later as peeling, bubbling, or a cloudy finish that just looks… off.
Think of your floor like a painter’s canvas. You wouldn't paint over a dirty, greasy surface and expect a masterpiece, right? Same principle applies here. Success starts with having every single thing you need within arm's reach before you even crack open a can of finish. Scrambling for a tool mid-project is a recipe for disaster.
Your Essential Supply Checklist
Putting together your toolkit isn't just about grabbing items off a list; it's about understanding why each one matters. A cheap, flimsy painter's tape will bleed and leave you with a messy cleanup job on your baseboards. The right vacuum attachment will stop tiny bits of grit from ruining your perfectly smooth finish.
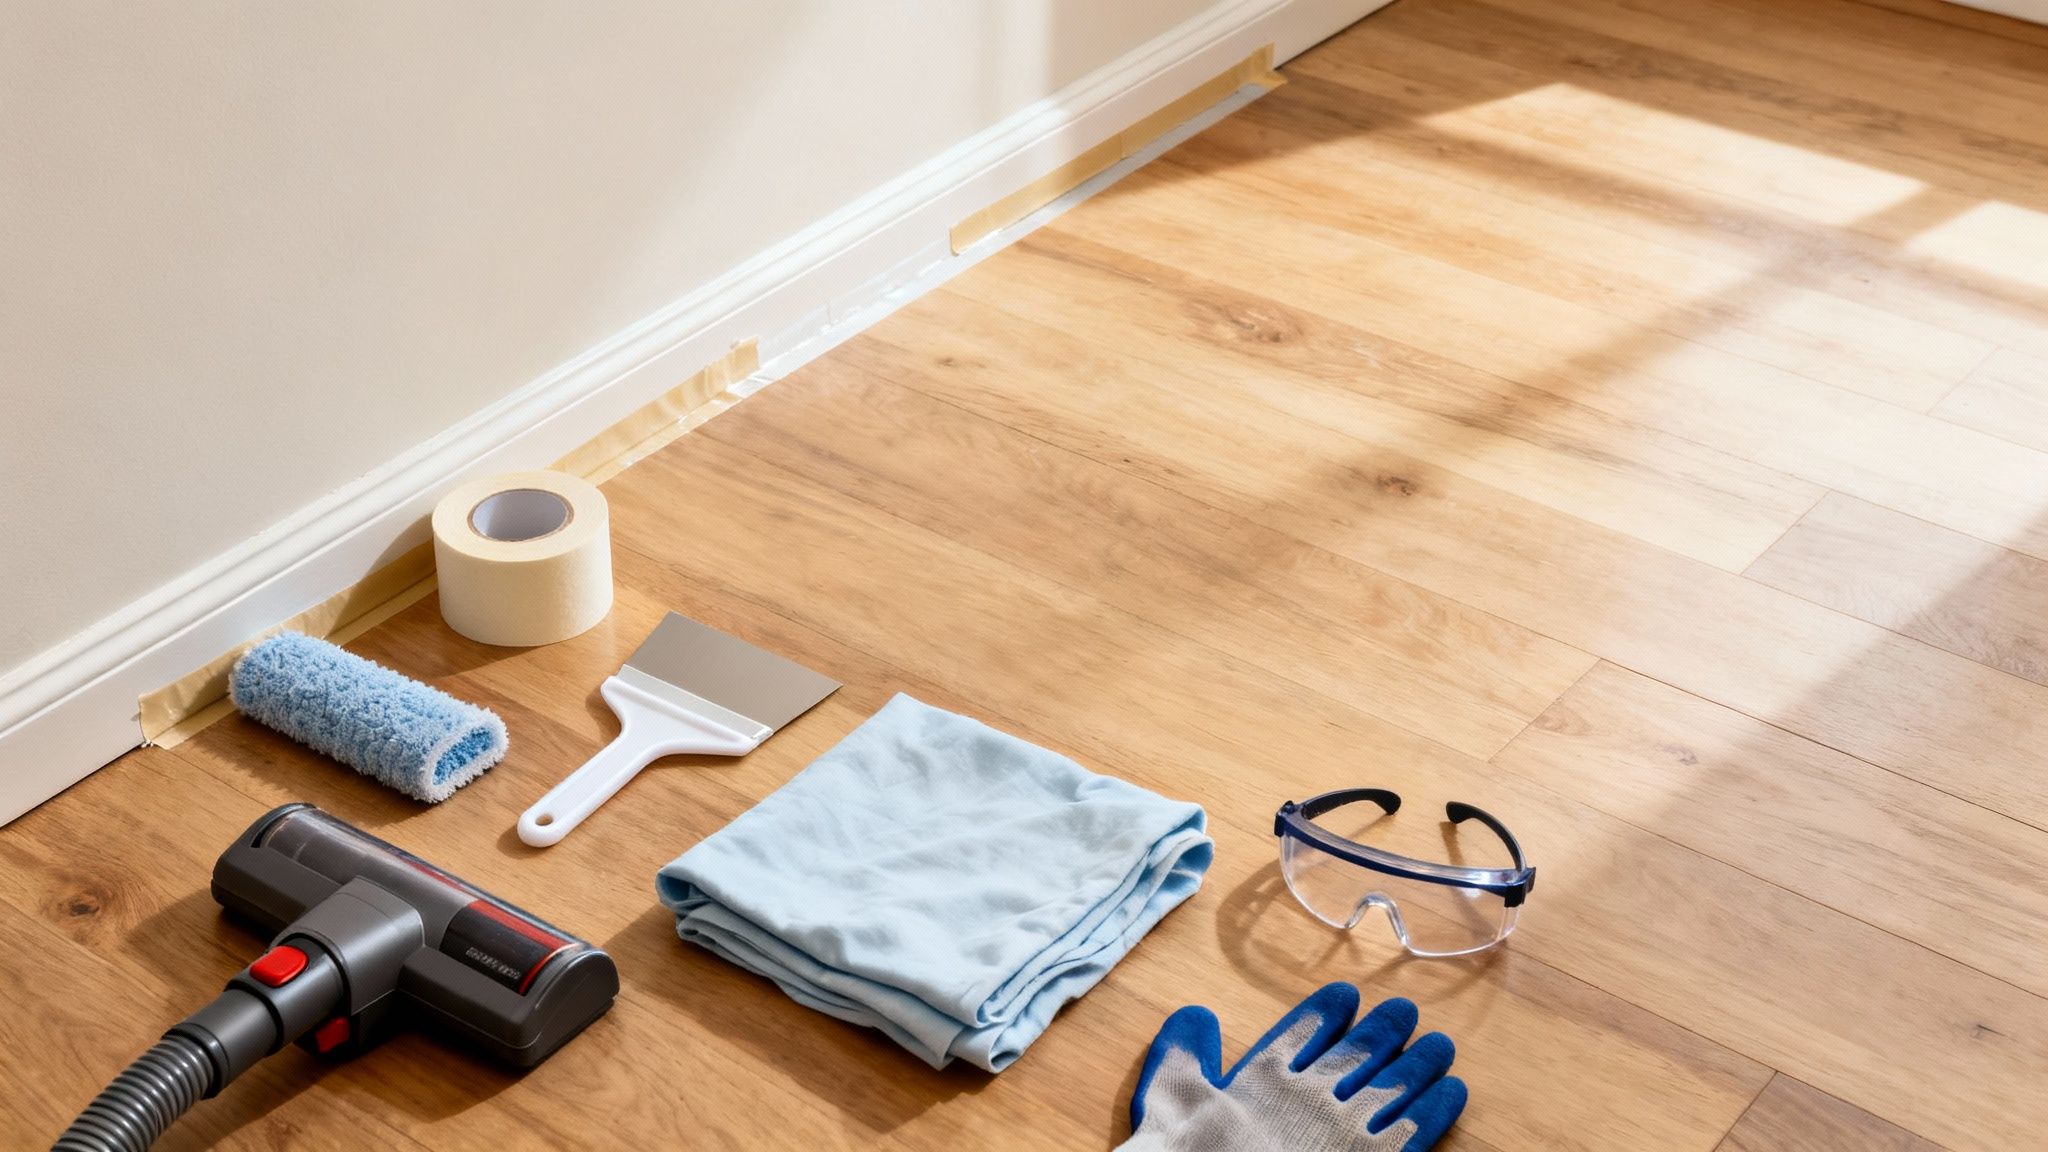
Here’s the gear you'll need and why it's non-negotiable:
- High-Quality Painter's Tape: Go for a brand known for sharp, clean lines, like FrogTape or 3M Blue. This is what separates a pro-looking job from an amateur one. You’ll use it to protect baseboards and any transitions to other flooring.
- Hardwood Floor Cleaner: You need a pH-neutral cleaner made specifically for hardwood. Stay far away from products promising oils, waxes, or "shine enhancers"—they leave a residue that will absolutely sabotage the new finish.
- Microfiber Mop and Pads: Grab one for cleaning and have a separate, brand-new one ready for applying the finish (if your chosen method requires it). Microfiber is a magnet for dust and debris in a way old-school mops just aren't.
- Vacuum with a Hard Floor Attachment: Your vacuum’s beater bar is the enemy; it can easily scratch your floor. Use a soft-bristle attachment designed for hard surfaces to get everything up safely.
- Plastic Putty Knife: Perfect for gently scraping up any of that stubborn, stuck-on gunk without gouging the wood.
- Protective Gear: Don't even think about skipping this. You'll want nitrile gloves to protect your hands, safety glasses, and a respirator with organic vapor cartridges. This is especially critical if you're working with chemical de-glossers.
Pro Tip: I always keep a stack of extra microfiber cloths on hand. They’re lifesavers for wiping up small drips, cleaning tools, and doing one final dust check right before you lay down that first coat of finish.
Clearing and Cleaning the Room
Once your tools are lined up, it's time to prep the room itself. The goal here is simple: create a clean, controlled environment where your new finish can be applied flawlessly and cure without anything messing it up.
First things first: remove every single item from the room. I mean everything—furniture, rugs, curtains, and even pictures on the wall. Dust loves to fall from these items and land right in your wet finish. An empty room is the only way to guarantee a clean result.
Next up is a deep, thorough clean. This isn't your average weekly sweep. You need to get rid of every last trace of dirt, oil, and grime. Start by vacuuming the entire floor, getting deep into the corners and along the edges where dust bunnies love to congregate.
After you've vacuumed, it's time for a wet clean. Using your hardwood-specific cleaner and a microfiber mop, clean the floor meticulously. If you hit a stubborn spot, use that plastic putty knife to gently lift the grime.
Now, a critical warning: if you even suspect your floors have ever been waxed, you have to deal with that first. A new finish applied over wax will fail 100% of the time. For a complete guide, check out our post on how to tackle hardwood floor wax removal like a pro.
Finally, get the room ventilated by opening windows and using fans, but be strategic. Point the fans so they blow air out of the room. You want to pull fumes away, not kick up a dust storm.
Feeling a bit overwhelmed by the prep? It’s the most common hurdle. If you want to make sure it's done right, don't hesitate to call in the experts. Our team at 720-327-1127 can handle the prep work to guarantee a flawless finish. You can also see more of our projects over on our YouTube Channel.
Applying Your New Finish Like a Pro
Alright, you've done the hard prep work, and now comes the most satisfying part of the job—laying down that fresh, new finish. This is where all that cleaning and prep pays off and your floors truly start to transform. Whether you went with a chemical kit or the screen and recoat method, the rules of application are the same: be methodical, apply thin coats, and always maintain a wet edge.
Rushing this stage is a one-way ticket to streaks, bubbles, or an uneven sheen. We're going to walk through the exact techniques we pros use to get a flawless, durable surface that looks like a million bucks. This is the final step in learning how to refinish hardwood floors without sanding, so let's make it count.
And hey, if you're a visual learner, be sure to subscribe to our YouTube channel. We post tons of project walkthroughs that bring these techniques to life.
The Initial Abrasion Step
Before you can even think about applying a new finish, you have to give it something to stick to. This is the abrasion stage, and it’s the secret sauce that makes a no-sand refinish possible.
If you’re using a chemical abrasion kit, this step involves a liquid de-glosser. You’ll spread this solution evenly across the floor with a mop or an applicator pad, following the product's instructions to the letter. This chemical brew ever-so-slightly etches the existing polyurethane, creating a perfectly prepared surface for the new finish to grab onto. Don't get impatient here—let it work for the recommended time, or you'll be dealing with peeling later.
For a screen and recoat, this is where the floor buffer gets its moment to shine. Using a mildly abrasive screen, you'll systematically buff the entire floor. This lightly scuffs up the old finish, creating a fine, uniform texture for the new polyurethane to grip. When you’re done, the floor should have a consistent, hazy look with zero shiny spots left.
Expert Takeaway: No matter which method you choose, the goal is the same: get rid of the gloss from the old finish. Any shiny patches are red flags indicating areas where the new coat won't adhere properly, leading to peeling down the road. Double-check your work in good lighting before you move on.
Applying Thin and Even Coats
The single biggest mistake we see DIYers make is globbing on the finish too thickly. It’s a common myth that a heavier coat means better protection, but it’s actually the opposite. A thick coat struggles to cure correctly, leaving you with a soft, tacky surface that’s a magnet for dust and dents.
The real key is applying multiple thin, even coats. This approach lets each layer dry and cure perfectly, building up a hard, durable shield that looks crystal clear.
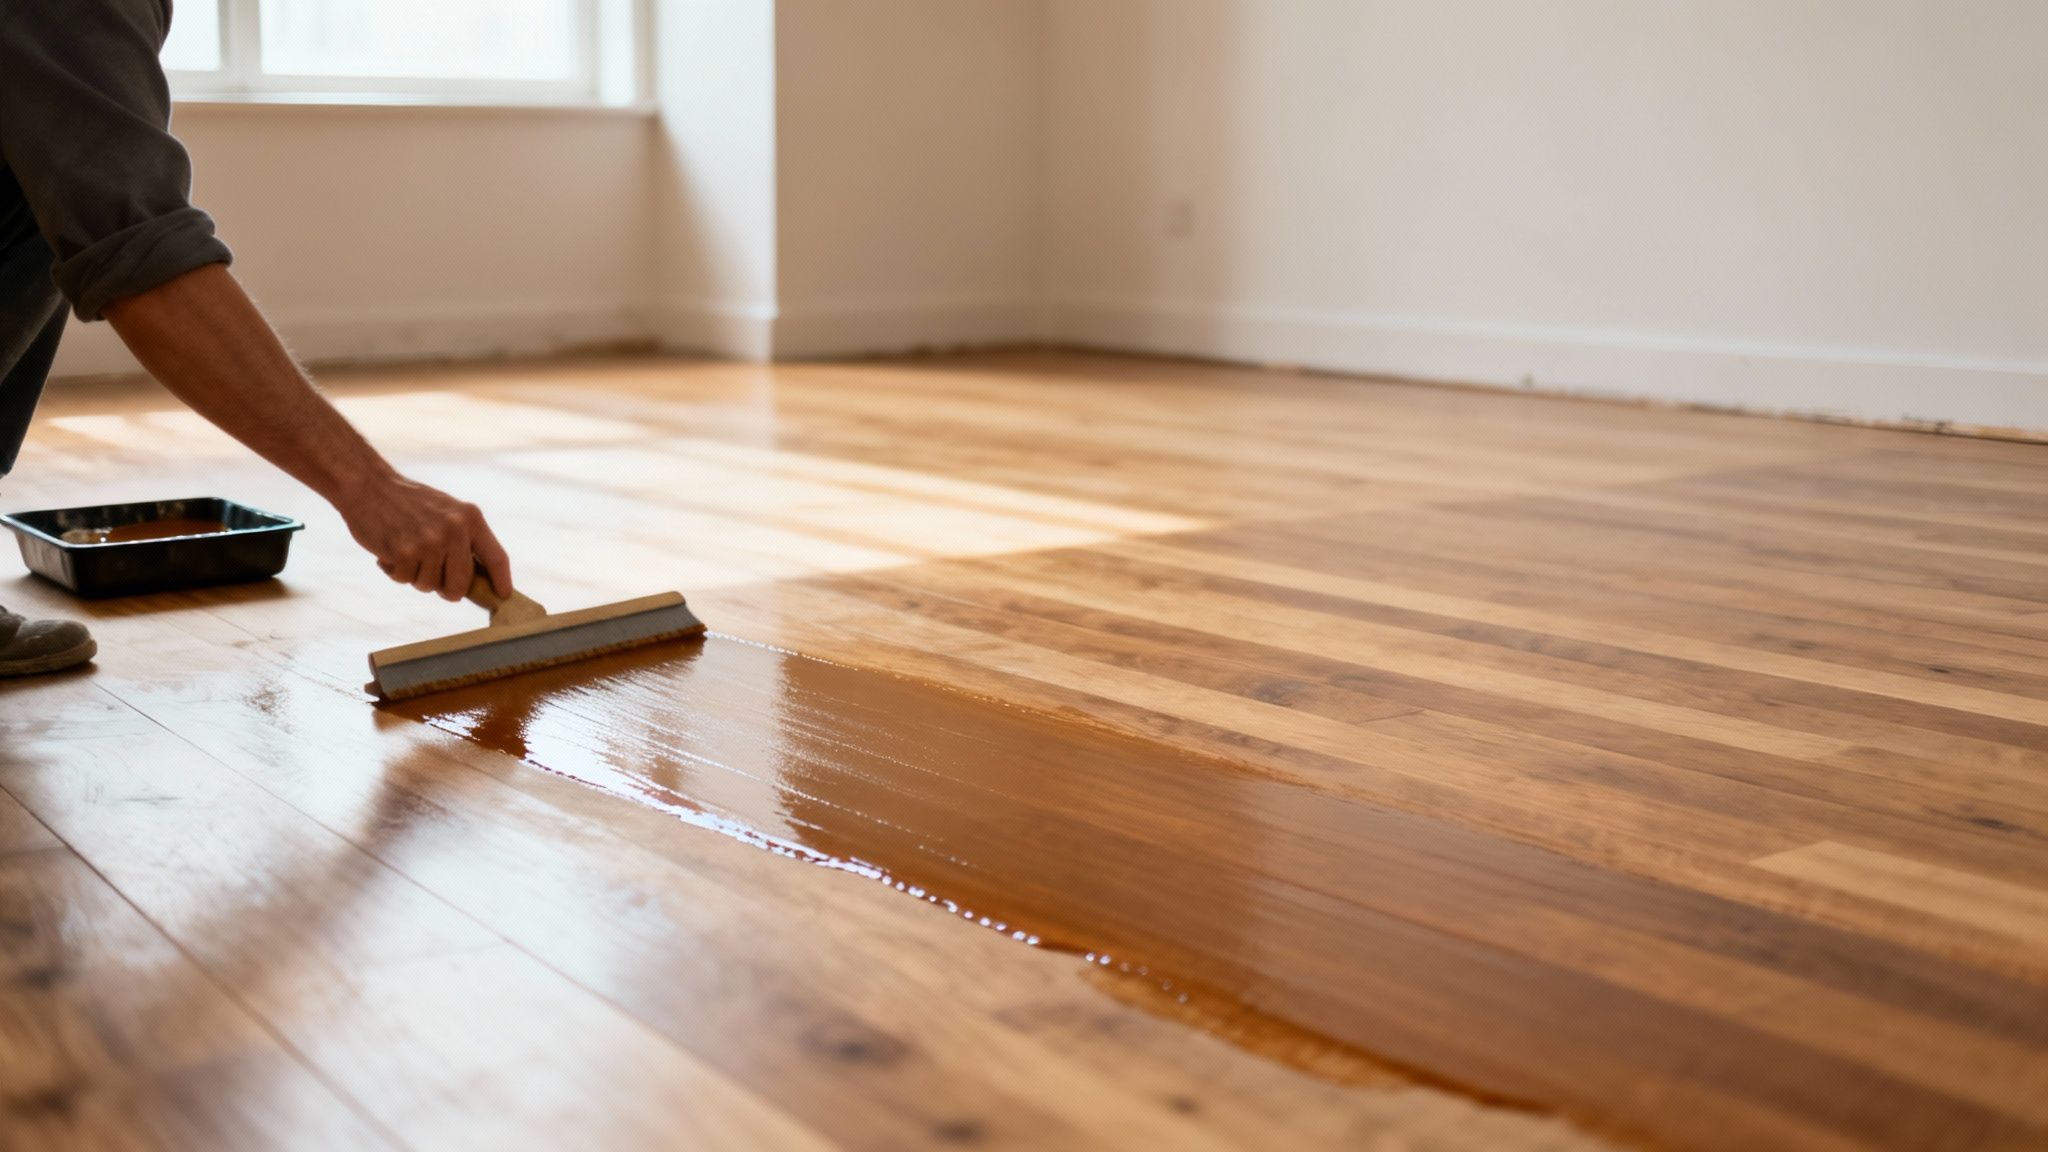
- Start in a Corner: Always begin in the corner farthest from your exit. The goal is to paint yourself out of the room, not into a corner.
- Pour, Don't Dump: Pour a manageable S-shaped line of finish on the floor. A small, controlled puddle is way easier to work with than a giant one.
- Spread Evenly: Grab a high-quality applicator (a T-bar or microfiber pad is perfect) and smoothly spread the finish, always going with the grain of the wood. Use long, consistent strokes.
A good rule of thumb? If the finish looks milky or cloudy as you're applying it, you’re putting it on too thick. It should go on clear and level itself out almost immediately.
Maintaining a Wet Edge
Ever seen a floor with ugly, obvious lines where one section stops and another begins? Those are called lap marks. They happen when you let the edge of your finish start to dry before blending in the next section.
To avoid this amateur mistake, you have to maintain a "wet edge." It’s a simple concept: the edge of the area you just coated must stay wet until you apply the adjoining section. This allows the two areas to flow together seamlessly into one uniform surface.
Work in manageable sections, about 3-4 feet wide, running the full length of the room. Apply finish to one section, then immediately move to the next, overlapping your strokes by a few inches into the previous wet area. This little trick is what separates a professional-looking job from a DIY disaster.
If you're feeling a bit overwhelmed by the application process, our team is always here to help. A professional application guarantees a perfect result without the stress. Give us a call at 720-327-1127 for a free, no-obligation quote.
Curing and Maintaining Your Refreshed Floors
The final coat is down, and your floors look incredible. It’s so tempting to think the job is done, but the next few days are actually the most critical. This is the curing phase, and your patience here will directly translate into how long that beautiful finish lasts.
There's a huge difference between a floor that’s dry to the touch and one that is fully cured. A dry floor can usually handle light sock traffic after about 24 hours, but the finish is still soft and incredibly vulnerable underneath. Full curing is the chemical process where the finish hardens completely, reaching its maximum strength. This can take anywhere from 3 to 7 days, depending on the product you used, the temperature, and the humidity in your home.
The Curing Timeline: What to Expect
Rushing to move your furniture back is the number one reason we see premature scratches and scuffs on a freshly coated floor. Just think of the new finish like freshly poured concrete—it needs time to set up and get strong.
Here’s a safe, realistic timeline to follow:
- 24-48 Hours Post-Application: You can typically walk on the floors with socks only. No shoes, no pets, no exceptions. The finish is still soft enough that a single piece of grit stuck to a shoe can leave a permanent mark.
- 72 Hours (3 Days): Now you can start carefully returning light furniture. The key here is to lift and place every single item. Never, ever drag or slide anything across that new finish.
- 7 Days: Your floor is now considered fully cured. You can bring back area rugs and get back to normal life. But before any furniture touches the floor, make sure you’ve installed new, clean felt protector pads on every leg. Seriously.
This is also a great time to think about your long-term maintenance routine. Consistent, smart care is what keeps a no-sand refinish looking its best. For instance, understanding when and why to buff your hardwood floors can be a game-changer for extending the life of your finish between recoats.
Long-Term Care and Protection
You've put in all this work, so protecting that investment is all about smart, consistent habits. The right cleaning routine and a few preventative measures will keep your floors looking pristine.
Cleaning Done Right
First things first: ditch the all-purpose cleaners, oil soaps, and vinegar solutions. These products are notorious for leaving a dulling film or, worse, stripping away the very finish you just applied. Stick to a pH-neutral cleaner made specifically for hardwood floors. A microfiber mop is your best friend here, as it traps dust and dirt without scratching the surface.
Expert Insight: For day-to-day cleaning, a simple dust mop or a vacuum with a soft-bristle head is all you need. Less is more with cleaning products; you only really need to damp-mop high-traffic areas weekly or bi-weekly.
Preventative Maintenance Tips
Being proactive is your best defense against wear and tear.
- Use Area Rugs: Place them strategically in high-traffic zones like entryways, hallways, and in front of the kitchen sink.
- Felt Pads are a Must: We said it before, but it's worth repeating. Every single piece of furniture, from a massive sofa to a tiny side table, needs felt pads.
- Wipe Spills Immediately: Don't let liquids sit. Even a simple water spill can seep into the finish and cause damage if left unattended.
Ultimately, opting for a no-sand method is a much cleaner and faster experience. The traditional sanding approach produces a ton of dust, while modern dustless refinishing techniques can achieve up to 99% dust reduction. This cleaner process shortens project timelines, allowing homeowners to get back to using their floors much sooner.
For questions about your specific floor's maintenance or to schedule a professional cleaning, call our team at 720-327-1127.
Got Questions About No-Sand Refinishing? We've Got Answers.
Even after walking through all the steps, I know you probably have a few specific questions buzzing around. Diving into a floor project for the first time can feel a little intimidating, so I've gathered the most common queries we get from homeowners just like you.
Think of this as your final gut-check before you roll up your sleeves.
And hey, if your question isn't on this list, just give our team a ring. You can reach one of our floor experts directly at 720-327-1127 for some real-world advice tailored to your home.
How Long Does a No-Sand Refinish Actually Last?
This is the big one, right? A professionally done no-sand finish, like a screen and recoat, should give you a solid 3 to 7 years of good looks and protection. The exact lifespan really boils down to a couple of key things.
The biggest variable is always foot traffic. A busy hallway that sees kids, pets, and muddy boots is naturally going to show wear faster than a quiet guest room. Your daily maintenance routine also plays a huge part in how long that finish holds up.
To get the most mileage out of your refreshed floors, just follow these simple rules:
- Clean smart: Always use a pH-neutral cleaner made specifically for hardwood floors. No vinegar, no oil soap!
- Pad your furniture: Stick high-quality felt pads under every single chair leg, table leg, and sofa foot. No exceptions.
- Trap the grit: Use doormats at every entrance and consider area rugs in high-traffic zones to catch the dirt before it can scratch the finish.
Remember, a no-sand refinish is all about restoring the floor's protective shield, not performing deep surgery. A little consistent care is the absolute best way to keep it looking fantastic for years.
Can I Change My Floor Color Without Sanding?
I hear this all the time, and I'll give you the straight answer: no, it's not possible to change the stain color of your floor using a sandless method.
These techniques work by scuffing up and bonding to the existing topcoat of polyurethane—not the wood itself. The process applies a new clear protective layer right over what you already have.
Key Takeaway: If you're dreaming of turning those light oak floors into a rich, dark espresso, you'll have to go the full sanding route. That's the only way to strip the floor down to bare wood, remove the old color, and apply a new stain evenly.
What Are the Biggest Mistakes People Make?
After years in this business, I've seen a few common missteps that can completely derail a project. Sidestepping these pitfalls is the secret to getting that professional, durable result you're after.
The absolute number one mistake is shoddy prep work. If you fail to get every last speck of oil, wax, or cleaning residue off that floor, the new finish is guaranteed to peel or flake. A perfectly, surgically clean surface is completely non-negotiable.
Another classic blunder is laying the finish on too thick. This is what leads to that cloudy, milky look or tacky spots that just never seem to fully cure. Thin, even coats will win the day, every time.
Finally, rushing the process and not letting the finish properly dry and cure is just asking for scuffs and damage right out of the gate. A little patience during prep and application truly makes all the difference.
Still on the fence or prefer to leave it to the pros? The team at J.R. Hardwood Floor Refinishing & Cleaning is here to deliver a flawless, tough-as-nails finish every time. For more tips from the field and to see our work, be sure to subscribe to our YouTube Channel
Article created using Outrank