 Skip to content
Scuffed hardwood and lingering pet scratches can leave even the most beautiful Denver homes looking tired. Eco-friendly sanding solutions offer homeowners a chance to restore shine and resilience without sacrificing quick usability for families and pets. By choosing certified professionals and sustainable products, you invest in both the long-term health of your floors and a cleaner local environment. Discover how thoughtful preparation, expert guidance, and green finishing methods deliver lasting, family-friendly durability for every room.
Table of Contents
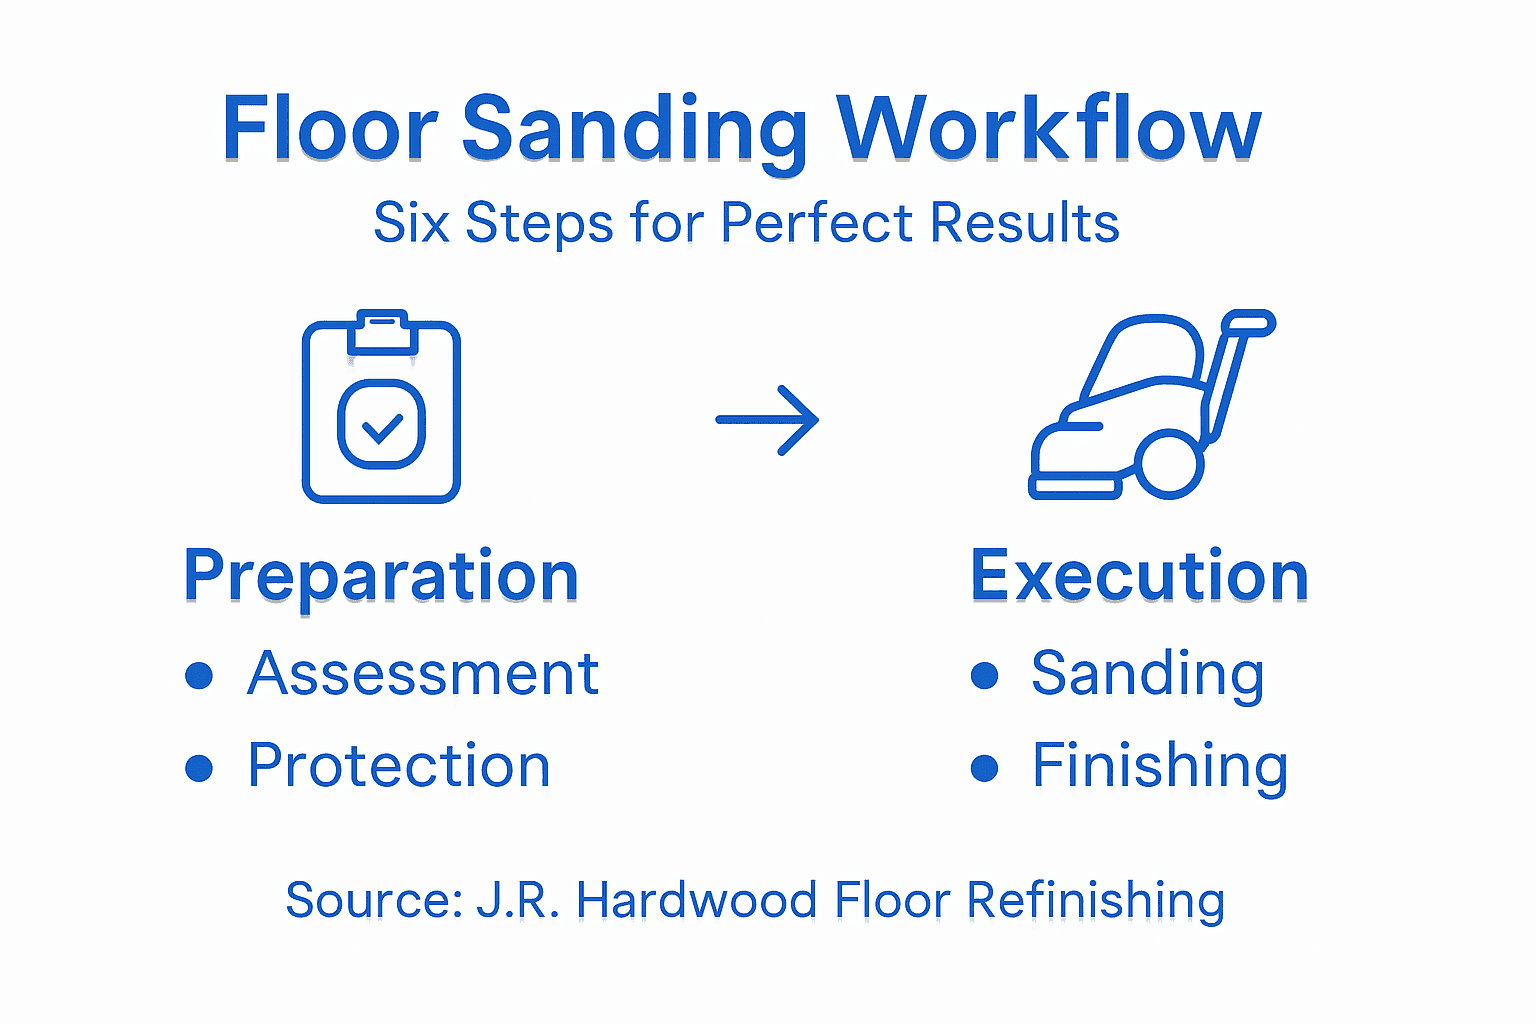
- Step 1: Schedule A Floor Assessment And Consultation
- Step 2: Prepare The Space And Protect Surroundings
- Step 3: Select Eco-Friendly Sanding Tools And Finishes
- Step 4: Sand Floors Using The Proper Sequence
- Step 5: Apply Stain And Finish For Lasting Protection
- Step 6: Inspect Final Results And Ensure Quality
Quick Summary
| Key Insight | Explanation |
|---|---|
| 1. Schedule a Professional Assessment | Begin by evaluating your hardwood floors for tailored restoration guidance to avoid costly mistakes later. |
| 2. Prepare Your Space Meticulously | Clear the room, protect surfaces, and ensure ventilation for a smooth sanding process that prevents damage. |
| 3. Choose Eco-Friendly Materials | Opt for sustainable sanding tools and low-VOC finishes to protect both your floors and the environment. |
| 4. Follow Proper Sanding Techniques | Use a systematic approach with different grit sandpapers for a uniform, professional-quality finish on your floors. |
| 5. Conduct a Thorough Final Inspection | Meticulously check for even color, smoothness, and finish quality to ensure the highest standards before finalizing your project. |
Step 1: Schedule a Floor Assessment and Consultation
Setting up a professional hardwood floor assessment is your first critical move towards transforming tired, worn floors into stunning surfaces. When you contact J.R. Hardwood Floor Refinishing & Cleaning, you’ll start a personalized journey that begins with a comprehensive evaluation of your specific floor conditions.
Scheduling an expert consultation involves several strategic steps. First, gather basic information about your hardwood floors – including square footage, wood species, current condition, and any specific concerns you’ve noticed. When you call, be prepared to provide details like:
- Age of your hardwood flooring
- Visible damage or wear patterns
- Previous refinishing history
- Room types where flooring needs assessment
Professional floor assessments are crucial for determining the most appropriate restoration approach. By consulting with certified floor covering inspectors, homeowners can receive expert guidance tailored to their specific flooring needs. These professionals will conduct a thorough visual and technical examination, helping you understand exactly what your floors require.
A professional assessment can reveal hidden issues and prevent costly mistakes during refinishing.
During your consultation, expect a detailed discussion about potential restoration options, estimated timelines, and projected costs. The expert will evaluate factors like wood condition, subflooring integrity, potential moisture issues, and the most suitable sanding and finishing techniques for your specific hardwood.
Pro tip: Prepare digital photos of your floors from multiple angles before the consultation to provide inspectors with comprehensive visual information.
Step 2: Prepare the Space and Protect Surroundings
Preparing your workspace is a critical foundation for successful hardwood floor sanding. This step involves creating a clean, protected environment that minimizes potential damage and ensures a smooth refinishing process. Your goal is to set up a controlled workspace that safeguards both your floors and surrounding areas.
Start by completely clearing the room of furniture, rugs, and movable items. You’ll want to create a completely open workspace that allows full access to your hardwood floors. Next, focus on comprehensive space protection strategies:
- Remove baseboards carefully to prevent damage
- Cover air vents with plastic sheeting
- Seal doorways with plastic drop cloths
- Protect adjacent surfaces with masking tape and painter’s plastic
Floor sanding preparation requires meticulous attention to detail. Inspect the floor carefully, ensuring all protruding nails or staples are hammered down or removed. This prevents potential damage to sanding equipment and ensures a smooth, even surface for refinishing.
Thorough preparation is the difference between a professional-looking result and an amateur finish.
Ensure proper ventilation by opening windows and setting up fans to help manage dust. Remove any existing floor coverings, clean the surface thoroughly, and repair minor imperfections using wood filler. Allow sufficient drying time for any repairs before beginning the sanding process.
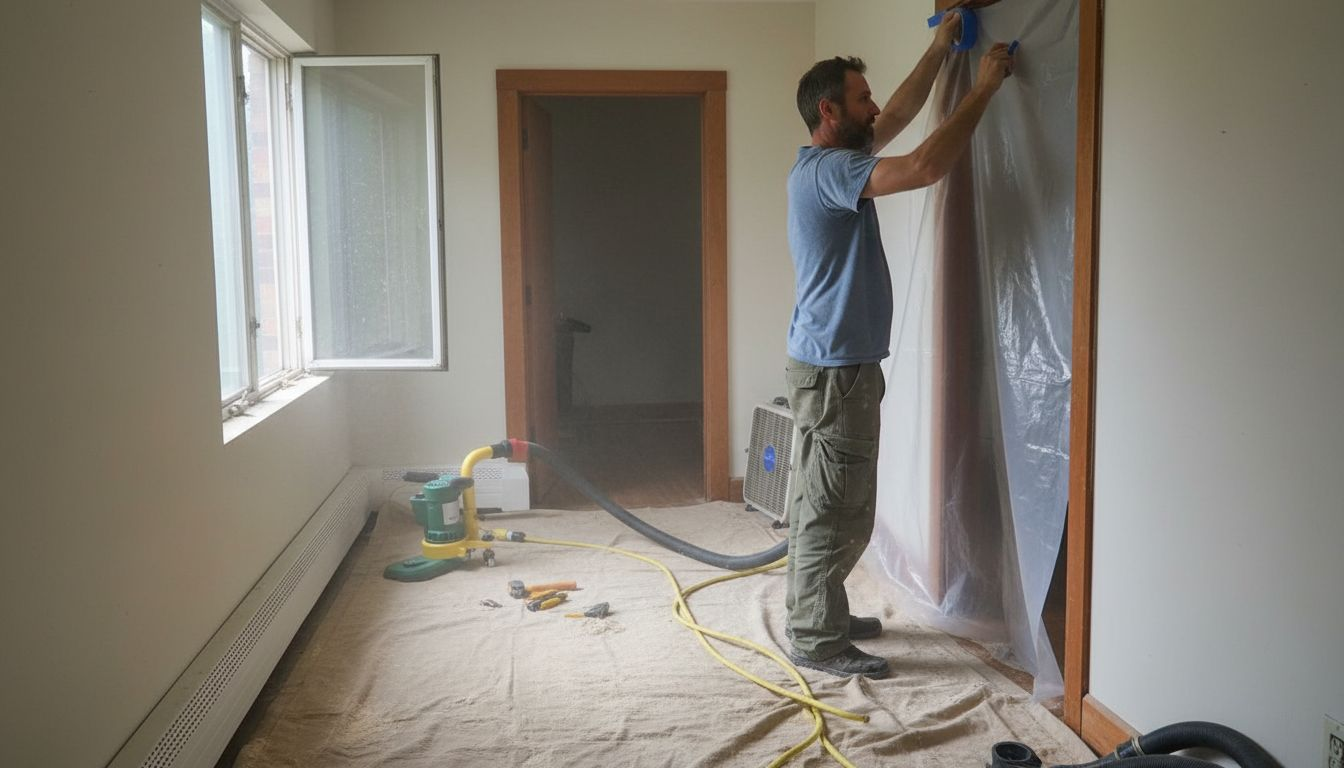
Pro tip: Create a dedicated “dust control zone” by hanging plastic sheeting in doorways and sealing off adjacent rooms to minimize dust spread throughout your home.
Step 3: Select Eco-Friendly Sanding Tools and Finishes
Choosing sustainable sanding tools and finishes is your opportunity to protect both your hardwood floors and the environment. This step focuses on selecting equipment and materials that minimize environmental impact while delivering professional-grade results for your hardwood restoration project.
Your eco-friendly approach begins with selecting energy-efficient sanding equipment. Look for dust-collection systems and electric sanders with low power consumption. Consider these key characteristics:
- Electric sanders with variable speed controls
- Dust-collection attachments that minimize airborne particles
- Machines with high-efficiency particulate air (HEPA) filters
- Rechargeable battery-powered options
Sustainable wood processing emphasizes reducing chemical usage and environmental impact. When selecting finishes, prioritize water-based, low-VOC (volatile organic compound) products that provide durability without harmful emissions. Natural oil-based finishes offer excellent alternatives to traditional chemical-heavy products.
Eco-friendly choices protect your floors, your family’s health, and the planet.
Pay close attention to finish compatibility with your specific wood type. Some eco-friendly finishes work better on certain wood species, so consult with professionals to ensure optimal protection and appearance. Consider factors like wear resistance, drying time, and long-term maintenance requirements when making your selection.
Pro tip: Request material safety data sheets for all sanding tools and finishes to verify their true environmental credentials and potential health impacts.
Step 4: Sand Floors Using the Proper Sequence
Sanding hardwood floors is an art that requires precision, patience, and a strategic approach. Your goal is to transform rough, worn surfaces into smooth, flawless foundations ready for a beautiful new finish. Understanding the correct sanding sequence is crucial to achieving professional-quality results.
Begin with coarse-grit sandpaper to remove existing finishes and major imperfections. Hardwood floor sanding techniques involve a systematic progression through different sandpaper grits. Your sanding workflow will look like this:
- Start with 36-grit sandpaper for initial surface removal
- Progress to 60-grit for smoothing initial scratches
- Move to 80-grit for further surface refinement
- Finish with 100-120 grit for a smooth, ready-to-finish surface
Use specialized sanding equipment for different areas. Belt sanders work best for large floor sections, while edge sanders tackle corners and hard-to-reach spaces. Always sand with the wood grain to prevent cross-grain scratches that can mar the final appearance.
Consistent, overlapping passes are the key to a uniform, professional-looking floor.
Maintain a steady, even pressure during sanding and avoid lingering too long in one spot. Clean your work area frequently to remove dust and debris, which can cause scratches or uneven sanding. Between grit changes, vacuum thoroughly and wipe the floor with a tack cloth to ensure a clean surface for the next pass.
Pro tip: Test your sanding technique on a small, inconspicuous area first to perfect your technique and understand how your specific wood responds.
Step 5: Apply Stain and Finish for Lasting Protection
Transforming your hardwood floors from raw, sanded surfaces to stunning, durable masterpieces happens through careful stain and finish application. This crucial step not only enhances your floor’s natural beauty but also provides critical protection against daily wear and environmental challenges.
Stain selection is your first critical decision. Choose a color that complements your home’s aesthetic while highlighting the wood’s natural grain. Hardwood floor finishing techniques require meticulous preparation and application. Consider these key steps for professional results:
- Ensure the surface is completely clean and dust-free
- Apply wood conditioner for even stain absorption
- Use high-quality, lint-free applicator pads
- Apply stain in thin, even layers
- Work in small sections to maintain consistency
- Allow recommended drying time between coats
Choose between water-based and oil-based finishes, each with unique characteristics. Water-based finishes dry faster and have lower odor, while oil-based options provide deeper, richer protection. Multiple thin coats always outperform a single thick application.
Here’s a comparison of water-based versus oil-based hardwood floor finishes to help inform your selection:
| Finish Type | Drying Time | Odor Level | Durability | Environmental Impact |
|---|---|---|---|---|
| Water-Based | 2-4 hours per coat | Low | Good, less ambering | Lower VOCs, eco-friendly |
| Oil-Based | 6-12 hours per coat | Moderate to High | Excellent, rich look | Higher VOCs, less eco-friendly |
The right finish transforms your floor from merely functional to truly exceptional.
Apply finish using smooth, consistent strokes following the wood grain. Use a high-quality lambswool applicator or microfiber roller for even distribution. Allow adequate curing time between coats, typically 2-4 hours, depending on the product and environmental conditions.
Pro tip: Maintain consistent room temperature and humidity during application to ensure optimal finish adhesion and appearance.
Step 6: Inspect Final Results and Ensure Quality
The final inspection is your ultimate quality checkpoint, transforming your hardwood floor refinishing project from good to exceptional. This critical step ensures every inch of your floor meets professional standards and your highest expectations. You’ll be looking for uniformity, smoothness, and a flawless finish that reflects your meticulous work.
Hardwood floor technical standards require a comprehensive visual and tactile examination. Evaluate your newly refinished floor using these key inspection criteria:
- Check for consistent color and stain coverage
- Verify absence of sanding marks or dust particles
- Test surface smoothness by running your hand gently across the floor
- Examine finish for bubbles, streaks, or uneven application
- Verify edge and corner refinishing quality
- Confirm proper adhesion of finish to wood surface
Use strategic lighting to reveal subtle imperfections. Natural daylight or bright, angled lighting helps expose any remaining flaws that might be invisible under standard room lighting. Move around the room, examining the floor from multiple angles to catch every detail.
The following table summarizes key inspection criteria for evaluating newly refinished hardwood floors:
| Inspection Aspect | What to Look For | Tools or Methods |
|---|---|---|
| Color Consistency | Uniform color, no streaks | Visual check under daylight |
| Surface Smoothness | No bumps or rough patches | Hand test, tactile inspection |
| Finish Quality | No bubbles or dust nibs | Strategic lighting, close-up view |
| Edge Refinishing | Even finish at corners | Walkaround, angled viewing |
A meticulous final inspection separates professional results from amateur attempts.
If you discover minor imperfections, most can be addressed with light touch-ups. Small areas with dust nibs or slight finish irregularities can often be smoothed with fine-grit sandpaper and a careful reapplication of finish. For significant issues, consulting a professional refinishing expert might be the best approach.
Pro tip: Photograph your finished floor in different lighting conditions to perform a detailed digital inspection and document your remarkable transformation.
Achieve Flawless Hardwood Floors with Expert Refinishing Solutions
Mastering the hardwood floor sanding workflow is essential to avoid common challenges like uneven surfaces, visible scratches, and poor finish adhesion. If you are searching for a trusted partner to help you with thorough floor assessments, precise sanding sequences, and eco-friendly finishes, look no further. Our team understands the importance of proper preparation, specialized sanding equipment, and lasting protection to deliver the professional-quality results you deserve.
Discover how J.R. Hardwood Floor Refinishing & Cleaning brings craftsmanship, advanced technology, and premium eco-friendly products together to elevate your hardwood floors throughout the Denver Metro Area and beyond. Whether you need full sanding and restoration or expert advice tailored to your floor’s condition, start your transformation today by exploring our Uncategorized Archives – J.R. Hardwood Floor Refinishing & Cleaning and contacting our specialists for a free, personalized quote. Don’t settle for less than a flawless finish—take the first step to stunning, durable hardwood floors now.
Frequently Asked Questions
What steps are involved in the hardwood floor sanding workflow?
The hardwood floor sanding workflow includes six key steps: scheduling a floor assessment, preparing the space, selecting eco-friendly sanding tools and finishes, sanding the floors using the proper sequence, applying stain and finish, and inspecting the final results. Follow these steps systematically to achieve a professional-quality finish on your hardwood floors.
How do I prepare my space for hardwood floor sanding?
To prepare your space, clear the room of all furniture and movable items, and protect adjacent areas with plastic sheeting and masking tape. Ensure proper ventilation by opening windows and using fans to manage dust during the sanding process.
What is the proper sequence for sanding hardwood floors?
The proper sequence for sanding hardwood floors begins with 36-grit sandpaper to remove existing finishes, followed by 60-grit for smoothing scratches, then 80-grit for further refinement, and finishing with 100-120 grit for a smooth surface. Make consistent, overlapping passes to ensure a uniform finish, and remember to clean your workspace after each grit change.
How can I select an eco-friendly finish for my hardwood floors?
To select an eco-friendly finish, prioritize water-based, low-VOC products that enhance durability while reducing harmful emissions. Consult with professionals to ensure that the chosen finish is compatible with your specific wood type and meets your aesthetic and protective needs.
What should I look for during the final inspection of my refinished hardwood floors?
During the final inspection, check for consistent color, absence of sanding marks, and smoothness of the surface. Look for bubbles or streaks in the finish and confirm that edges and corners are evenly refinished to ensure a high-quality outcome.
What common issues can arise after sanding, and how can I address them?
Common issues after sanding include dust nibs, uneven finish application, or minor scratches. Most minor imperfections can be addressed with light touch-ups using fine-grit sandpaper and a careful reapplication of finish to restore the floor’s appearance.