 Skip to content
Often yes: surface-level yellowing can usually be fixed, and the safest first move is a small test patch with a shellac seal coat or a light scuff and water-based recoat. If the discoloration runs deep into the wood or the finish has broken down from years of UV exposure, you may be looking at a full sand and refinish instead. Either way, test before you commit, because the wrong fix on the wrong surface wastes time and finish.
TL;DR:
- Yellowing caused by UV photooxidation is more likely in finishes with aromatic isocyanates, especially oil-based polyurethanes that amber faster than water-based versions.
- Tannin and dye bleed-through from the wood or old stain often results in yellowing that appears as a sudden, localized color shift, not gradual aging.
- Quick fixes like cleaning, shellac sealing, and water-based re-coating are effective for surface-level yellowing, but deep or uneven discoloration requires sanding and refinishing.
- Always test any repair on a hidden area and allow full cure time before evaluating results to prevent wasting effort on incompatible products.
- Using water-based or acrylic polyurethane from the start, along with proper priming over bleed-prone substrates, can prevent most yellowing issues in future projects.
Table of Contents
- What makes polyurethane yellow in the first place
- Fast, ranked fixes you can try now
- Step-by-step repair workflow for furniture and small wood surfaces
- How to avoid yellowing on future projects
- What years of refinishing calls have taught us about yellowing
- How J.R. Hardwood Floor Refinishing & Cleaning can help with yellowed floors
- FAQ
- Sources
What makes polyurethane yellow in the first place
Yellowing is almost never random. It is usually one of three things happening to your finish, and knowing which one you are dealing with changes your whole repair plan.
The biggest culprit is photooxidation, the slow chemical breakdown that happens when UV light hits the polymer backbone of the coating. Finishes built with aromatic isocyanates are especially prone to this: sunlight oxidizes the chemical structure and the clear coat gradually ambers, even indoors near a sunny window. Research on polyurethane composites confirms that this UV-driven oxidation is a well-documented cause of yellowing and finish degradation over time.
UV-cured finishes add another wrinkle. The photoinitiators used to cure these coatings can themselves contribute to yellowing, depending on which chemistry the manufacturer chose. Technical literature on photoyellowing shows that some photoinitiators and amine co-synergists drive more color change than others, which is why two UV-cured products can age very differently under the same sunlight.
Then there is a cause that has nothing to do with the topcoat itself: tannin and dye bleed-through. Clear finishes, especially water-based ones, can slowly dissolve or interact with tannins in the wood or dyes in an old stain underneath, pulling that color up into the topcoat. This is the classic reason a white-painted piece develops a yellow or amber cast that was never in the paint can.
A few quick signs help you sort out which type of finish you are working with:
-
Amber or honey tint straight out of the can usually points to oil-based polyurethane, which yellows faster than water-based versions.
-
A finish that stays crystal clear for years, then suddenly shifts often means tannin bleed-through from the substrate, not the topcoat aging.
-
Yellowing concentrated near windows or under skylights is a strong signal of UV-driven photooxidation.
-
A cloudy, hazy yellow over white paint usually means the clear coat is reacting with something beneath it, not simply aging on its own.
Wood Magazine’s comparison of finish types notes that water-based and acrylic polyurethanes generally resist ambering better than traditional oil-based poly, which is worth knowing before you pick a recoat product.
General Finishes points out that there is no reliable way to predict yellowing in advance because every substrate, old finish, and environment behaves a little differently, which is exactly why testing matters so much in the fixes below.
Fast, ranked fixes you can try now
Before you reach for sandpaper, work through these options roughly in order of how little they disturb your existing finish. Start simple, test small, and escalate only if the lighter fix does not hold.
- Clean and polish first. If the yellowing is actually grime, old wax, or a dull ambering layer sitting on top of a sound finish, a gentle cleaning with a wood-safe cleaner and a soft polish can restore a surprising amount of clarity in minutes.
- Seal it with shellac. A thin coat of dewaxed shellac can lock down tannin or dye bleed-through fast, which makes it one of the quickest fixes for painted furniture that has gone yellow over white.
- Scuff and recoat with water-based poly. If the existing finish is still structurally fine but visually tired, a light scuff sand followed by a water-based topcoat often refreshes the look without a full strip.
- Prime and repaint. When the yellowing keeps bleeding through everything you try, a stain-blocking primer followed by fresh paint is usually the more permanent answer.
- Full refinish. Deep, uneven, or long-standing yellowing that has worked its way into the wood itself generally calls for sanding back to bare material and starting over.
In practice, a shellac seal coat often stops tannin or dye bleed-through quickly on painted pieces and lets you skip full stripping altogether. Just know that shellac can amber on its own over decades and is not a great match for high-heat surfaces like tabletops near a stove, or for pieces that see a lot of moisture.
Pro Tip: Always test your chosen fix on a hidden spot, like the underside of a shelf or the back of a drawer, and give it the full cure time before judging the result.
Step-by-step repair workflow for furniture and small wood surfaces
This is the process we would walk a friend through if they called asking how to tackle a yellowed tabletop or a cabinet door that has gone amber on them.
Step 1: Assess the finish. Figure out what you are dealing with before you touch anything. A small dab of denatured alcohol in a hidden spot tells you a lot: shellac will soften or smear, while a true polyurethane film will resist it. A mineral spirits or methyl hydrate test can help separate oil-based films from water-based ones, since oil-based finishes tend to feel slightly tackier when rubbed.
Step 2: Choose and run a spot test. Pick an inconspicuous area, ideally one that matches the lighting and wear of the problem spot. Apply your intended fix there, whether that is a cleaner, a shellac coat, or a light scuff and recoat, and then wait through the full cure time before judging the color. Oil-based polyurethane needs real patience here.
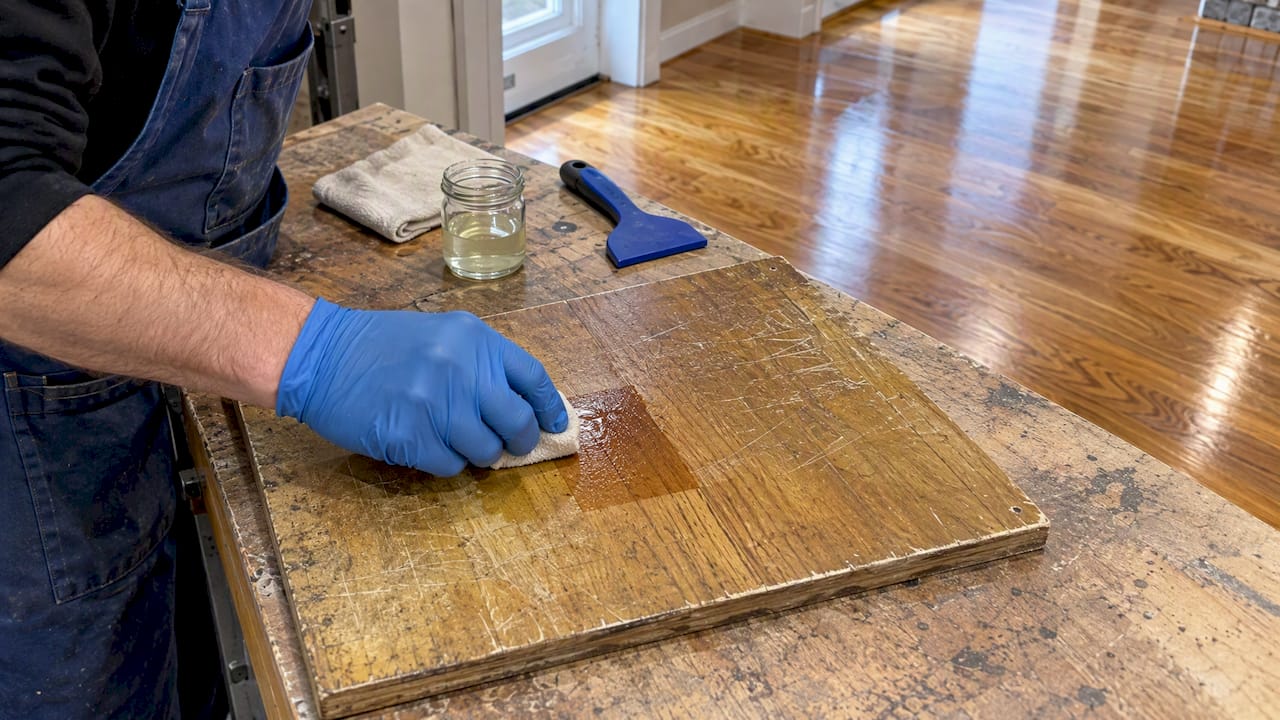
Step 3: Prep the surface. Clean off wax, polish residue, and surface grime with a wood-safe degreaser before doing anything else. Wear gloves and work in a ventilated space, especially if you are using mineral spirits or alcohol-based cleaners.
Step 4: Apply your chosen repair.
- For a shellac seal, apply one thin, even coat with a natural bristle brush or a pad, let it dry fully, then lightly scuff with fine sandpaper before adding a protective topcoat if needed.
- For a scuff and recoat, work through a grit progression from around 220 to 320, vacuum thoroughly, wipe with a tack cloth, then apply a water-based polyurethane in thin, even coats.
- For stain blocking before paint, apply a dedicated stain-blocking primer in two coats over problem substrates, letting each coat dry fully, before your topcoat goes on.
Step 5: Go to full removal when needed. If the yellowing is too deep or uneven for the lighter fixes, sand all the way back to bare wood, apply a stain-blocking primer where tannins or old dye are a concern, and refinish with your chosen product from scratch. This is also the point where a lot of DIYers decide a professional refinish makes more sense, especially on larger pieces or flooring.
Step 6: Cure and verify. Water-based poly dries to the touch quickly but still needs time to fully harden. Oil-based polyurethane is slower across the board: give it at least 30 days before you judge the final color or put the surface back into heavy use. Press a fingernail gently into an inconspicuous spot; if it leaves a mark, it is not ready. Only recoat again once you are sure the first layer has fully cured and the color has settled.
A quick reference as you work through this:
- Shellac seal coat: fast, effective against bleed-through, not ideal for heat or heavy moisture.
- Scuff and recoat: low effort, works best when the base finish is still sound.
- Full strip and refinish: most reliable for deep or uneven yellowing, but the most labor-intensive.
Pro Tip: Write down what you used and when on a sticky note tucked under the piece. Future-you will thank present-you when it is time to touch up again.
How to avoid yellowing on future projects
The best fix for yellowing is never needing one, and a few product choices up front make a bigger difference than most people expect.
Reach for a water-based or acrylic polyurethane when you want a finish that stays clear for the long haul. Wood Magazine notes that these topcoats generally resist ambering far better than traditional oil-based poly, which still has its place if you actually want that warm amber tone on a rustic piece.
If you are finishing over a substrate that might bleed, whether that is a knotty wood with heavy tannins or an older finish with dye in it, prime first. General Finishes recommends using their Stain Blocker product, applied in two coats, specifically for substrates that are prone to this kind of reaction.
A few more habits worth building in:
- Avoid clear topcoats over bright white paint when you can; a self-sealing white paint or a professional white poly designed for that purpose carries far less risk.
- Always test your entire finishing schedule, primer through topcoat, on scrap or a hidden area, and let it sit through a full cure before you call it done.
- Keep sensitive pieces out of direct, prolonged sun exposure when possible, since UV is one of the main drivers of photooxidation in the first place.
One lab study on PU formulations found that adding modified nanocrystalline cellulose improved anti-yellowing performance by 57.7% at certain additive concentrations under accelerated UV testing, which is a reminder that formulation chemistry, not just application technique, plays a real role in how a finish ages. If you want more detail on finish types before your next project, our guide to hardwood floor finishes breaks down the tradeoffs further. Sheen choice matters too, and practical guidance on interior sheen selection is a useful reference when you are weighing finish performance against appearance.
What years of refinishing calls have taught us about yellowing
Most of the yellowing calls we get fall into two buckets: a thin ambering layer on top of an otherwise healthy finish, or tannin bleed-through on a painted piece that someone finished too quickly without testing. The first type is almost always fixable with a clean and polish or a light scuff and recoat. The second usually needs a shellac seal or a stain-blocking primer before anything else goes on.
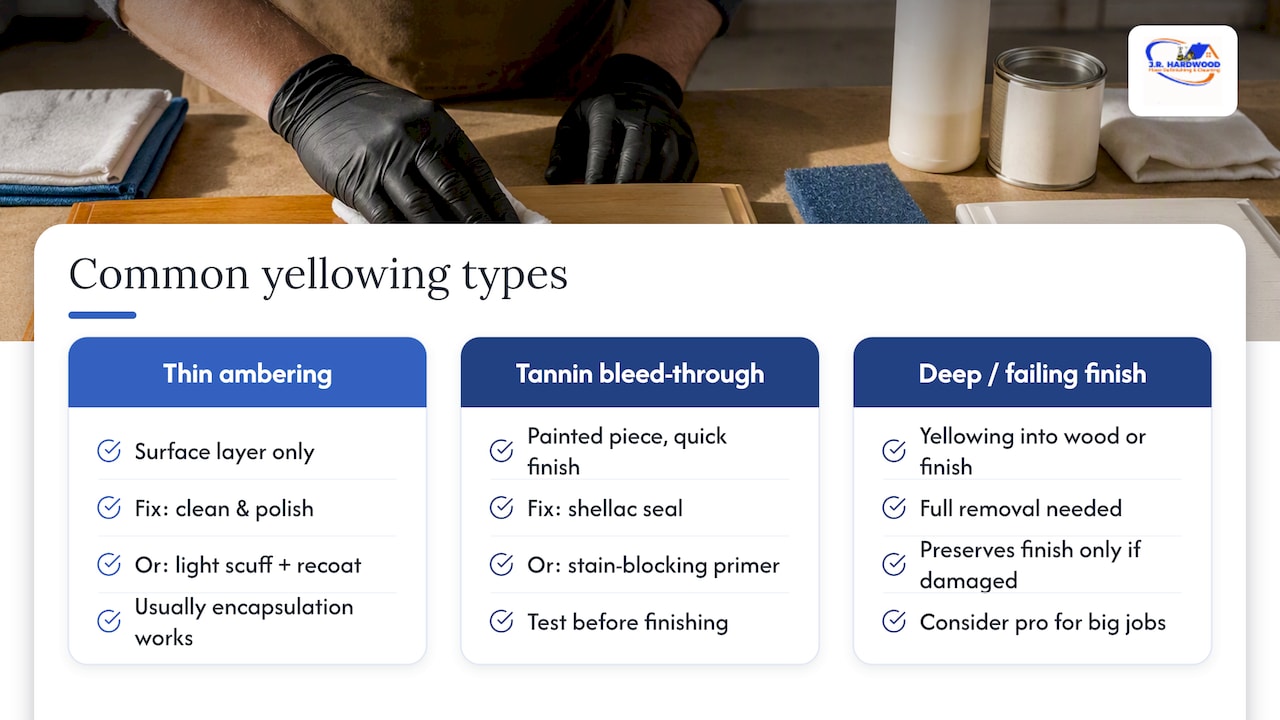
We lean toward encapsulation, sealing the problem in rather than fighting it, whenever the existing finish is structurally sound, because it saves time and preserves more of the original material. Full removal only makes sense once the yellowing has worked its way deep into the wood or the finish itself has started breaking down.
One safety note worth repeating: moisture-cure urethanes and strong-solvent products need serious ventilation and are not forgiving of shortcuts. If a job calls for either of those, or covers a large surface, that is usually where DIY should stop and a professional should start.
— J.R.
How J.R. Hardwood Floor Refinishing & Cleaning can help with yellowed floors
When yellowing shows up on a hardwood floor instead of a small piece of furniture, the math changes. Larger surfaces mean more time, more product, and a lot less room for a test patch to go wrong, which is exactly where our team comes in.

We offer various sanding, refinishing, coating, and finishing services suited to different stages of yellowing and wear. A screen and recoat can refresh a finish that is only lightly ambered, while a full sand and refinish handles yellowing that has worked its way deep into the wood. For floors that need to go back into use fast, our instant UV-curable finish cures on the spot instead of waiting weeks like a traditional oil-based poly.
Getting started is simple:
- Send photos of the affected area along with a short description of the finish and the problem.
- The company provides a free over-the-phone quote based on what you share, with no in-person visit required just to get a number.
- The work is scheduled around a timeline that fits your home or business.
| Situation | Suggested service |
|---|---|
| Light ambering on an otherwise sound floor | Screen & Recoat |
| Yellowing too deep to scuff out | Full Sanding & Refinishing |
| Need the floor walkable again quickly | Instant UV-Curable Finish |
If your DIY attempts have not held up, or the surface is simply too large to test safely on your own, request a free over-the-phone quote and we will walk you through the right fix for your floor.
FAQ
Why would polyurethane turn yellow?
Polyurethane yellows mainly from UV exposure, which oxidizes the chemical structure of the finish over time, especially in oil-based products made with aromatic isocyanates. Technical research on polyurethane chemistry confirms this photooxidation as a primary driver of yellowing and finish breakdown.
Does polyurethane yellow with age?
Yes, most polyurethane finishes shift color somewhat as they age, with oil-based versions ambering noticeably faster than water-based ones. Wood Magazine’s finish comparison notes that water-based and acrylic polyurethanes tend to stay clearer over the long term.
Why has my polyurethane topcoat turned yellow over white paint?
This usually happens when the clear topcoat reacts with tannins in the wood or dye in an older finish underneath, pulling that color up through the clear coat. General Finishes explains that a stain-blocking primer or avoiding a clear topcoat over bright whites helps prevent this reaction.
Does water-based polyurethane turn yellow over time?
Water-based polyurethane yellows far less than oil-based poly and is generally the better choice when you want a finish to stay clear for years. It can still discolor if applied over a substrate that bleeds tannins or dye, which is why testing the full finishing schedule first matters.
Sources
- How Do I Prevent Water Based Topcoat or Light Colored Paint from Yellowing? | General Finishes University
- Oil vs. Film, Choose Your Finish | Wood Magazine
- Manufacturing and characterization of soy-based polyurethane composites (doctoral dissertation)
- Anti-yellowing property of polyurethane with surface modified nanocrystalline cellulose (BioResources)