 Skip to content
Use a T-molding when two floors sit at nearly the same height, a beveled reducer when the gap runs up to 1/2 inch, and treat anything beyond that as a ramp or a substrate repair, not a trim problem. Floating floors need a track or overlap reducer so the planks can still move. Glued or nailed floors handle a flush reducer or stair nose just fine.
TL;DR:
- For height differences up to 1/4 inch, a T-molding or caulk bead can suffice, and no bevel or ramp is necessary.
- A bevel reducer with a slope no steeper than 1:2 is required for gaps between 1/4 and 1/2 inch, based on accessibility guidelines.
- Ramps or substrate corrections are needed for gaps over 1/2 inch, as these exceed code-compliant slope limits and pose trip hazards.
- Proper measurement must include underlayment, adhesive, or padding, with uneven subfloors requiring correction before transition installation.
- Professional help is recommended for gaps over 1/2 inch, moisture issues, or structural problems that can’t be fixed with trim profiles alone.
Table of Contents
- What Are the Different Types of Floor Height Transitions?
- How Do You Measure for a Floor Transition and Stay Within Safety Limits?
- How Do You Choose the Right Transition for Your Height Difference?
- How Do You Install a Floor Transition Without Ruining It?
- When Is a Transition Hiding a Bigger Substrate Problem?
- What a Contractor Actually Needs From You Before Installing a Transition
- What the Rules Get Right, and What They Leave Out
- Need a Pro for a Trickier Transition?
- Where to Verify These Standards Yourself
- Sources
- FAQ
What Are the Different Types of Floor Height Transitions?
Walk into any flooring aisle and you’ll find a rack of moldings that all sort of look alike until you know what each one actually does. Here’s the breakdown, and why picking the wrong one is the fastest way to end up with a lip that catches every sock and stroller wheel in the house.
- T-molding: Shaped like a capital T, this one bridges two floors that finish at nearly the same height, typically in a doorway between two rooms with similar flooring. It floats between the two surfaces and lets both sides expand without buckling into each other.
- Reducer (flush): A flush reducer tapers from a taller floor down to a shorter one, and is fastened directly to the subfloor, which makes it the right call for glued or nailed hardwood meeting tile or thinner LVP.
- Reducer (overlap): An overlap reducer does the same tapering job but sits on top of a track instead of being face nailed, which gives a floating floor room to shift seasonally without pulling the molding loose. Mixing these two up is one of the most common DIY errors we see. Nail a flush reducer straight through a floating laminate, and you’ve just locked a floor that’s supposed to move.
- Threshold: Usually reserved for doorways between rooms of different flooring types, like tile to hardwood, a threshold sits higher and wider than a standard reducer and often marks a true room boundary rather than a mid-room seam.
- Stair nose: Built specifically for the top step of a staircase where flooring meets a drop-off, with a rounded lip that overhangs the riser for grip and visual continuity.
- End cap: Used where flooring butts up against a surface that won’t have flooring on the other side, such as a fireplace hearth or sliding glass door track.
- Carpet trim (carpet-to-hard-surface): Grips carpet edge on one side and tapers down to a hard floor on the other, usually with a tackless strip built in.
Material matters almost as much as profile shape. Wood moldings can be stained to match, which is worth knowing given how many floor stain colors 2026 trends lean toward warmer, more saturated tones than the gray-washed looks of a few years back. Metal transitions cost less and hold up in high-moisture spots like entryways, but they won’t take stain, so color matching is limited to whatever finish the manufacturer offers. Vinyl and rubber trims flex more, which helps in uneven doorway framing but shows wear faster under rolling furniture.
How Do You Measure for a Floor Transition and Stay Within Safety Limits?
Grab a straightedge and a tape measure, and check finished height on both sides of the seam, not just the flooring material itself. That means underlayment, adhesive, carpet pad, and the surface layer all get counted together. A lot of homeowners measure the plank or tile alone and buy a reducer that’s the wrong size once you factor in the 3/8 inch of padding hiding underneath the carpet.
Take measurements at three or four points along the transition line, especially in older homes where subfloors have settled unevenly. If one end of the doorway measures a 1/4 inch gap and the other a significantly larger difference, you have a bigger problem than trim selection, and that unevenness needs to get resolved before any molding goes down.
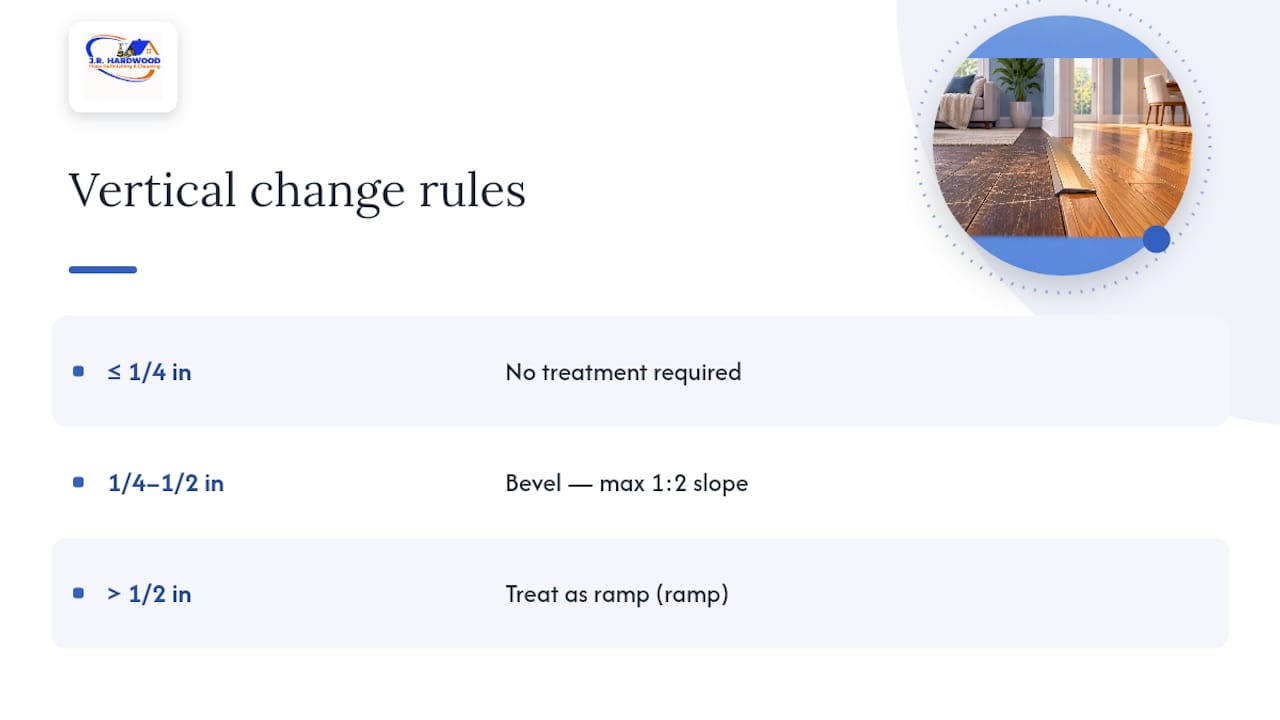
By the numbers: The U.S. Access Board’s PROWAG guidance permits a vertical change in level up to 1/4 inch with no treatment at all. Between 1/4 inch and 1/2 inch, the change must be beveled at a slope no steeper than 1:2. Anything above 1/2 inch has to be treated as a ramp.
That 1:2 ratio isn’t arbitrary. It means for every inch of rise, the bevel needs two inches of horizontal run, a gentle enough slope that a wheelchair caster or a walker tip won’t catch. Compare that to a ramp’s 1:12 running slope required under ADA Chapter 3 guidance for new construction, which spreads a single inch of rise over a full foot of length. A steep, hardware-store bevel reducer that looks like it “handles” a 3/4 inch drop is not code-compliant on any accessible route, and it’s a real trip hazard in a private home too, especially for kids or older family members.
Public buildings and commercial spaces answer to these standards directly. Private homes aren’t legally bound the same way, but the physics of a trip hazard doesn’t care whether you’re in a courthouse or your own hallway. Building this cutoff into your decision making protects you either way.
How Do You Choose the Right Transition for Your Height Difference?
Once you know your actual height gap, the profile choice mostly picks itself. Here’s how we map it out for homeowners who call in for a quote:
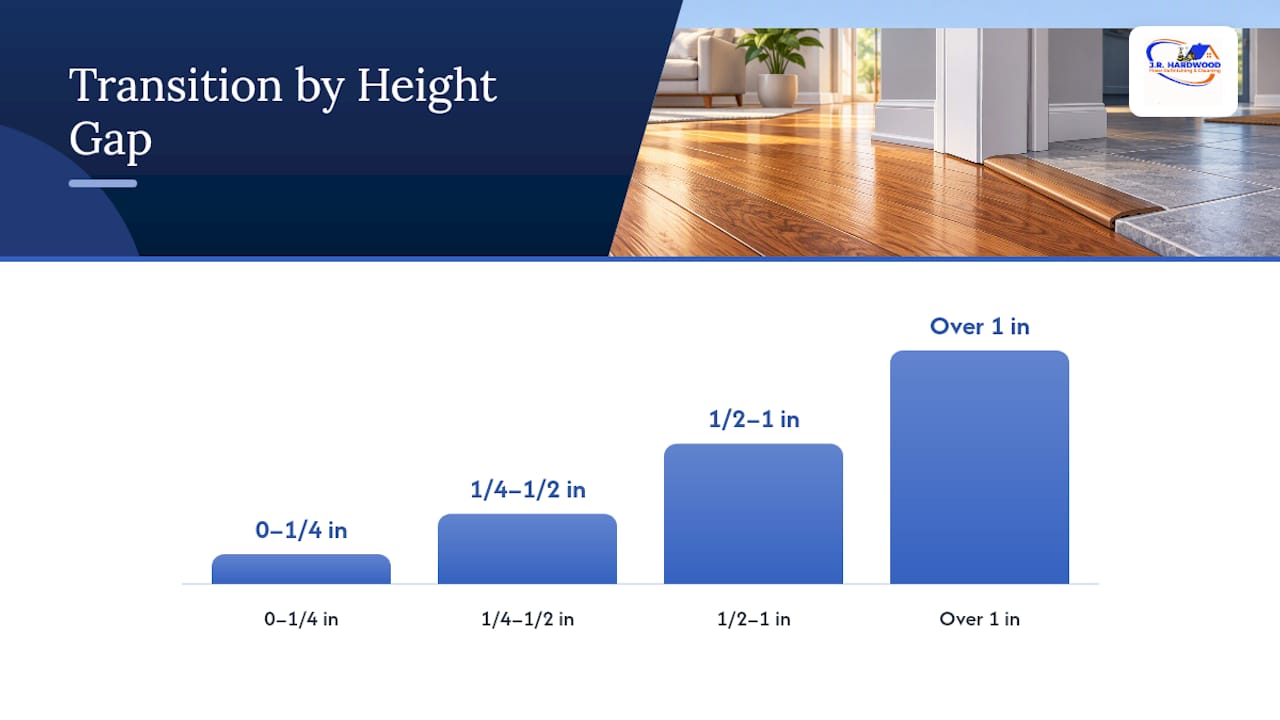
- 0 to 1/4 inch: A standard T-molding or even just a caulk bead in tight doorway framing works. No bevel needed, no ramp required.
- 1/4 to 1/2 inch: A beveled reducer, sloped no steeper than 1:2, is your go-to. This is the sweet spot for most hardwood-to-tile or LVP-to-carpet doorway situations.
- 1/2 to 1 inch: You’re now in ramp territory or you need to correct the substrate underneath the shorter floor. A reducer this steep will violate the 1:2 slope rule and create a real stumble risk.
- Over 1 inch: This almost always points to a structural or subfloor issue rather than a trim solution. Leveling compound, additional underlayment, or a full substrate correction should come before any molding purchase.
Floor pairings add another layer. Hardwood meeting tile usually calls for a flush reducer or threshold, since both are typically fixed installations. LVP meeting tile often uses a similar flush profile, but if the LVP is a floating click-lock product, you’ll want an overlap reducer on a track instead. Hardwood transitioning to carpet almost always uses a carpet trim with a tackless strip, and floating floors meeting glued floors need a transition that’s fastened only to the subfloor or track, never through the floating material.
Pro Tip: If you’re staining a wood reducer to match refinished hardwood, order or cut it after your final coat cures. Stain absorption on molding scraps rarely matches the field exactly, and a slightly off reducer is one of the most noticeable mismatches in a whole room.
When does this stop being a weekend project? If your height difference measures over 1/2 inch, if you’re seeing soft spots or moisture staining near the seam, or if the transition crosses from a wet area like a bathroom, professional evaluation saves you from redoing the work twice.
How Do You Install a Floor Transition Without Ruining It?
Installation is where good planning either pays off or falls apart. Here’s the sequence that actually works, in order.
- Remove existing trim or old transition strips carefully so you don’t chip the surrounding flooring finish.
- Verify your finished heights again at the doorway, since demo sometimes reveals a different gap than your original measurement.
- Check flatness across the seam with a straightedge; any dip or hump needs to get addressed before the transition goes in, not covered by it.
- Clean the subfloor of debris, old adhesive, and dust so your track or adhesive bonds properly.
- Leave expansion space. Floating floors need roughly the thickness of the flooring itself in gap space at the wall and transition line. Skipping this is one of the most common causes of buckling.
- Install the track first if using one. Molding track systems get screwed or nailed to the subfloor, positioned so the flooring edge sits roughly a quarter inch from it.
- Dry-fit the profile before committing to adhesive or fasteners, checking that the bevel or overlap actually clears both floor surfaces cleanly.
- Fasten or snap the molding into place, either into the track (floating floors) or directly to the subfloor behind the flooring lip (glued or nailed floors).
- Verify movement and finish, gently flexing the floor near the seam to confirm nothing binds, then wipe down and inspect the finished line.
The single biggest mistake we see homeowners make is nailing straight through a floating floor’s expansion zone because it felt more “secure.” It isn’t. It transforms a floor designed to expand and contract with humidity into one that’s fighting against fixed points, which is exactly how cupping and buckling start. A second common mistake: cutting the bevel run too short for the actual height change, leaving a visible unsupported lip on one edge that catches shoes and vacuum heads.
Pro Tip: Before you even shop for molding, run a 4 foot level across the transition zone in both directions. If you find more than 3/16 inch of variance across that span, budget for a leveling compound pass first. No transition profile is designed to bridge an uneven substrate, only a clean height difference.
If your subfloor has minor low spots but the overall height difference still falls in a normal reducer range, a thin-set leveling compound or an extra layer of underlayment under the shorter floor’s edge can smooth things out before the transition ever gets installed.
When Is a Transition Hiding a Bigger Substrate Problem?
Not every uneven seam is a trim problem. Sometimes the transition is masking something underneath that needs real repair first, and installing a molding over it just delays the reckoning.
- Persistent buckling or cupping near the seam, especially after humidity swings, points to moisture intrusion rather than a simple height mismatch.
- Large dips or noticeable deflection when you walk across the joint suggest joist or subfloor damage, not something a bevel reducer will fix.
- Squeaking that gets worse over time often means loose subfloor fasteners or a failing joist connection underneath.
- Moisture readings under tile or LVP that come back elevated mean the transition should wait until the source gets addressed, since sealing over damp substrate traps the problem.
A simple straight-edge test across the joint reveals most of this in under a minute. If light shows under the straightedge in the middle but not the ends, you’re looking at a dip that needs leveling compound, not a fancier reducer. Corrective work ranges from a quick sanding and refinishing pass on a slightly high board to full subfloor and joist repair on the more serious end, and the cost gap between those two scenarios is significant enough that it’s worth diagnosing correctly before you buy anything.
Any scenario involving active moisture, visible mold, or deflection you can feel through your shoes is a red flag for professional evaluation rather than a DIY fix.
What a Contractor Actually Needs From You Before Installing a Transition
Getting an accurate quote over the phone comes down to giving us the right details up front. A measurement checklist that covers finished height on both sides of the seam, photos from a couple of angles, and a note on what underlayment or adhesive is already down speeds up estimating more than almost anything else.
One recent example that captures this well: an LVP-to-tile transition using 100 percent silicone instead of standard adhesive, specifically to avoid buckling where the LVP needed just enough flex room against the rigid tile edge. That kind of detail only surfaces once someone’s actually looked at photos and asked about the substrate, which is why a quick phone call beats guessing from a big-box chart.
We build free phone quotes around verbal descriptions and photos, lean on eco-friendly finishes across the board, and keep scheduling predictable so you’re not left guessing when the crew shows up.
What the Rules Get Right, and What They Leave Out
The Access Board thresholds are the best tool homeowners have for this decision, but treating them as the whole answer misses something. A quarter inch bevel rule tells you what’s compliant. It doesn’t tell you whether your subfloor is actually flat enough for that number to mean anything, and that’s the gap where most bad transitions happen.
Conventional flooring advice leans hard on charts: match this height to that profile, done. What gets skipped is the measurement discipline underneath it. Homeowners consistently measure the flooring material and forget the underlayment, the pad, or the adhesive layer sitting beneath it, then wonder why the reducer they bought doesn’t sit flush.
If there’s one thing worth prioritizing above profile selection, it’s the straightedge test across the seam before you buy anything. A transition strip can bridge a clean height difference beautifully. It cannot fix a wavy subfloor, and no amount of bevel angle changes that math. Get the substrate flat and accurately measured first, and the profile choice becomes almost mechanical.
— J.R.
Need a Pro for a Trickier Transition?
Some transitions are a Saturday afternoon job. Others involve a height difference north of an inch, a moisture reading that makes you nervous, or a stair nose where a bad cut means redoing the whole run. That’s where calling a professional becomes the better call than another weekend spent second-guessing a miter saw. Experienced flooring specialists serve homeowners with substrate repair, sanding, and installation work that transitions often expose once the old flooring comes up.

If your project involves substrate leveling before a transition goes in, our full sanding and refinishing service runs $4.20 to $5.50 per square foot and handles the flattening work that no molding can substitute for. Planning new hardwood or LVP and laminate installation around an existing floor with a tricky height mismatch is exactly the kind of job where our crew’s experience with track systems and expansion gaps pays off. To get a fast, accurate phone quote, have your measurements and a few clear photos of the seam ready. Call or reach out through our site, and we’ll walk you through next steps the same day.
Where to Verify These Standards Yourself
For the technical accessibility limits, the U.S. Access Board’s PROWAG guidance is the primary source. For profile-specific installation steps, always defer to your flooring manufacturer’s own instructions, since track placement and fastening vary by product line.
Sources
- U.S. Access Board — PROWAG technical guidance (changes in level)
- Installing laminate floor moldings — Shaw Floors (Costco)
FAQ
How Do You Transition Between Floors of Different Heights?
Match the height gap to the right profile: a T-molding for near-equal heights, a beveled reducer for gaps up to 1/2 inch, and a ramp or substrate correction for anything larger. Always measure finished surfaces, including underlayment and adhesive, before selecting a profile.
What Is the Rule of 3 for Flooring?
There’s no single official “Rule of 3” in flooring codes; the term gets used loosely by installers to describe checking height, slope, and expansion room together before choosing a transition. The one standard that is codified is the Access Board’s 1/4 inch and 1/2 inch bevel thresholds, which govern the slope portion of that check.
How High Is Too High for a Floor Transition?
Anything above 1/2 inch is too high for a standard beveled reducer and must be treated as a ramp or fixed at the substrate level, according to Access Board guidance. Below that, a 1/4 inch change needs no treatment at all, and 1/4 to 1/2 inch calls for a bevel no steeper than 1:2.
What Are the Latest Trends in Floor Transitions?
Homeowners are increasingly matching transition strips to warmer stain tones as part of the broader shift in floor stain colors for 2026, moving away from cooler gray finishes. Overlap reducers on track systems are also seeing more use as floating LVP and laminate installations continue to outpace traditional nail-down hardwood in many remodels.
Should I DIY a Transition or Hire a Professional?
Simple T-molding or reducer installs at a 1/4 to 1/2 inch gap are reasonable DIY projects for a competent homeowner. Anything involving substrate leveling, moisture issues, or a stair nose on an open staircase is worth a call to a professional like Jrhardwoodfloorrefinishingandcleaning, since fixing a bad transition install often costs more than doing it right the first time.