 Skip to content

A screen-and-recoat will almost always solve dull, scratched engineered hardwood as long as the finish is still intact and the wear layer hasn’t been sanded thin already. Run the water-drop test on a few high-traffic spots first: if water beads up, you’re likely a candidate for a recoat. If it soaks in fast, call a pro before anyone touches a buffer.
TL;DR:
- Recoating is suitable only if water beads on the floor and the veneer thickness exceeds approximately 1.6mm, supporting one light sanding at most.
- Full refinishing is necessary when deep gouges, stains, or cupping are present, especially if the veneer is thinner than 1mm or water soaks in quickly.
- Proper preparation involves thorough cleaning, light screening with an abrasive pad, dust removal, and careful application of finish, often requiring additional primer if factory aluminum-oxide coatings are present.
- DIY recoating suits floors with good veneer thickness, proper surface conditions, and a willingness to rent equipment, but professional refinishing offers better dust control and is recommended for thinner or previously sanded floors.
- Regular re-coating every 3 to 7 years maintains appearance, while waiting too long risks costly repairs due to deep damage or delamination.
Table of Contents
- What’s the Difference Between a Recoat and a Full Refinish?
- Is Your Engineered Floor a Good Candidate for Recoating?
- What Tools and Finishes Do You Need for a Successful Recoat?
- How Do You Screen and Recoat a Floor Step by Step?
- When Does a Full Refinish Beat a Recoat?
- Should You DIY the Recoat or Hire a Professional?
- What Do Inspection and Maintenance Actually Look Like?
- Preventive Care Beats Emergency Repairs Every Time
- Ready for a Free Quote on Your Engineered Floor?
- Sources
- FAQ
What’s the Difference Between a Recoat and a Full Refinish?
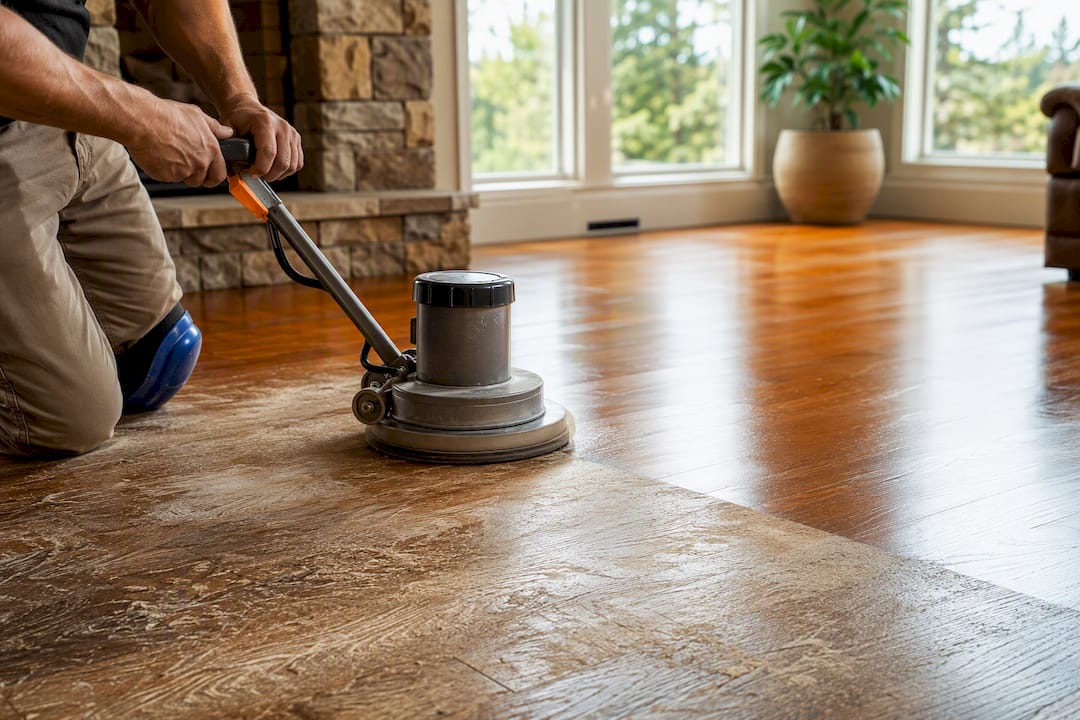
Think of a screen-and-recoat as your floor’s spa day, and a full sand-and-refinish as surgery. Screening lightly abrades the existing finish with a floor buffer and an abrasive pad, roughing it up just enough for a new coat of finish to grab hold. No wood is removed, which is exactly why this method restores shine and erases minor scuffs without touching bare wood underneath. A screen-and-recoat typically wraps up in a single day.
A full refinish is a different animal entirely. It strips the floor down through the finish and into the wood itself using progressively finer sandpaper, which means it can erase deep gouges, stains, and uneven boards that a recoat can’t touch. Here’s the tradeoff:
- Recoating costs a fraction of a full sand job, produces far less dust, and often finishes same-day.
- Recoating can’t fix deep scratches, water stains that have penetrated the wood, or discoloration.
- Full refinishing removes real damage but consumes precious veneer that engineered floors can’t spare forever.
- Factory-applied finishes, especially aluminum-oxide coatings common on prefinished engineered planks, resist bonding with new topcoats unless they’re properly abraded first.
That last point trips up a lot of homeowners. If your floor came prefinished from the factory, don’t assume any old buffer pad and any old polyurethane will stick. It won’t, unless the surface is prepped correctly.
Is Your Engineered Floor a Good Candidate for Recoating?
Three checks tell you almost everything you need to know before you rent equipment or call anyone.
- Run the water-drop test. Drip a few drops of water onto the floor in a busy area. If it beads on top, the finish is likely still intact and recoating is on the table. If it darkens the wood or soaks in within a minute, the finish has failed and you’re probably looking at a full refinish.
- Measure your wear layer. Pull a floor vent cover or check a closet transition strip where the edge of a plank is exposed. Engineered flooring documentation (sometimes on the box or the original invoice) also states veneer thickness.
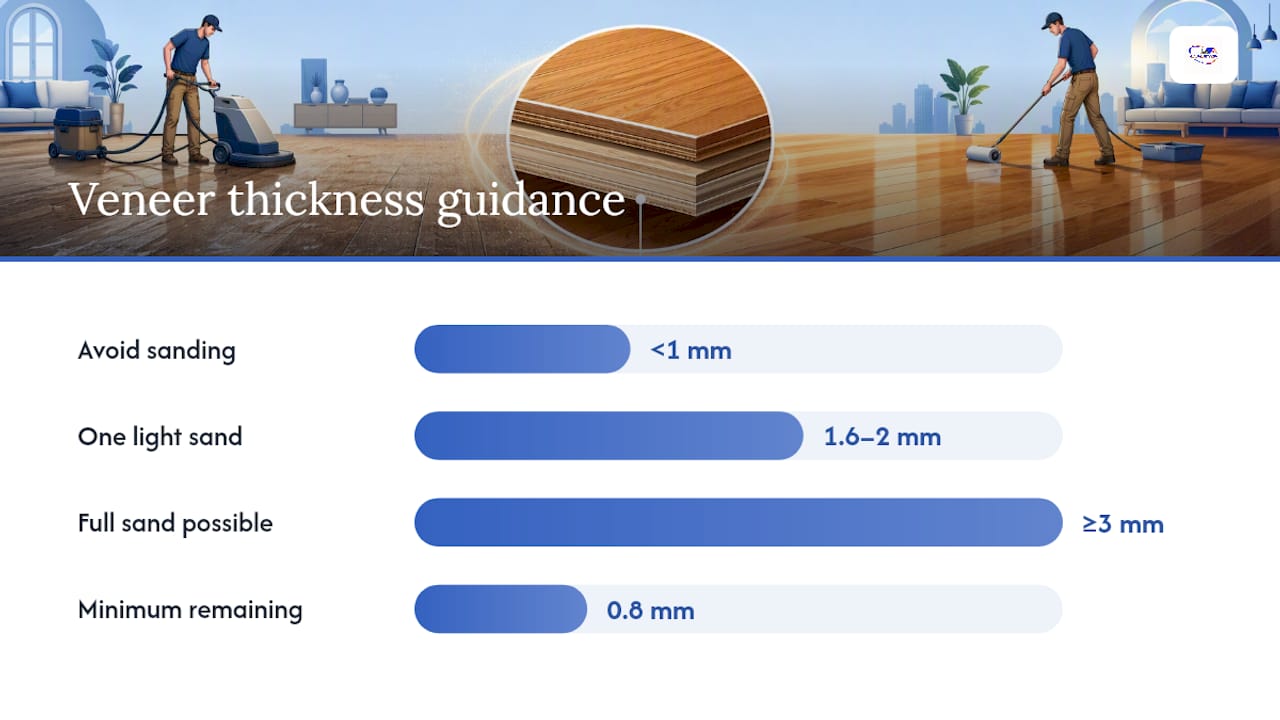
- Compare your number against the thresholds. Veneers under roughly 1mm should never be sanded, only recoated or eventually replaced. Veneers in the 1.6mm to 2mm range allow for one light, careful sanding pass at most. Veneers at 3mm or thicker give you room for a full sand, though industry guidance still caps things at a minimum of 0.8mm remaining above the core to avoid delamination.
Pro Tip: If you find gaps between planks, cupping, or soft spots when you press near a seam, stop and call a professional. Those are signs of moisture damage or delamination that no amount of recoating will fix, and sanding over them can make things worse.
Floors that fail the water test AND measure under 1mm of remaining veneer usually aren’t refinishing candidates at all. At that point, replacement is often the more honest answer than another round of patchwork.
What Tools and Finishes Do You Need for a Successful Recoat?
You don’t need a professional’s entire truck, but a few specific items separate a smooth recoat from a botched one.
- Floor buffer (rentable from most hardware stores) fitted with a screening pad in the 120 to 150 grit range.
- HEPA-filter vacuum to pull dust out of grain lines before finish goes down.
- Tack cloths for the final pass before coating.
- Adhesion primer or deglosser if your floor has a factory aluminum-oxide finish, since bonding new finish over these coatings requires extra prep work.
On finish choice, water-based polyurethane dries fastest, carries the least odor, and has closed the durability gap with oil-based products in recent years. Oil-based finishes still offer a warmer amber tone but take longer to cure and smell stronger while doing it. If you want speed above everything, UV-curable finishes cure almost instantly under professional equipment, though that route typically requires a contractor with the right lamps on hand. For sheen selection, a glossier finish shows scratches more than a satin or matte topcoat, which matters if your household includes dogs or heavy foot traffic.
How Do You Screen and Recoat a Floor Step by Step?
Once you’ve confirmed your floor qualifies, the actual process follows a predictable sequence. Skipping steps here is exactly how homeowners end up with peeling finish and a wasted weekend.
- Clear the room and clean thoroughly. Remove furniture, then vacuum and damp-mop (with a nearly dry mop) to pull up grit, wax residue, and any oil-based polish. This step matters more than people expect. Wax and polish don’t screen off. They have to be fully stripped, or the new finish simply won’t stick.
- Screen the floor with a 120 to 150 grit pad. Run the buffer with the grain in overlapping passes, keeping it moving so you don’t burn a spot or leave swirl marks. Get into corners and edges with a smaller hand sander or edger, since the big buffer can’t reach tight against baseboards.
- Vacuum with a HEPA-filter machine. Regular shop vacuums push fine dust back into the air instead of trapping it, which leaves particles that ruin your finish coat. Follow with a tack cloth pass across every board.
- Apply your first coat of finish. Use a lambswool applicator or a natural-bristle brush for edges, working in long, even strokes along the grain. Avoid overloading the applicator. That’s the number one cause of lap marks and bubbling.
- Let it cure per the manufacturer’s schedule, then lightly re-screen if a second coat is planned, and repeat the dust removal step before recoating.
- Wait out the full cure time before furniture returns. Most water-based finishes are walkable in hours but need several days before rugs or furniture legs go back down, since the surface is still hardening underneath.
Pro Tip: Open a window or run a fan during application and curing, even with low-odor water-based finish. Airflow speeds curing and helps prevent dust from settling into a tacky topcoat.
When Does a Full Refinish Beat a Recoat?
Recoating has limits, and pretending otherwise just delays a bigger repair bill. A full sand becomes necessary once damage goes deeper than the topcoat: deep gouges, dark water stains soaked into the wood, or cupped and warped boards. None of that responds to screening, because screening never touches bare wood.
- Sanding is only viable when veneer thickness supports it, and the 0.8mm safety floor above the core is non-negotiable no matter how the math looks on paper.
- Uneven wear across a room (heavier traffic paths, furniture indentations) means some boards may already be thinner than others even if the average measurement looks safe.
- Sanding removes stains, deep scratches, and unevenness that no amount of recoating can mask.
- DIY drum sanding on engineered floors carries real risk of sanding through the veneer entirely in a single pass, since these machines remove material fast and don’t discriminate between veneer and glue line.
Most contractors treat a single full sanding as the realistic lifetime limit for engineered floors, even on 3mm veneers, unless there’s clear documentation the floor has never been sanded before.
Should You DIY the Recoat or Hire a Professional?
DIY recoating makes sense when your floor passes the water test, shows only light surface wear, and you’re comfortable running a rented buffer in a well-ventilated space. It’s a reasonable weekend project for a single room with straightforward, factory-finished flooring.
Hiring a professional makes more sense once veneer thickness gets uncertain, the floor has been sanded before, or the space involves multiple rooms with transitions and stairs. A qualified refinisher brings dustless sanding equipment that captures dust professional buffers simply can’t match, which matters if anyone in the house has allergies or you don’t want a fine film settling on every surface for a week.
Before hiring anyone, ask a few pointed questions:
- Will they measure your veneer thickness before recommending sanding, or just assume it’s safe?
- What dust containment method do they use, and is it included in the quote?
- What finish brand and sheen do they recommend, and why?
- Does the work come with any written guarantee?
Pro Tip: A quote dramatically lower than others you’ve received is often a red flag for skipped prep steps, like decontamination or edge work, not a sign of a better deal. Compare what’s included, not just the bottom-line number.
You can read more on weighing DIY against professional refinishing if you’re still on the fence.
What Do Inspection and Maintenance Actually Look Like?
Every proper floor assessment, whether it’s us walking through your home or you doing your own pre-check, follows the same basic sequence: water-drop testing in multiple rooms, a peek at exposed plank edges near vents or transitions, and a check for contamination from old wax or polish that would stop new finish from bonding.
- Water-drop test in at least three high-traffic areas, not just one spot.
- Vent or transition-strip check to measure remaining veneer.
- Contamination probe (a quick rub test) to catch old wax before it ruins a recoat.
On timing, recoating roughly every 3 to 7 years keeps most engineered floors looking sharp, with heavy-traffic households and homes with pets landing closer to the 3 to 5 year mark, and lower-traffic spaces stretching past 7 years between coats.
If you want a free phone or photo quote, send us square footage, a few clear photos of the worst-affected areas, and any known history (prior sanding, age of the floor, brand if you have it). That’s usually all we need to give you a real, workable estimate.
Preventive Care Beats Emergency Repairs Every Time
Waiting until a floor looks bad enough to worry about is the single most expensive habit homeowners fall into. A recoat done on schedule, before the finish actually breaches, protects veneer you can never get back once it’s sanded away. We’d rather see a floor recoated a year early than sanded a year too late. Treat maintenance as routine upkeep, not a reaction to damage, and your engineered floor will outlast the schedule most people assume it has.
— J.R.
Ready for a Free Quote on Your Engineered Floor?
Some floor refinishing companies offer veneer assessments before any equipment touches your floor, helping you avoid paying for a full sand when a recoat might suffice. Whether your floor needs a same-day screen and recoat, full sanding and restoration, or one of our Instant UV-curable finishes for a fast turnaround, we tailor the approach to what your wear layer can actually support.

Getting started costs nothing upfront. Call us or send photos of the affected rooms along with your approximate square footage, and we’ll walk you through whether a recoat, a full refinish, or something else entirely is the right call. Get your free quote and service details and find out what your floor actually needs before you spend a dollar on the wrong fix.
Sources
Veneer thresholds and the 0.8mm minimum come from USA Pro Floors; recoat cadence and the water test come from JAB Floors.
- How to screen and recoat hardwood floors
- Engineered Hardwood Sanding Guide | USA Pro Floors
- Can You Screen and Recoat Engineered Hardwood Floors? – Keystone Hardwood Floor Care, INC
- Screen and Recoat vs Full Refinish: Which Does Your Floor Need? | JAB Floors
FAQ
Can Engineered Hardwood Be Resurfaced?
Yes, as long as the veneer is thick enough. Floors with 3mm or more of wear layer generally support a full sand, while thinner veneers are limited to screening and recoating instead.
What Are the Signs Engineered Wood Can’t Be Refinished?
Water soaking into the finish instead of beading, visible cupping or gaps between boards, and a measured veneer under 1mm are the main red flags that sanding isn’t safe.
What Are the Downsides of Refinishing Engineered Wood Floors?
Every sanding pass removes irreplaceable veneer, and going below the 0.8mm minimum above the core risks delamination. DIY sanding also carries a real risk of sanding straight through thin veneer in one pass.
How Many Times Can You Refinish Engineered Hardwood?
Most engineered floors can only handle one full sanding in their lifetime, sometimes two if the veneer is unusually thick and evenly worn. Screen-and-recoats, by contrast, can be repeated many times since they don’t remove wood.