 Skip to content
Match your transition profile to the actual height difference: T-molding when LVP and tile sit at nearly the same level, a reducer when tile runs higher, and a threshold when the gap is bigger than a reducer can cover.
TL;DR:
- Use a T-molding or mortar-embedded metal profile for seamless transitions when floors are within 3 millimeters of each other, depending on durability and aesthetics.
- A reducer profile effectively handles height differences up to a quarter inch when tile sits higher than LVP, but must be checked carefully for door clearance and proper installation.
- When LVP ends up higher than tile, a reverse reducer or raising the tile with thin-set are options, but large gaps require a threshold or subfloor correction to prevent hazards.
- Proper flatness and subfloor preparation are critical, with a standard of 1/8-inch variation over six feet, to prevent cracked tiles or loose vinyl edges.
- Wet areas demand silicone sealing and waterproof profiles to prevent water infiltration, with proper installation order crucial to long-term durability.
Table of Contents
- Same-Height Transitions: T-Molding and Flush Metal Profiles
- Tile Higher Than LVP: Reducers and Ramp Profiles
- LVP Higher Than Tile: Reverse Reducers, Ramps, or Raising Tile Options
- Choosing the Right Profile and Materials
- Subfloor, Flatness, and Movement: Measurements and Prep
- Waterproofing and Sealing for Bathrooms and Kitchens
- Step-By-Step Installation Checklist
- Maintenance and Common Problems
- Tools You’ll Need for a Clean Transition Install
- Matching Transition Molding to Your Flooring
- Safety Considerations While Installing Transitions
- An Installer’s Take on When to DIY and When to Call Someone
- Hiring J.R. Hardwood for Transitions and Subfloor Prep
- Sources
Same-Height Transitions: T-Molding and Flush Metal Profiles
When your LVP and tile land within about 3 millimeters of each other, T-molding is your best bet. It straddles both surfaces with a shallow, rounded profile that looks intentional rather than like a patch job, and it’s forgiving if your measurements are off by a hair.
You’ve got two real choices here, and they solve different problems.
- Track-mounted T-molding: A plastic or metal track screws or glues to the subfloor in the gap between materials, and the cap snaps on top. Easy to pull off and replace years later if it gets scuffed or cracked.
- Mortar-embedded metal profiles: Products like Schluter’s Reno-T or Reno-TK get set directly into the tile mortar bed during installation, giving a thin metal reveal that resists chipping and lines up cleanly with your grout joints. This is preferred in modern designs and wet areas because it’s more durable than a snap-in cap, though it only works if you’re setting the tile at the same time.
The installation sequence stays consistent either way. Square off your last LVP plank so the cut edge is clean, not ragged. Leave your expansion gap. Set the track (or embed the metal profile in mortar if that’s your route), snap or set the cap into place, and if you’re anywhere near a shower, tub, or sink, run a thin bead of silicone along the exposed edge before you call it finished.
Pro Tip: Dry-fit your last plank and the transition piece together before you commit to any adhesive or screws. A 1/16" measuring error is invisible on paper but obvious the moment the cap won’t seat flush.
If you’re weighing LVP against other flooring for the room in the first place, our breakdown of LVP versus hardwood walks through thickness and durability trade-offs that affect how your transitions will fit down the road.
Tile Higher Than LVP: Reducers and Ramp Profiles
This is the most common scenario homeowners run into, because tile plus its mortar bed usually sits taller than a floating LVP floor. A reducer profile handles height differences commonly up to about 1/4 inch, sloping down from the tile edge to meet the LVP without a lip. Go bigger than that, and you’re better off with a threshold or raising the LVP side with an underlayment adjustment.
- Measure the actual gap at three points along the seam. Tile installations aren’t always perfectly level, so check both ends and the middle before choosing a profile.
- Pick your material based on the room’s function. Stained wood or color-matched vinyl reducers disappear visually against LVP, while aluminum holds up better in entryways, mudrooms, or anywhere wet.
- Check door swing clearance before installing. A reducer adds height on the LVP side; if a door already brushes the floor, this can turn into a sticking door fast.
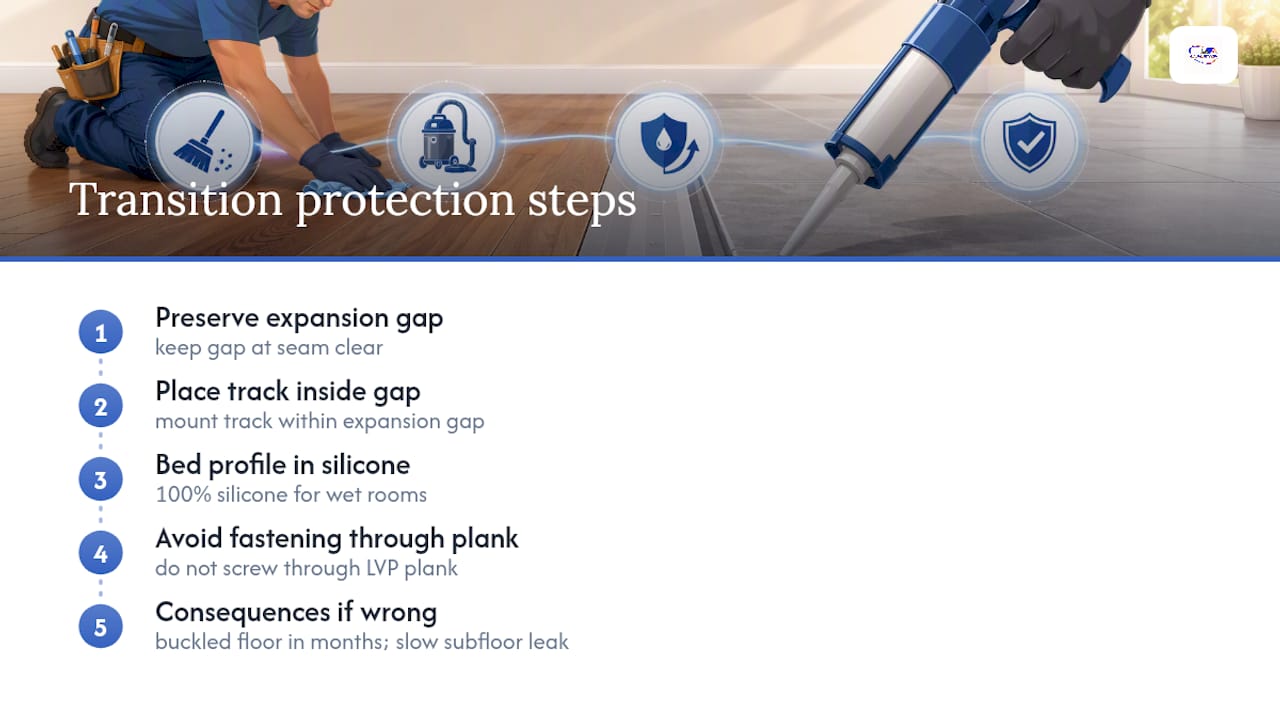
- Set the track without fastening through the LVP itself. Screws or nails through the plank pin it in place and defeat the whole purpose of the expansion gap.
- Shim under the track if the subfloor dips. A wobbly reducer telegraphs every flex in the floor underneath it.
- Seal it if moisture is a factor, even in a “dry” room like a laundry area or entry near an exterior door.
Skipping the clearance check in step three is the mistake we see most often on DIY jobs. It’s a five-minute check that saves you from planing down a door after the fact.
LVP Higher Than Tile: Reverse Reducers, Ramps, or Raising Tile Options
Less common, but it happens: LVP goes down thicker than expected, or the tile substrate settled lower than planned, and now the vinyl edge is the one sticking up. That’s the more hazardous version of this problem, because a raised lip at a doorway is exactly what catches a bare foot or a rolling office chair.
- A reverse reducer does the same job as a standard one, just oriented the other direction, sloping from the higher LVP down to the tile.
- Adding thin-set under future tile work can raise that side to close the gap, though this only makes sense if the tile hasn’t been set yet or you’re already planning a partial redo.
- Planing or sanding the vinyl edge is a narrower fix, useful for shaving down a slight overage rather than solving a real structural mismatch.
- Check door and cabinet clearances first. Raising either surface by even 1/8" can turn a smooth-swinging door into one that drags.
- When the gap is substantial, don’t force a cosmetic fix. A custom threshold or a proper subfloor correction beats a reducer that’s being asked to do more than it’s built for.
Choosing the Right Profile and Materials
Once you know your height difference, the decision gets simple. Here’s the shorthand we use on job sites:
- Same height (≤3 mm): T-molding, snap-in or mortar-embedded
- Small drop (up to about 1/4"): Reducer, wood-look or aluminum depending on traffic
- Larger gap (over 1/4"): Threshold, or reconsider subfloor prep to shrink the difference
- Wet area (bathroom, kitchen, laundry): Aluminum or PVC profile bedded in 100% silicone, never wood
Concealment and durability pull in opposite directions more often than people expect. A color-matched wood reducer hides the seam beautifully but won’t take the abuse an aluminum strip shrugs off in a busy entryway. Metal profiles cost more and need tighter installation tolerances, but they’re the longer-term bet in high-traffic or high-moisture zones. Flush, invisible transitions look fantastic in photos, but they only work when tile thickness and subfloor height get planned together from the start — retrofitting one into an existing floor usually means self-leveling compound, thinner tile, or a custom metal inlay, and none of those are cheap or fast.
Subfloor, Flatness, and Movement: Measurements and Prep
Every transition profile assumes a reasonably flat subfloor underneath it, and that assumption fails more often than people think. The standard tolerance most installers work to is 1/8" of variation over any 6-foot span. Lay a straightedge across the seam area and check for dips or humps before you install anything.
- Sand down high spots on wood subfloors or old adhesive ridges.
- Use self-leveling compound for broader dips, especially on the tile side where mortar coverage depends on a flat base.
- Shim under plywood subfloors where a track needs to seat evenly.
- Trim underlayment so it doesn’t creep under the track and throw off your reveal height.
A subfloor that’s out of tolerance is behind most of the cracked tile and loose vinyl edges we get called out to fix. Skipping the flatness check to save twenty minutes is the single most expensive shortcut in this entire process.
Pro Tip: Plan your expansion gap before you cut a single plank, not after. Trying to carve out a gap retroactively on an already-installed floor almost always means pulling planks back up.
Waterproofing and Sealing for Bathrooms and Kitchens
Wet rooms change the rules. A transition that looks fine and holds tight in a hallway can let water sneak straight to the subfloor if it’s not sealed correctly in a bathroom.
- Use 100% silicone for the joint, not standard latex caulk, because it keeps its flexibility as the LVP expands and contracts with humidity and temperature.
- Bed the profile itself in silicone, not just the visible seam on top, for a real waterproof barrier rather than a cosmetic one.
- Skip wood transitions in wet zones entirely. Aluminum or waterproof PVC are the only materials that won’t swell or rot from splashed water.
- Extend the moisture barrier slightly into the expansion gap so water that does get past the surface bead still has somewhere safe to go.
Silicone applied both under and along the exposed edge of a track-mounted profile creates a reliable waterproof layer without pinning the vinyl in place, as long as it’s applied correctly and not overpacked into the expansion gap itself.
Step-By-Step Installation Checklist
Work this sequence and you’ll avoid the two most common install-day headaches: a profile that doesn’t fit and a floor that’s pinned tight.
- Measure the seam length at three points, then dry-fit the profile and the final plank together before any adhesive comes out.
- Confirm the expansion gap and check door clearance on both sides of the transition.
- Cut and fasten the track to the subfloor, screwing into plywood or using construction adhesive on concrete slabs.
- Snap the profile into the track, or set it per the manufacturer’s adhesive instructions if it’s a bonded system.
- Seal with silicone in any wet-area installation.
- Verify LVP movement by pressing along the edge, then inspect the caulk line for gaps before you call the job done.
Pro Tip: Walk the transition line a week after installation, once the floor has settled through a full day/night temperature swing. Any tightness you feel now is the time to fix it, not six months from now when the plank has buckled.
Maintenance and Common Problems
Most transition failures trace back to one of three causes, and all three are easy to catch early.
- Pinned floating floors buckle because the vinyl was fastened or trapped against the tile with no room to expand. Re-cutting the edge to restore the expansion gap usually solves it.
- Loose profiles happen when the track wasn’t secured well or shims shifted; re-tightening or replacing the track fixes most cases.
- Cracked caulk in wet areas needs a yearly check and re-bead, since silicone does eventually wear at high-flex points.
- Cracked tile or a sunken transition near the seam usually points to subfloor or mortar failure underneath, and that’s a job for a professional, not another tube of caulk.
Tools You’ll Need for a Clean Transition Install
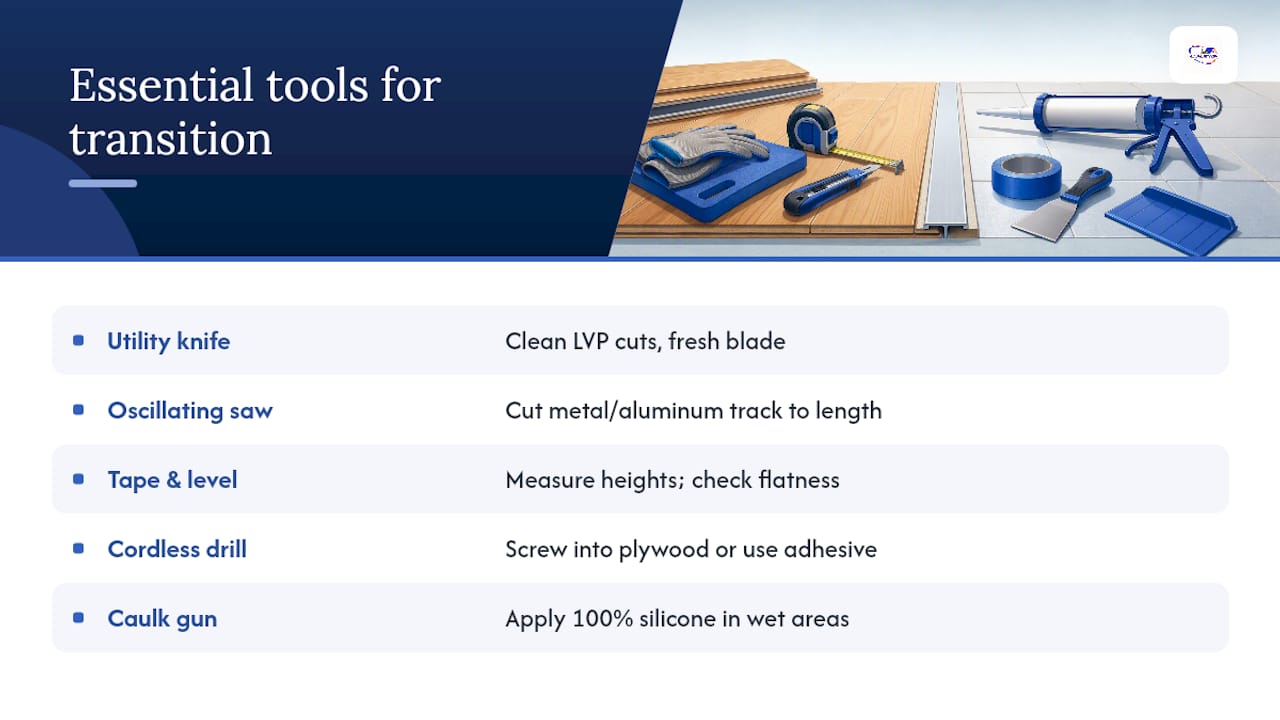
You don’t need a full workshop for a single transition, but a few specific tools make the difference between a crisp finish and a sloppy one. A utility knife with fresh blades handles LVP trimming cleanly; a dull blade tears the vinyl edge instead of slicing it. A fine-tooth multitool or oscillating saw cuts metal or aluminum track to length without chewing up the edges. Keep a tape measure and a 4-foot level or straightedge on hand for both height-difference checks and the flatness test across the subfloor.
For fastening, you’ll want a cordless drill with a countersink bit for screwing track into plywood subfloors, and construction adhesive for concrete slabs where screws aren’t practical. A rubber mallet seats snap-in caps without cracking them, which a hammer will do if you’re not careful. Keep a caulk gun loaded with 100% silicone ready for any wet-area work, plus a caulk finishing tool or a gloved finger for a clean bead line.
Round it out with a pencil for marking cut lines, painter’s tape to protect the surrounding tile or vinyl from scratches while you work, and a shop vacuum for cleanup between cuts. If you’re setting mortar-embedded metal profiles alongside new tile, add a notched trowel and a rubber float to your list, since those profiles go in during the tile-setting process, not after.
None of this is specialty equipment. Most of it is already in a homeowner’s garage, which is part of why this particular job is one of the more approachable DIY flooring tasks, right up until the subfloor prep gets complicated.
Matching Transition Molding to Your Flooring
The transition strip is one of the most visible lines in the entire room, so color and finish matter more than most people budget for. The safest rule: match the transition to whichever material you want it to visually disappear into, not to whichever material is more expensive.
If your LVP has a warm oak or walnut tone, a stained wood or wood-look vinyl reducer in that same tone reads as a natural extension of the floor rather than a hard stop. If your tile is the dominant visual element, especially large-format porcelain or a patterned tile, a slim aluminum or brushed-nickel metal profile tends to look more intentional than trying to color-match vinyl to stone, which rarely comes out convincing.
Finish matters as much as color. A high-gloss LVP next to a matte aluminum strip can look slightly mismatched even when the color is right, so check whether your transition profile comes in a matching sheen. Many manufacturers offer the same profile in multiple finishes, brushed, polished, and matte, specifically so it can match either flooring type.
One trick worth knowing: if you can’t find a perfect match, lean darker rather than lighter. A slightly darker transition strip reads as a deliberate design choice, a border or accent line, while a lighter mismatched strip just looks like the wrong part was ordered.
Safety Considerations While Installing Transitions
Cutting LVP and tile transition materials generates fine dust, especially when you’re trimming aluminum track or scoring tile edges near the seam, so basic precautions matter even on a small job. Wear safety glasses any time you’re cutting metal track with a multitool or oscillating saw, since metal shavings fly farther than you’d expect. A basic dust mask or N95 respirator is worth wearing when cutting or sanding near old tile grout or adhesive, particularly in older homes where you can’t always be certain what’s in the original materials.
Knee protection matters more than people plan for. Transition work means kneeling at floor level for extended stretches, measuring, dry-fitting, and re-checking. A set of foam knee pads or a padded kneeling mat saves your joints on tile or concrete subfloors, which are unforgiving surfaces for repeated kneeling.
Keep your work area contained with a shop vacuum running during cuts rather than sweeping afterward, since sweeping just redistributes fine dust into the air. If you’re working near a doorway or a room that’s still in use, close it off with painter’s plastic to keep dust from spreading through the house. And if you’re using a caulk gun for silicone sealant in a bathroom with limited ventilation, crack a window or run a fan. Silicone fumes aren’t dangerous in small doses, but they’re unpleasant in an enclosed space for the twenty minutes it takes the bead to skin over.
An Installer’s Take on When to DIY and When to Call Someone
Most transitions are genuinely a weekend project, and we’d rather see a homeowner tackle a straightforward T-molding or reducer install than pay for a service call on something that simple. The trade tip that separates a good DIY result from a callback job is small but non-negotiable: bed aluminum or PVC profiles in silicone in any wet room, and always mount the track inside the expansion gap rather than screwing through the plank itself. Get that wrong, and you’re either dealing with a buckled floor in six months or a slow leak under the tile that nobody notices until the subfloor is already damaged.
Where things shift toward hiring a pro is subfloor correction. A simple transition often takes under an hour, but leveling compound or a fresh mortar bed adds a full day of labor and dry time, and that’s where professional labor rates start to matter more than the cost of materials. If you’re already seeing an uneven subfloor, cracked tile near the seam, or a height difference bigger than a standard reducer can handle, that’s your signal.
Requesting a quote is simple: send photos of the transition area from a couple of angles, along with rough measurements of the height difference and the length of the seam. That’s usually enough for a free, accurate phone estimate without a site visit.
— J.R.
Hiring J.R. Hardwood for Transitions and Subfloor Prep
Jrhardwoodfloorrefinishingandcleaning handles the parts of this job that go beyond a snap-in strip, custom reducers and thresholds, subfloor leveling, and full waterproofing for bathrooms and kitchens where a mistake means real water damage down the line. That’s the gap between a weekend DIY project and a transition that’s going to hold up for the next fifteen years.

If your height difference is bigger than a standard reducer can handle, or your subfloor has dips outside that 1/8" over 6-foot tolerance, that’s exactly the situation where a professional eye pays for itself. Jrhardwoodfloorrefinishingandcleaning offers free over-the-phone quotes across the Denver Metro Area and surrounding Colorado communities, based on a description and a few photos, no site visit required to get a number. We use eco-friendly products and premium finishes throughout, and our process is documented in detail on YouTube if you want to see exactly how a transition or a full LVP installation gets handled before you book anything.
Ready to get a number on your project? Reach out with photos and measurements of the transition area, and check our guide to hiring LVP flooring installers for what to expect from scheduling to final walkthrough, or visit our hardwood refinishing services page to see the full range of what we handle beyond transitions.
Sources
For manufacturer specs and profile guidance, see MSI’s transition strips guide and D and G Flooring’s transition ideas. For sealant recommendations in wet areas, check DAP’s 100% silicone product guidance. If you’re also weighing door clearance changes, One Day Doors & Closets covers what’s involved in adjusting or replacing an interior door.
- How to Transition From Vinyl Plank to Tile — Flooring Clarity (2025-09-20)
- Tile to Vinyl Transition Ideas — D and G Flooring (2026-05-19)
- LVP transition strips guide — MSI Surfaces (2025-06-20)
- DAP: 100% Silicone Rubber Kitchen, Bath & Plumbing Sealant — Product guidance